Service accounts
Service accounts are identities designed for machine-to-machine API access. Unlike regular user accounts, service accounts are owned by your organization rather than individual users. This is useful for automated workflows such as CI/CD pipelines, monitoring agents, and billing data exporters that need programmatic access to Cloud Intelligence.
Each service account has its own name, description, and set of permissions that determine what the account can access. Service accounts can hold multiple API tokens with independent lifecycle states (active, disabled, or expired). Tokens do not have their own permission scope. An active token authenticates as the service account, and each request is authorized using the service account's current permissions.
Example: Nightly Cloud Analytics report export
Your FinOps team runs a scheduled job every night that pulls a Cloud Analytics report from the DoiT Reports API and loads the results into an internal database or data warehouse. The job runs on shared infrastructure (for example, GitHub Actions, Apache Airflow, or a cron job on a server) and it must keep working even if the person who set it up changes roles or leaves the company.
In this case, a service account is a better fit than a personal API token:
-
A user with the Service Account Creator permission—and who already has Cloud Analytics User—creates a service account named
finops-report-exportand adds a short description (for example, Nightly export of allocation report to internal warehouse). -
In Permissions scope, the admin assigns only Cloud Analytics User, because the Reports API requires that permission. Permissions are set on the service account, not on individual tokens.
-
The report owner shares the report with the whole organization as Viewer, or the job targets a preset report that is available to your organization. Service account tokens do not have a user email, so private reports that are not shared organization-wide are not accessible through the API.
-
On the service account's API tokens tab, the admin creates a token (for example,
github-actions-prod), sets an expiry date if your security policy requires rotation, and stores the token value in your secrets manager or CI/CD secret store. The token is never committed to source control. -
The scheduled workflow reads the token from that secret store and calls the Reports API, passing the token in the
Authorizationheader asBearer <token>. See DoiT Developer Hub: Get started for authentication details and the Get report results endpoint reference. -
When the token approaches expiry, a user with Service Account Manager creates a replacement token, updates the secret store, verifies the job succeeds, and then disables or deletes the old token.
The credential belongs to the organization, API access is limited to the permissions assigned on the service account, and you can rotate credentials without tying automation to any one user's profile.
Limits
Your organization can create as many service accounts as you need. There is no limit on the number of service accounts.
Each service account can hold up to 10 API tokens that are not deleted (active, disabled, and expired tokens all count toward this limit). See Manage service account API tokens.
Required permissions
Service accounts involve two permission layers. See Service account and API token permissions.
Manage service accounts in the console
The following permissions control who can view or change service accounts and their tokens:
To access and manage service accounts, you need the Users Manager permission.
| Permission | Grants access to |
|---|---|
| Service Account Viewer | View the service accounts list and service account detail pages. |
| Service Account Creator | Everything in Viewer, plus create new service accounts and create API tokens. |
| Service Account Manager | Everything in Viewer, plus edit, disable, and delete service accounts and their API tokens. |
Service Account Creator and Service Account Manager each include Service Account Viewer access. You do not need to assign the Viewer permission separately to users who can create or manage service accounts.
The Creator and Manager permissions are otherwise independent of each other. A user with only Service Account Creator can create a new service account and tokens but cannot edit the service account or disable or delete tokens later unless they also have Service Account Manager.
These permissions do not apply to Personal API tokens. Any user with API access can create and manage their own API tokens independently.
Permissions assigned to a service account
When you create or edit a service account, you choose which API permissions the account (and its tokens) will have, for example, Cloud Analytics User. You can assign only permissions that your own user account already has. If you do not hold a permission, it does not appear in Permissions scope and cannot be granted to a service account.
Grant only the permissions each service account needs for its workload.
Access service accounts
To view service accounts, you need the Service Account Viewer permission (or higher).
To view your service accounts:
-
Sign in to the DoiT console, select the gear icon () from the top navigation bar, and then select Users and access.
-
Select Service accounts from the left-hand menu.
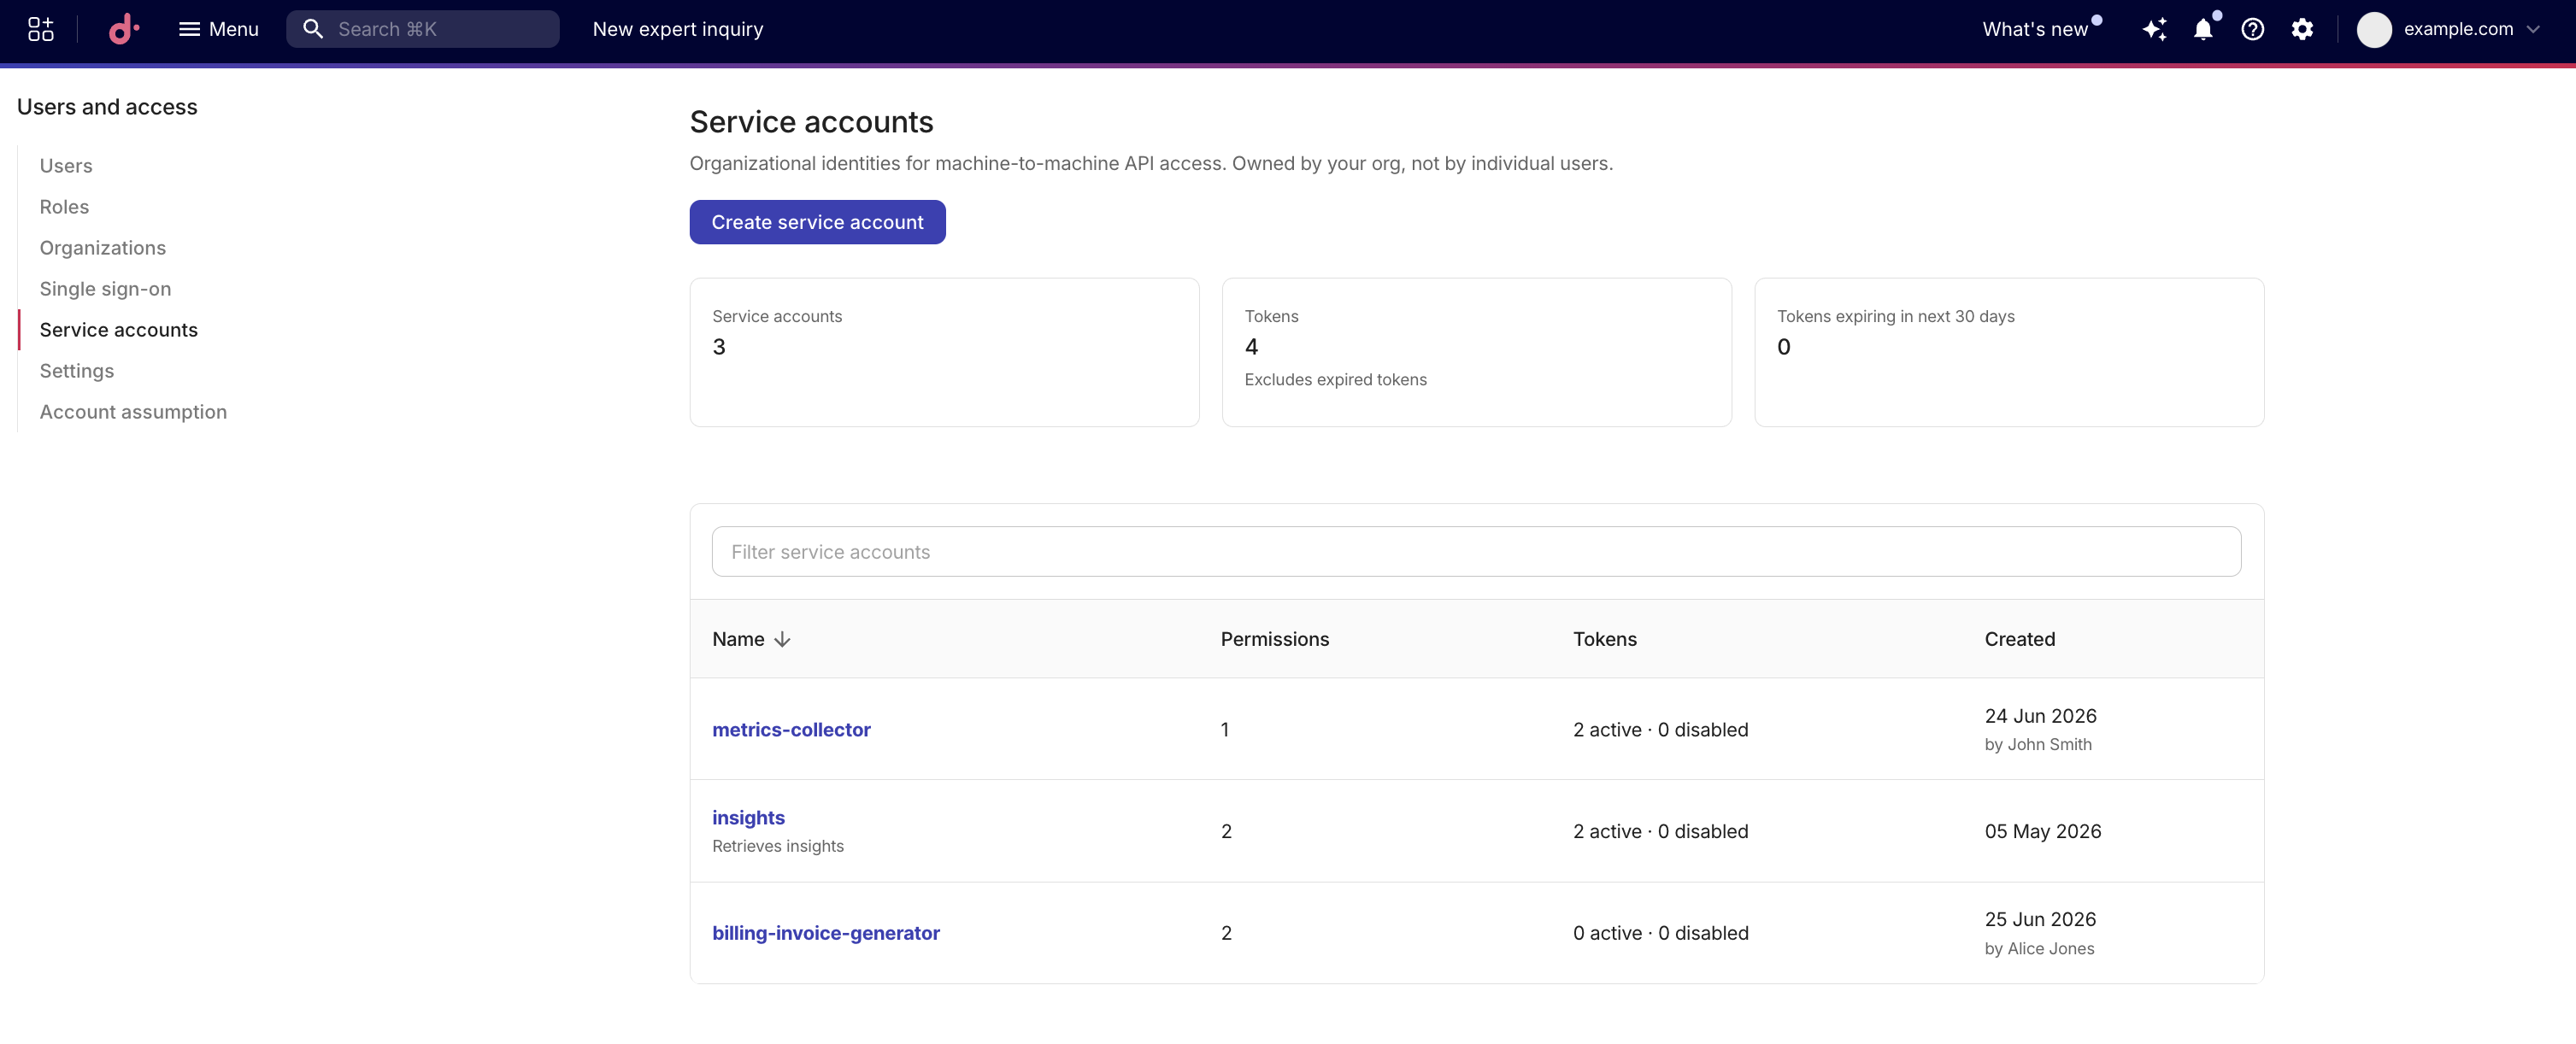
View service accounts
When you have at least one service account, the following information is displayed:
If no service accounts exist, the page displays an empty state with a prompt to create a service account.
-
Service accounts: The total number of service accounts in your organization.
-
Tokens: The total number of non-expired tokens across all service accounts (excludes expired tokens).
-
Tokens expiring in next 30 days: The number of tokens that will expire within the next 30 days.
The list displays all service accounts with the following columns:
| Column | Description |
|---|---|
| Name | The service account name. Selecting the name displays its detail page. Hover over descriptions longer than 60 characters to see the full description. |
| Permissions | The number of permissions assigned to the service account. |
| Tokens | A summary of the service account's tokens (for example, 2 active · 1 disabled). |
| Created | The creation date and the name of the user who created the service account. |
View service account details
Select a service account name to view its details. You can filter service accounts by name or by permission count.
The service account detail page has two tabs: Overview and API tokens.
The Overview tab shows when the service account was created, who created it, and the permissions assigned to the service account. Permissions are grouped by category and include a count for each group.
Every API token on the service account uses this same permission set. To grant a different scope, create a separate service account.
Create a service account
To create a service account, you need the Service Account Creator permission.
To create a new service account:
-
On the Service accounts page, select Create service account.
-
Enter a unique name for the service account. Names must be unique within your organization.
-
Optionally, add a description (up to 280 characters).
-
In Permissions scope, select one or more permissions to assign to the service account. Only permissions your user account already has are available.
-
Select Create service account.
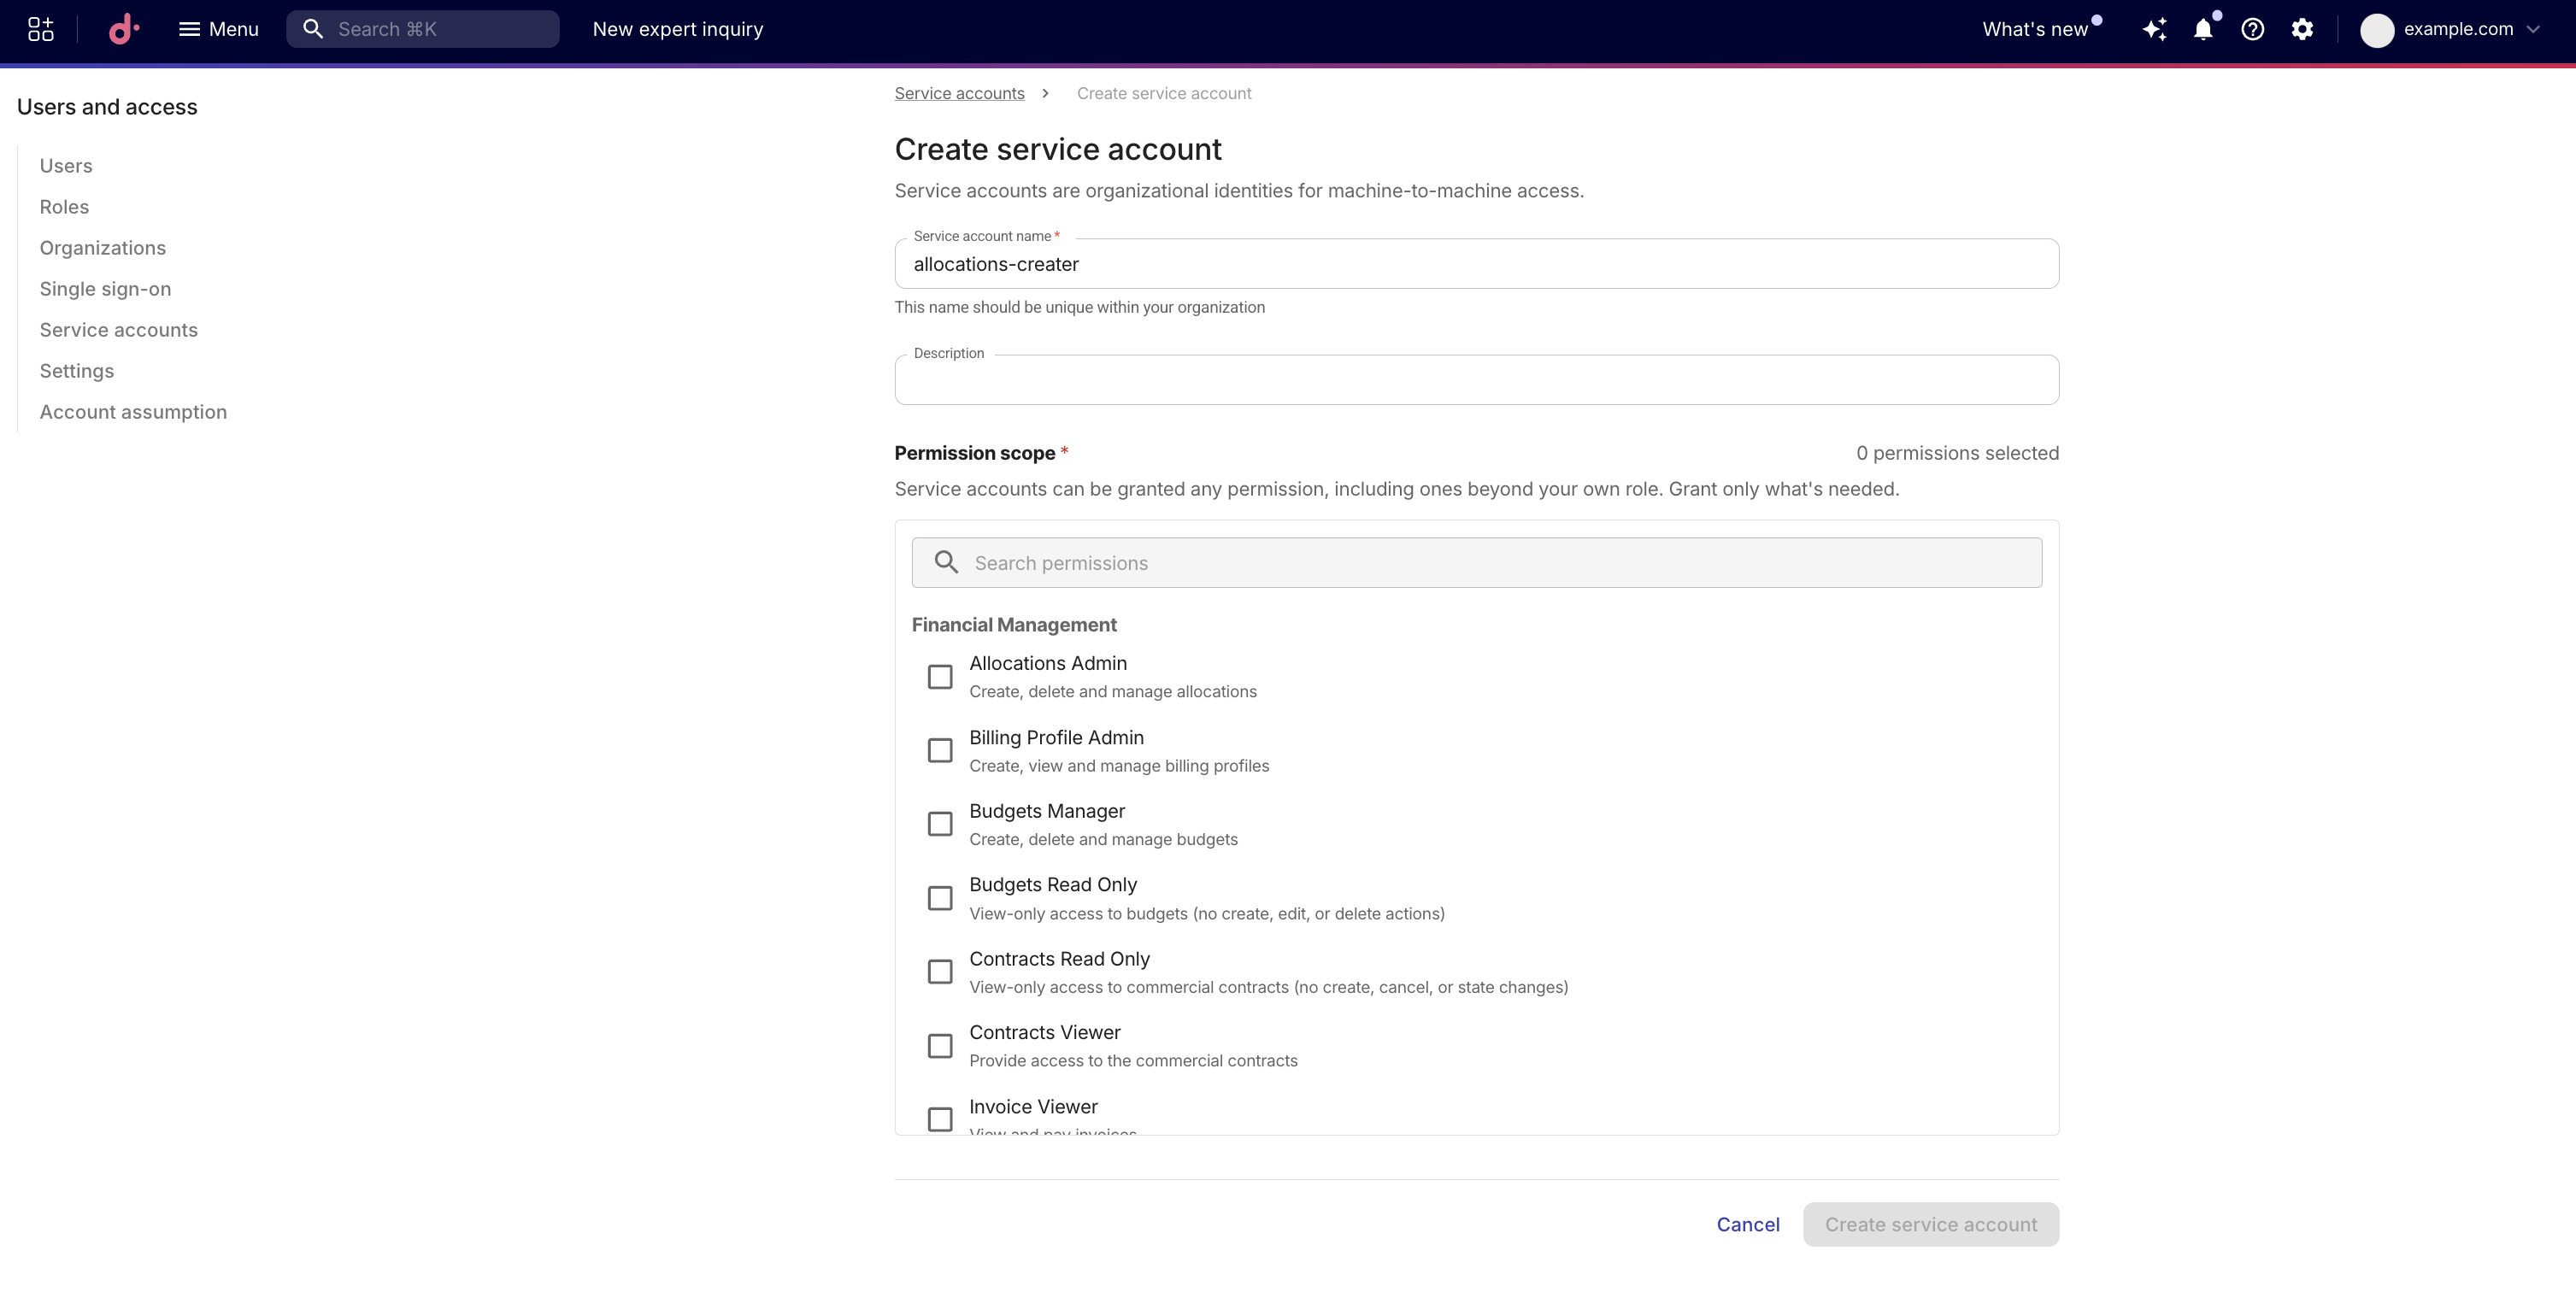
You cannot assign a permission to a service account unless your own user account already has that permission. Choose the narrowest set that meets the automation's needs.
Edit a service account
To edit a service account, you need the Service Account Manager permission.
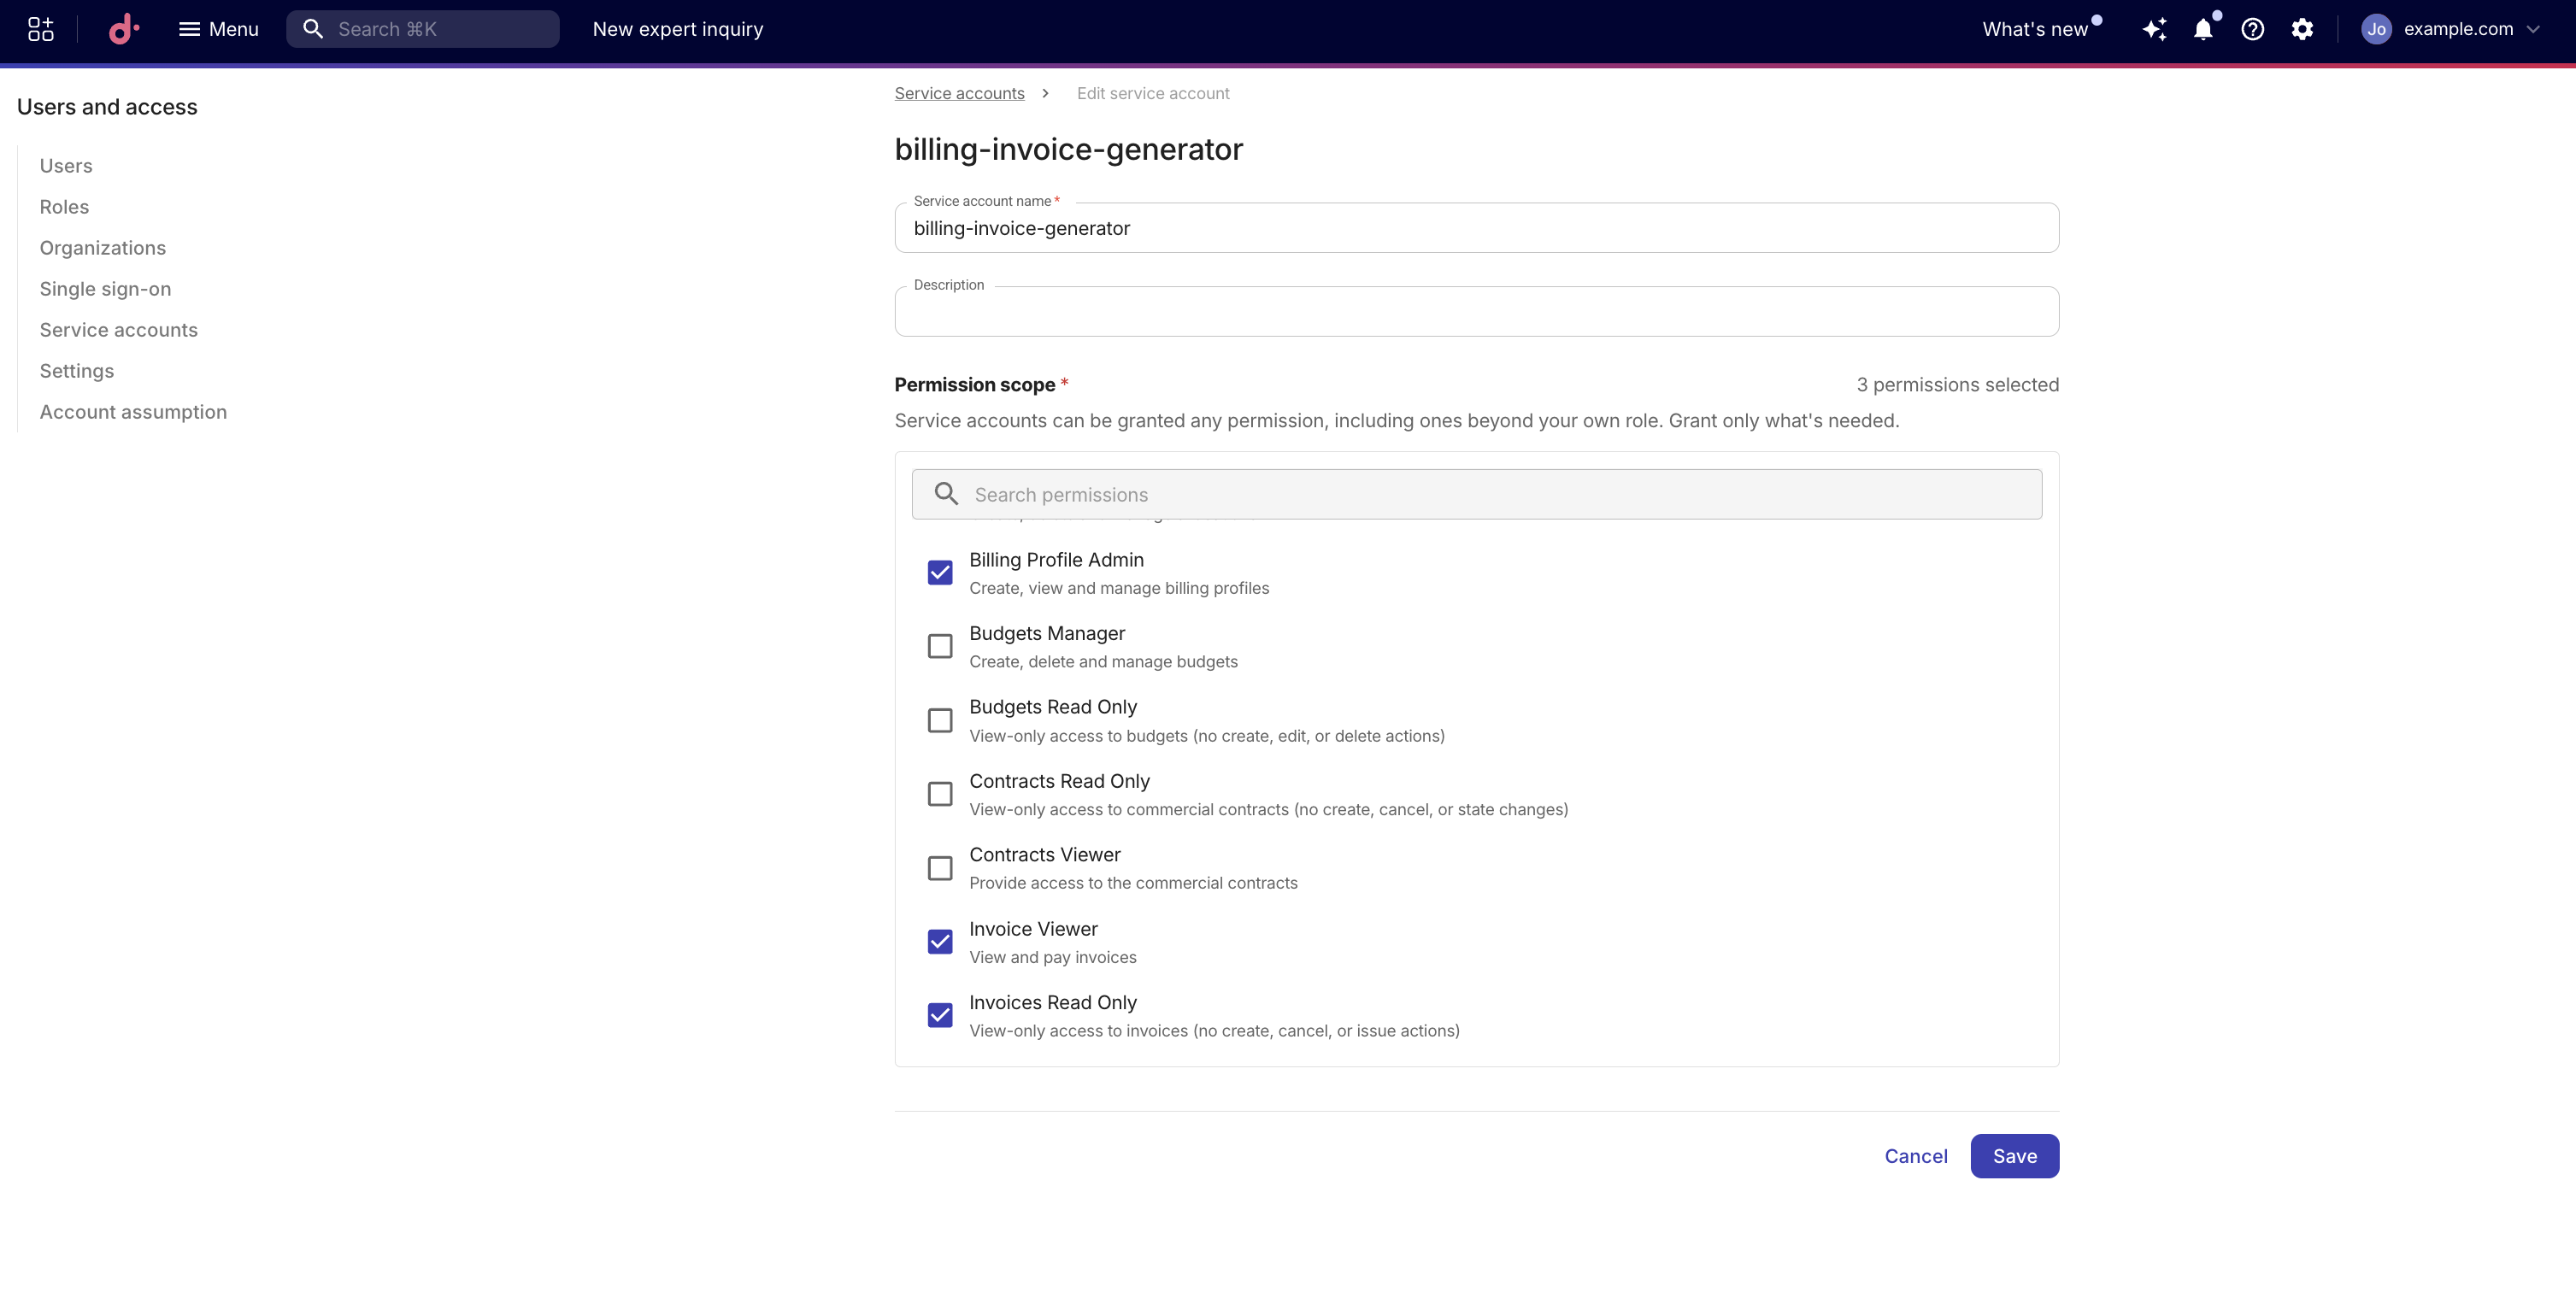
You can update a service account's name, description, and permissions at any time.
-
From the Service accounts list, select the service account you want to edit.
-
Select Edit service account.
-
Update the Name, Description, or permissions as needed.
-
The name must be unique across all service accounts in your organization.
-
In Permissions scope, you can add or remove only permissions your user account already has.
-
The Save button is only enabled after you make a change.
-
-
Select Save.
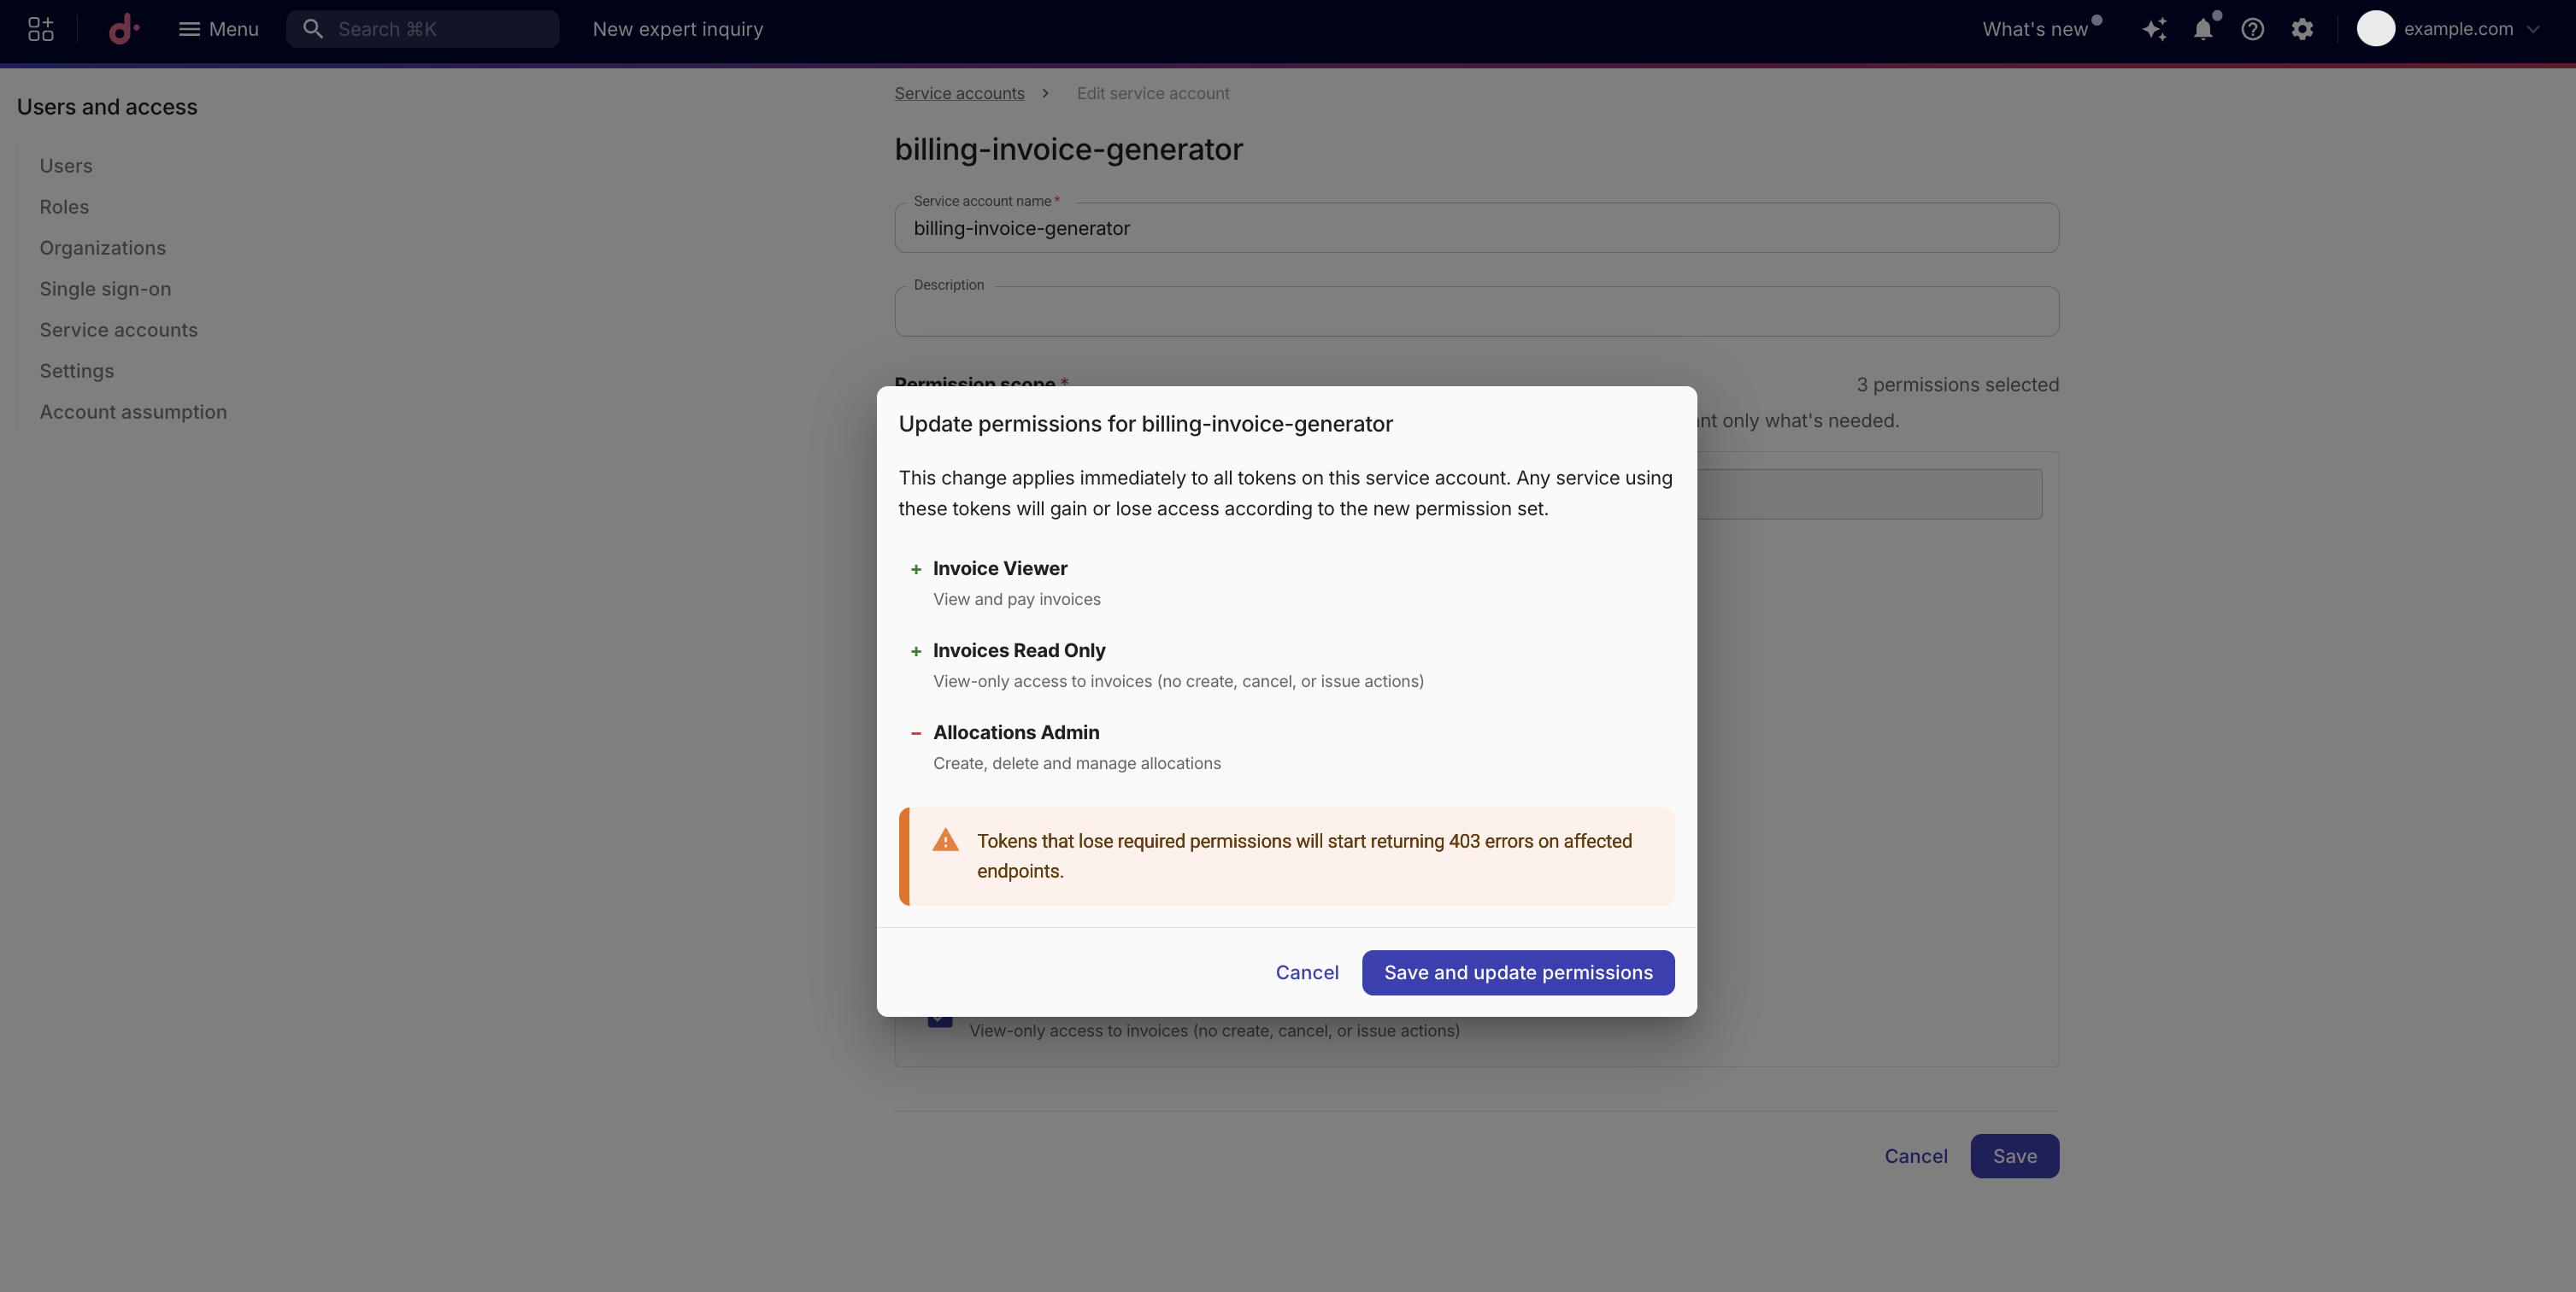
If you changed permissions, a confirmation dialog appears before the update is applied. The dialog shows which permissions will be added and which will be removed, so you can review the changes before confirming.
Removing permissions from a service account takes effect immediately. Any API tokens associated with the service account will start returning 403 errors for requests that require the removed permissions.
Delete a service account
To delete a service account, you need the Service Account Manager permission.
Deleting a service account permanently removes it and all associated API tokens.
-
From the service account detail page, select the option to delete the service account.
-
Review the warning. The dialog shows how many API tokens will be deleted.
-
Type the service account name to confirm, then select Delete service account.
This action cannot be undone. All tokens belonging to the service account are immediately invalidated. Any service still using those tokens must be reconfigured with new credentials.
Manage service account API tokens
Service accounts can have up to 10 non-deleted API tokens. You cannot scope permissions per token. Each active token uses the service account's current permissions.
On a service account's detail page, select the API tokens tab to create and manage tokens.
Create a service account API token
To disable or enable tokens, you need the Service Account Manager permission.
New tokens may take up to a minute to become active after creation.
-
Select Create API token.
-
In Create API token, complete the following:
-
Token name: Enter a descriptive name for the token.
-
(Optional) Expiry date: Select a date after which the token will no longer be valid. If you leave this blank, the token does not expire.
-
-
Select Create token.
-
Copy or download the token immediately. The token value is displayed only once and cannot be retrieved later.
-
Select Done to close the dialog.
Treat API tokens as securely as any other password. Do not share tokens or commit them to source control. After you close the dialog, the token value is no longer accessible.
See DoiT Developer Hub: Get started for how to use an API token.
View API tokens
The token list displays each token with the following information:
| Column | Description |
|---|---|
| Token | The token name, number of permissions, and a masked key. |
| Status | Current state: Active, Disabled, or Expired. |
| Created | The date the token was created. |
| Expires | The expiration date, if one was set during creation. |
| Last used | The date the token was last used to make an API request. |
A summary row above the table shows how many tokens the service account has, how many are expiring in the next 30 days, and how many have been inactive for 60 or more days.
View token permissions
To view the permissions that apply when a token is used, select the permissions count link (for example, "5 permissions") in the token row. The dialog shows each permission with its name and description.
Filter API tokens
Use the filter bar to search and filter the token list. To include expired tokens in the list, enable Show expired tokens.
Token lifecycle statuses
Each token has a lifecycle status:
-
Active: The token is valid and can be used for API requests.
-
Disabled: The token has been temporarily deactivated.
-
Expired: The token has passed its expiration date and can no longer be used.
Disable or enable a token
Requires the Service Account Manager permission.
Disabling a token temporarily revokes its access without deleting it.
-
Select the three-dot menu on the token row.
-
Select Disable token.
To re-enable a disabled token, select Enable token from the same menu. Requests using the token will succeed again after it is re-enabled.
Delete a token
To delete tokens, you need the Service Account Manager permission.
Deleting a token permanently removes it and cannot be undone. Any applications or scripts using the token will no longer be able to authenticate.
-
Select the three-dot menu on the token row.
-
Select Delete token.
-
In Delete this token?, enter DELETE to confirm deletion of the token.
Legacy API tokens
Legacy API tokens previously issued from user profiles were revoked on September 17, 2026 and can no longer authenticate API requests. Replace any legacy token still configured in an integration with a personal API token or a service account API token.
If a request using a legacy token returns 403 with invalid token: missing expiration, create a replacement token and update the integration. Personal API tokens and service account API tokens still support an optional expiry date.
Migrate a legacy token to a service account
-
Identify the permissions the integration actually needs. Legacy tokens inherited the creating user's full role, which is often broader than required.
-
Create a service account with only those permissions. See Create a service account.
-
On the service account's API tokens tab, create a token, copy it to your secrets manager or CI/CD store, and update the integration to send
Authorization: Bearer <token>. -
Verify that requests succeed with the new token, then remove the revoked legacy token from your secrets manager, CI/CD store, and integration configuration.
Migrate a legacy token to a personal API token
If the automation should remain tied to one user, create a personal API token with the appropriate scope instead of a service account. Update each caller to use the new token, verify that requests succeed, and remove the revoked legacy token from your stored configuration.