Triggers
When creating a flow, the first node is always a trigger node that starts the flow. The trigger node provides data to every downstream node in the flow. You can use this data in filters and other nodes.
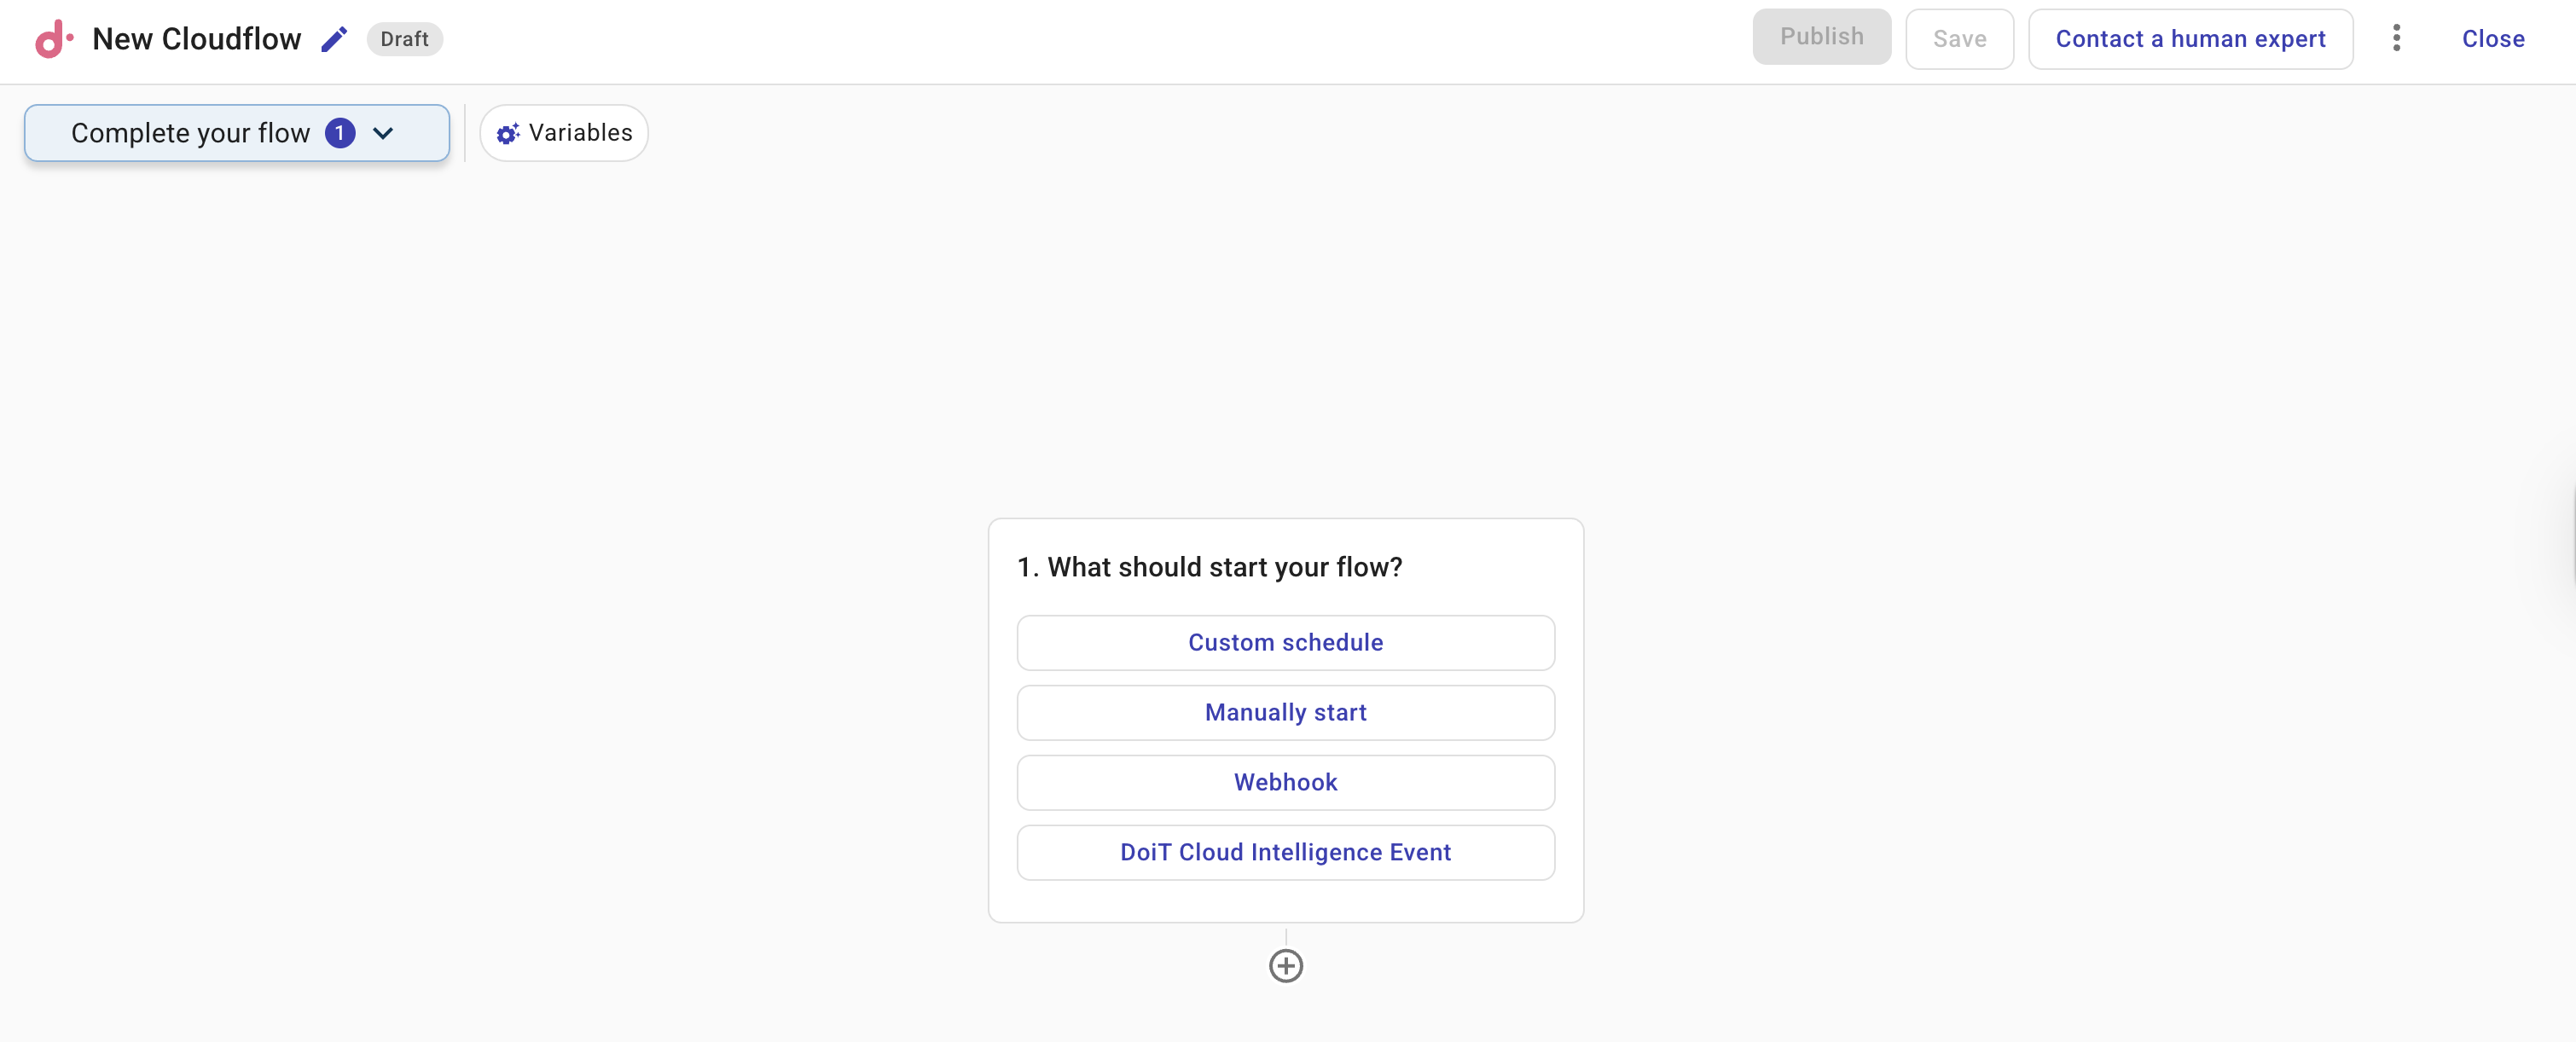
There are four types of triggers:
One flow can have only one trigger node. Schedule, webhook, and event triggers run only after the flow is published; a manual trigger lets you run the flow on demand from the editor once it is published.
Custom schedule
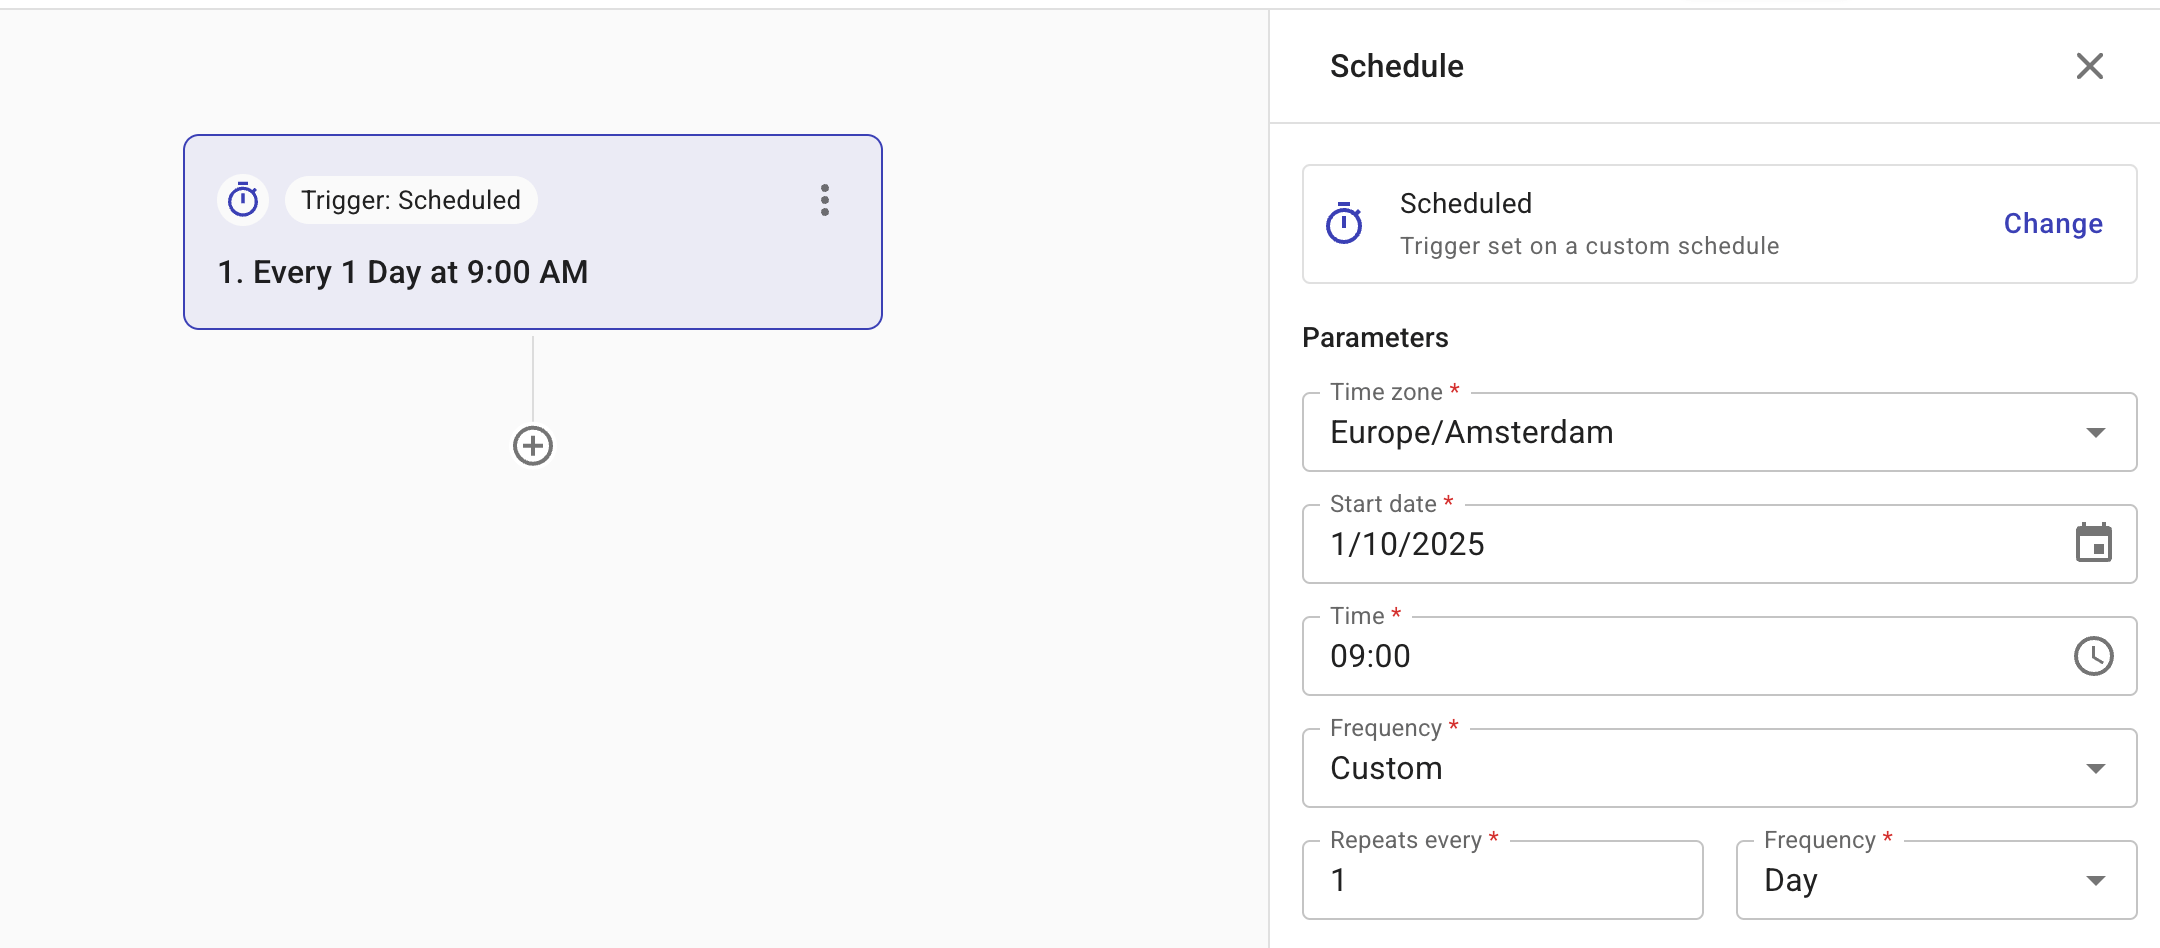
A Custom schedule is useful when you need a flow to run at specific times or recurring intervals. For example, checking the utilization rates of Google Cloud Compute Engine instances at 9:00 AM every day.
-
Configuration options: Time zone, Start date, Time, Frequency.
-
Frequency defines how often a flow is triggered. Supported values: Daily, Weekly, Monthly, Custom, and Run once.
-
When choosing Daily, you can trigger flows to run at specific times throughout the day. The minimum interval between runs is one hour, allowing you to schedule up to 24 executions per 24-hour period.
-
Choose Custom if you need the flow to run at recurring intervals. Supported values: Hour, Day, Week, or Month. For example, every two hours or every two weeks.
-
Choose Run once to schedule a single, non-repeating execution that can be run at a custom time. This is useful when performing one-time actions, such as updating the OS kernel on a legacy server or applying a patch during a maintenance window.
-
Below is an example custom schedule.
Manual trigger
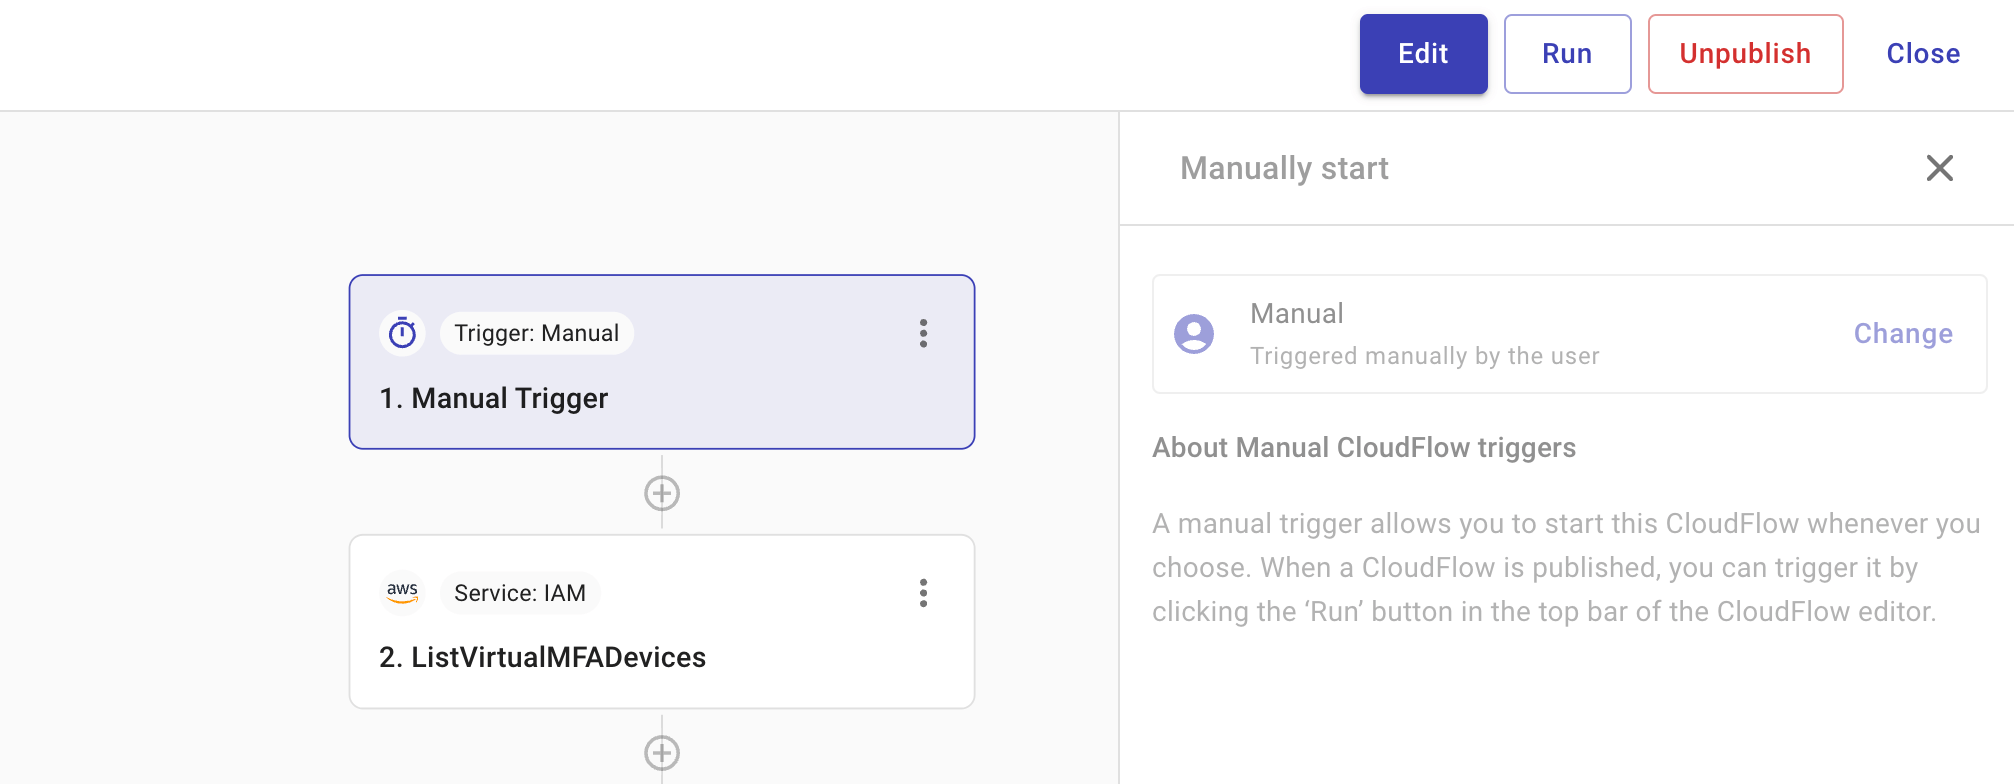
This type of trigger is used when a flow should only run on demand. It helps guarantee human oversight as well as offer flexibility, allowing you to control flow execution as needed.
To start a flow with a manual trigger, select Run in the top bar of the CloudFlow editor after the flow has been published.
Webhook trigger
You can use a webhook trigger to start a flow using data from an API. Consequently, any external system capable of making API calls can trigger a flow. For example, you can use the Run flow action in Zapier to trigger a flow. See also DoiT Integrations.
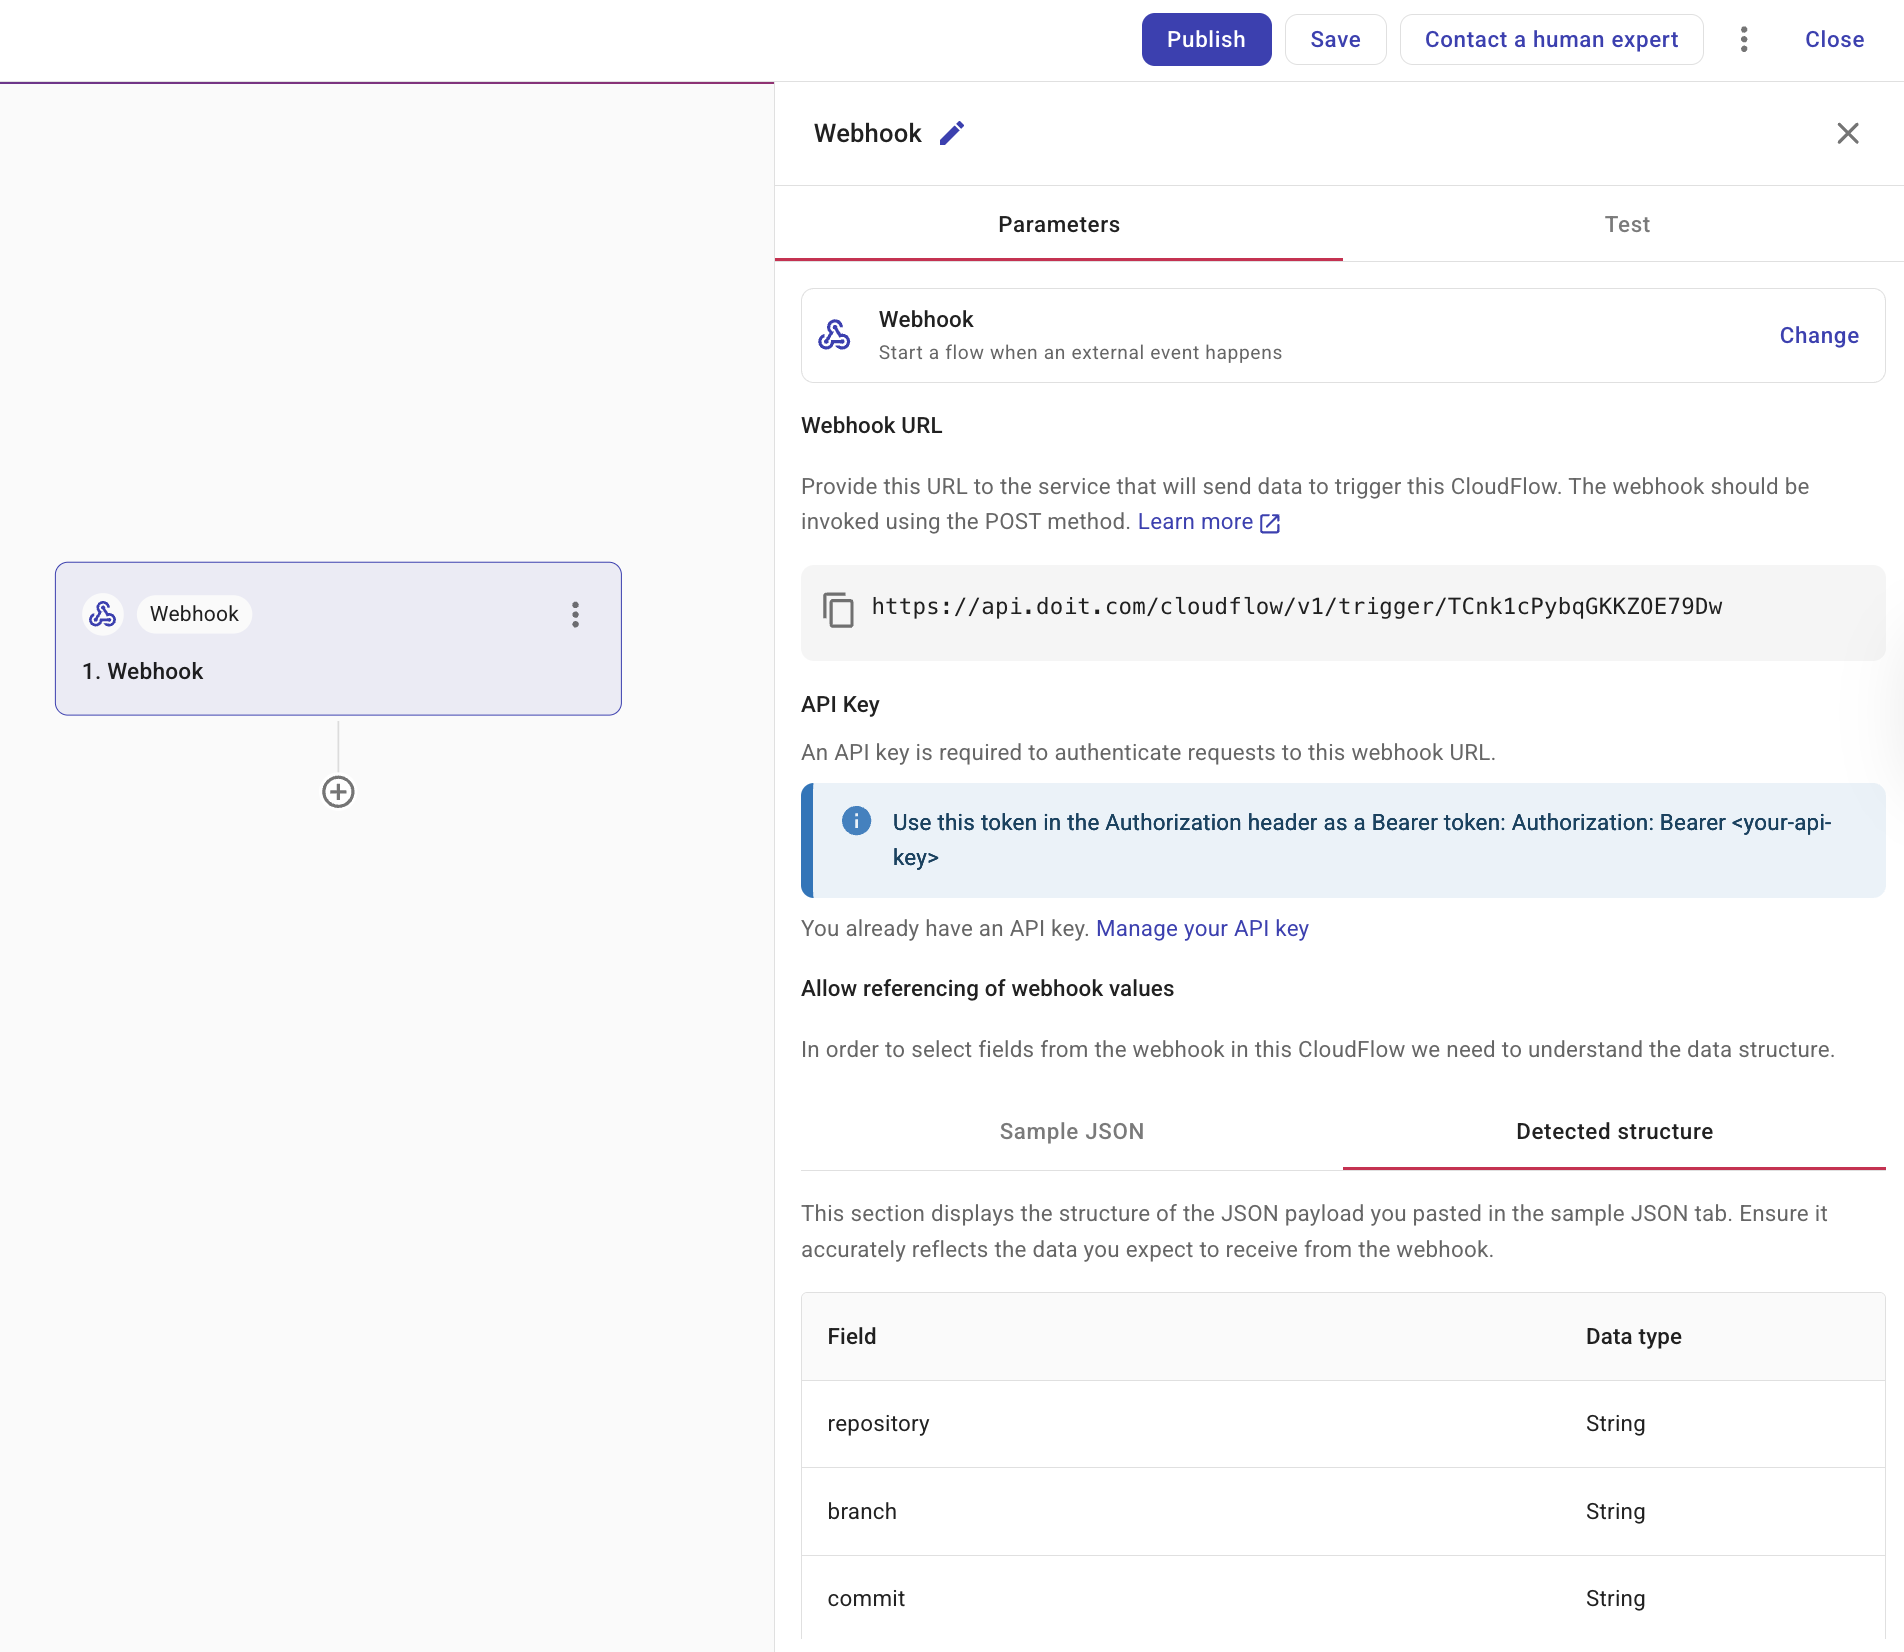
You must provide a sample of your JSON so that we can detect the structure of your data. Once we have detected the structure, the flow automatically creates the fields required for subsequent actions. With this, your data becomes part of the flow and can be used in any activity nodes, just like other data.
-
Webhook URL: Provide the URL to the service that will send data to trigger this flow.
-
Sample JSON: Provide a sample of your JSON so that we can detect the structure of your data. Select Detected structure to ensure that we have identified the fields correctly. If you think it is incorrect, amend your JSON sample and paste it again.
-
Generate API token: Create a DoiT API token from the trigger node so you do not have to open your Profile in DoiT Cloud Intelligence. If you already have an API token, the panel shows a link to manage your API tokens on the Profile page. This token is used only for DoiT APIs.
DoiT Cloud Intelligence event trigger
You can use a DoiT Cloud Intelligence event trigger to start a flow using an event generated by DoiT Cloud Intelligence. There are five categories of events:
-
DoiT Cloud Intelligence events: DoiT Cloud Intelligence events that you can use to start flows.
-
Applies when you use cost and usage alerts. Alerts: Fires when a cost or usage alert condition is satisfied or later resolves for the same period (and optional breakdown).
-
Applies when you use Budgets with notification thresholds. Cloud Analytics budgets: Fires when spend crosses a budget alert threshold upward. This is separate from cost and usage alerts, which are metric and dimension-based rules on Alerts.
-
Applies to AWS only. AWS CloudTrail: Events from AWS CloudTrail—for example, an EC2 instance being started or terminated, or an RDS instance created or modified.
-
Available for any cloud where anomaly detection is configured (billing and/or real-time). Cost anomaly detection: Fires when cost anomalies are created or updated.
DoiT Cloud Intelligence events
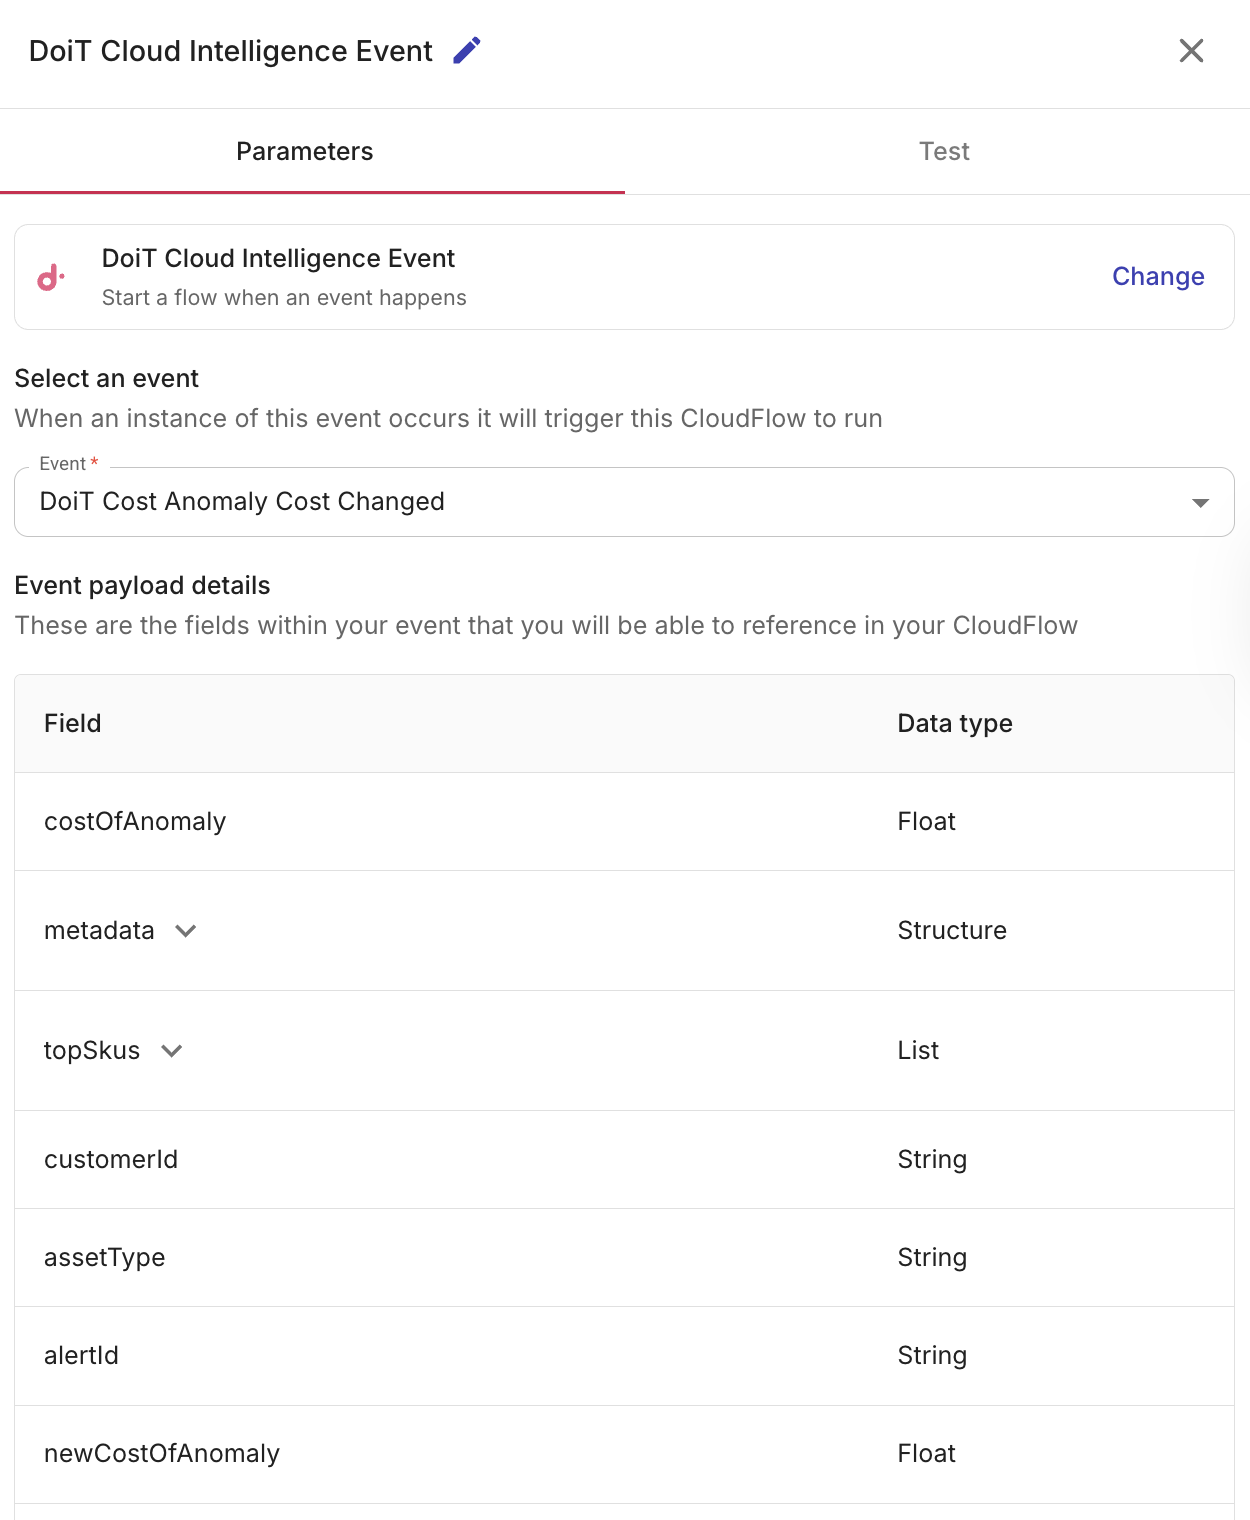
DoiT Cloud Intelligence can emit platform events that trigger flows. When you select a DoiT Cloud Intelligence event, Event payload details shows the fields you can reference in your flow.
Alerts
You can trigger a flow when any of the following alert events occur. These use the same evaluation as alert notifications (for example, email and Zapier) when a condition is met or clears.
-
DoiT Alert Condition Satisfied: When an alert's condition is met, for example, a cost threshold is met for the evaluated time period. For alerts evaluated per dimension (such as per service), an event can be emitted for each dimension value that triggers. The payload includes the value, the period that was evaluated, and alert details (name, threshold, metric, and so on). Sometimes an alert checks items one-by-one (for example, each service or each project), not just one grand total. In this situation,
breakdowntells you which specific item triggered the alert (for example,Compute Engine) andbreakdownLabeltells you the item category (for example,Service). -
DoiT Alert Condition Resolved: When an alert is resolved, for example, cost drops below the threshold for the same period. The alert aligns with DoiT Alert Condition Satisfied (same alert, period, and optional breakdown) so you can pair flows, for example, closing a Jira ticket or stopping follow-up actions you started when the condition was satisfied.
Budgets
You can trigger a flow when the DoiT Budget Threshold Reached event occurs. This event occurs when evaluated spend first crosses a budget alert threshold upward (for example 50%, 80%, or 100% of the budget amount). The payload includes the threshold crossed (thresholdPercentage), current spend and budget amounts, an optional forecasted date, when the threshold was reached (triggeredAt), and budget metadata (for example id, name, currency, and period). In the CloudFlow editor, exact field names are listed in Event payload details after you select this event. If multiple thresholds are passed, the event reflects the highest threshold percentage.
Use Budgets with Configure budget notifications so alert thresholds exist for this event to occur.
Cost anomaly detection
You can trigger a flow when any of the following cost anomaly events occur:
- DoiT Cost Anomaly Acknowledged Changed: When an anomaly is acknowledged or the acknowledgement is edited.
- DoiT Cost Anomaly Cost Changed: When the cost of an active anomaly changes.
- DoiT Cost Anomaly Created: When a new cost anomaly is detected.
- DoiT Cost Anomaly Severity Changed: When the severity of an anomaly changes.
- DoiT Cost Anomaly Status Changed: When status changes (for example, Active to Inactive).
- DoiT Cost Anomaly Top SKUs Changed: When the top contributing SKUs for an anomaly change.
You must have real-time cost anomaly detection configured to trigger flows for cost anomalies.
-
Select an event: From the list, select a DoiT Cloud Intelligence event for which you want to trigger a flow.
-
Event payload details: A list of referenced fields that are available within the selected event are displayed. These are the fields that you can reference in your flow.
-
(Optional) Event payload filter: Add conditions on payload fields so the flow runs only when an incoming event matches the conditions. You can use a filter to start a flow only for a relevant case, for example, a specific cost anomaly severity, a particular AWS resource ARN, a chosen budget or budget threshold, or other values in the event data.
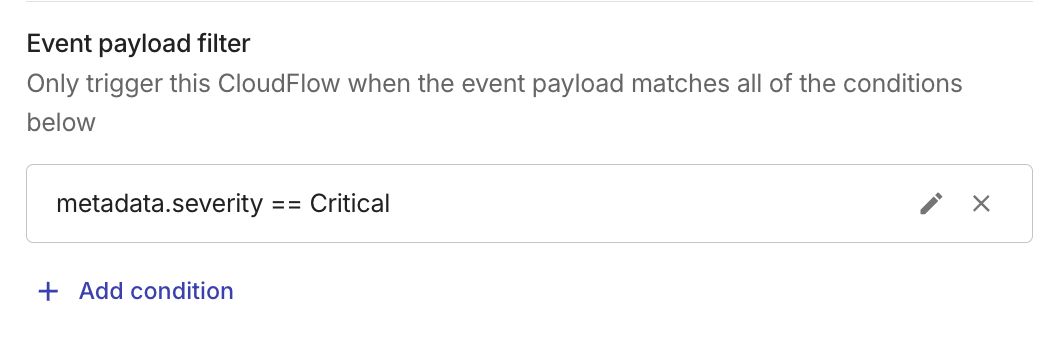
Event payload filter
You can filter which events trigger your flow by adding conditions based on the event payload. When one or more filter conditions are defined, the flow runs only when the incoming event matches the conditions. This lets you react to specific events, for example, triggering only when a cost anomaly has a particular severity or when an AWS CloudTrail event targets a specific resource.
When you add multiple conditions, they all must be true for the flow to continue. CloudFlow uses AND logic, meaning the flow won't move forward unless every single requirement is met.
To check a single field for multiple values at once, use operators like In or Not In. This allows you to create a list of approved (or blocked) items. See Filter operators.
For example:
-
Your flow listens for DoiT Cost Anomaly Created, but you only want it to run when the anomaly is Critical, not for every new anomaly. You can add the following condition:
-
Field:
severity -
Operator: Equal to (
==) -
Value:
Critical
-
-
For an AWS CloudTrail event, you might filter on a field such as
details.resourceArnwith contains and a substring of your production ARN (or use Equal to (==) with the full ARN) so the flow runs only when the API activity targets that resource. -
To narrow AWS CloudTrail activity to a specific cloud footprint, add multiple conditions so every one must match. For example, run the flow only when the event is in your production AWS account and a chosen Region:
-
Field:
userIdentity.accountId— Operator: Equal to (==) — Value: your 12-digit AWS account ID (for example,111122223333). -
Field:
awsRegion— Operator: Equal to (==) — Value: the Region code you care about (for example,eu-west-1).
Use the names shown in Event payload details for your selected event; nested fields often appear with dot notation (for example,
userIdentity.accountId). -
-
For DoiT Budget Threshold Reached, filter on
budget.budgetIdso the flow runs only for a specific budget, or onthresholdPercentage(for example, Equal to (==) with100) so only certain thresholds start the flow. Use the field names shown in Event payload details. Nested budget fields are usually underbudget.
To add a filter condition:
-
In Event payload filter, select + Add condition.
-
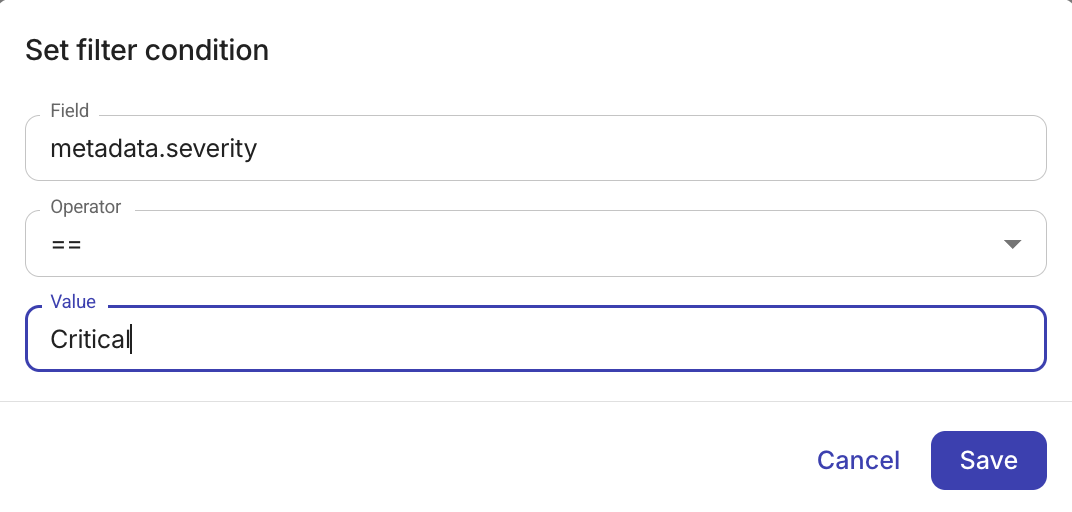
Configure the condition:
-
Field: Either select the field to display a list of available fields or manually type a field, for example,
severity,details.resourceArn,budget.budgetId, orthresholdPercentage. The fields shown depend on the event you selected. -
Operator: Choose a comparison operator. The Filter operators available depend on the field's data type.
-
Value: Enter the value to compare against. For timestamp fields, a date-time picker is shown. The value input is hidden for is null and is not null operators.
-
-
Select Save.
To add multiple criteria that must all be true (AND), select + Add condition for each condition you want to include. You can edit or delete a condition at any time.
Automate event responses
When your flow is started by a DoiT Cloud Intelligence event trigger (DoiT Cloud Intelligence events, alerts, Cloud Analytics budgets, AWS CloudTrail, or cost anomaly detection), you can automate responses—for example, post to Slack, create tickets, or run remediation steps. Reference fields from Event payload details in your downstream nodes:
-
Add a Notification node to send event details to your team. Use payload fields (for example, alert name and value for alert events, budget name and
thresholdPercentagefor DoiT Budget Threshold Reached, anomaly ID and cost for cost anomalies, or resource ARN for AWS CloudTrail events) in the message. -
Use a Branch node to run different steps depending on fields in that event's payload, for example, notify only when a cost anomaly's severity is high, when an alert's metric value is above a number you choose, when a budget threshold or
budget.budgetIdmatches what you care about, or when a breakdown or other dimension field matches a specific project or service.
Trigger node results
This section lists the fields available in the output of a trigger node that you can reference in downstream nodes. For Webhook and DoiT Cloud Intelligence event triggers, the node output also includes event-specific payload fields (for example, alert name and value, budget id and threshold, or cost anomaly ID and cost). Those fields are shown in Event payload details when you configure the trigger and can be referenced like any other trigger output.
When configuring a node, you typically choose one upstream node whose output to reference. The Schedule trigger node is an exception: its output can be referenced from any node in the flow, in addition to that chosen node.
The trigger result includes date and time in both legacy and ISO 8601 formats. Use the iso8601 object when an API requires ISO 8601 timestamps. The existing currentDate and startTime fields remain for backward compatibility.
| Name | Description | Example value |
|---|---|---|
| currentDate | Date of the run in YYYY-MM-DD format | 2026-02-09 |
| currentDay | Day of month (1–31) | 9 |
| currentMonth | Month (1–12) | 2 |
| currentYear | Four-digit year | 2026 |
| customerId | DoiT customer or organization identifier | ABCDeFhijKLm1nopQrStUVwx |
| ownerEmail | Email of the flow owner | [email protected] |
| startTime | Unix timestamp in milliseconds | 1770644776279 |
| startTimeMillis | Unix timestamp in milliseconds | 1770644776279 |
| startTimeSeconds | Unix timestamp in seconds | 1770644776 |
| userId | DoiT user identifier | aBBCDe1FG2hIJkL34MNO |
| iso8601 | Object with ISO 8601 date and time strings:
| currentDate: "2026-02-09T00:00:00.000Z", startTime: "2026-02-09T15:21:01.760Z" |
| variables | Global and local flow variables | globalVariables: {}, localVariables: {} |
| billingScopes | Lists of cloud project and account identifiers for the customer. Each key contains an array of objects with id and name:
| google-cloud: [{id: "my-project", name: "My GCP Project"}], amazon-web-services: [...], microsoft-azure: [...] |
| billingScopesRowCount | Total number of cloud scopes across all three providers (GCP + AWS + Azure). | 3 |
Use billingScopes when you need to run actions per GCP project, AWS account, or Azure subscription—for example, in loops or filters that reference Variables from the trigger node.
Event trigger example
You can automate responses from a trigger, for example, post to Slack, create tickets, or run remediation steps.
For example, a flow triggered by a DoiT Cost Anomaly Created can use a Branch node to filter for anomalies with a Critical severity. A Notification node then sends a message containing the anomaly ID and cost. Similarly, a flow triggered by DoiT Alert Condition Satisfied can notify a channel with the alert name, period, and value. A flow triggered by DoiT Budget Threshold Reached can branch on thresholdPercentage or budget.budgetId and notify with the budget name and current spend. These values come from the trigger node's output and can be mapped into any downstream node.