Set up PerfectScale for Commitments
This page explains how to set up PerfectScale for Commitments for AWS and Google Cloud.
Prerequisites
Before you begin, make sure that:
-
Your DoiT subscription includes the PerfectScale for Commitments entitlement, and you have an active PerfectScale for Commitments contract.
PerfectScale for Commitments is part of Cloud Intelligence and is governed by the same Master License and Services Agreement; the contract is an addendum in which you agree to the savings-share fee. If your subscription includes the entitlement but you have no active contract, please contact your account team or DoiT support.
-
Your cloud providers have been connected to DoiT Cloud Intelligence.
-
Your DoiT account must have the PerfectScale Commitments Admin permission. See Manage roles and users.
To explore commitment targets before onboarding, use Commitment Simulator. It requires Cloud Intelligence connectivity, but no PerfectScale for Commitments contract. See how the two tools differ.
Resources and permissions
To enable the PerfectScale for Commitments feature, grant DoiT required permissions on the relevant resources.
AWS enablement
For AWS, you enable the following when linking a new account or editing an existing one:
-
PerfectScale for Commitments - Read & Recommend: Read-only permissions to enable visibility and recommendation features. -
PerfectScale for Commitments - Purchases(optional): Write permissions to purchase commitments on your behalf. Required for auto-purchasing features. This option is valid only on AWS management accounts (payer accounts).
See Link AWS accounts for configuration instructions.
Google Cloud enablement
PerfectScale for Commitments reads spend-based CUD metadata from the BigQuery export. You first need to enable CUD export, and then grant DoiT the required permissions.
Enable CUD export in Google Cloud console
Follow the Google Cloud documentation to Enable CUD metadata export. It may take a few hours before Google Cloud populates cud_subscriptions_export after you first enable CUD metadata export.
For dataset location requirements, see Enable Cloud Billing export to the BigQuery dataset.
Enable PerfectScale for Commitments in DoiT console
PerfectScale for Commitments requires permissions at different levels.
-
Organization:
-
PS4Commitments Core: Read-only permissions to enable visibility and recommendation features. -
PS4Commitments Purchase(optional): Write permissions to purchase CUDs. Required for auto-purchasing features.
-
-
Project (for Google Cloud projects that do not belong to a connected organization):
PS4Commitments Core: Read-only permissions to enable visibility and recommendation features.
-
Dataset: After you enable CUD export in Google Cloud console, grant DoiT read access to the linked dataset of the exported CUD metadata.
The dataset connection must be for a project linked to the billing account you are onboarding. DoiT matches Cloud Connect dataset connections to billing accounts by project membership.
PS4Commitments CUD Export: Permissions to read the BigQuery tables that contain CUD data, plus a project-level permission for dataset access.
See Connect Google Cloud resources for configuration instructions.
Onboarding wizard
To launch the PerfectScale for Commitments onboarding wizard:
-
In the DoiT console, select Rate optimization > PerfectScale for Commitments from the top navigation mega menu.
-
Select Connect or Account Settings > Add new accounts to launch the onboarding page.
Eligible savings from newly onboarded accounts or services may be billed according to your PerfectScale for Commitments agreement.
Step 1: Cloud selection
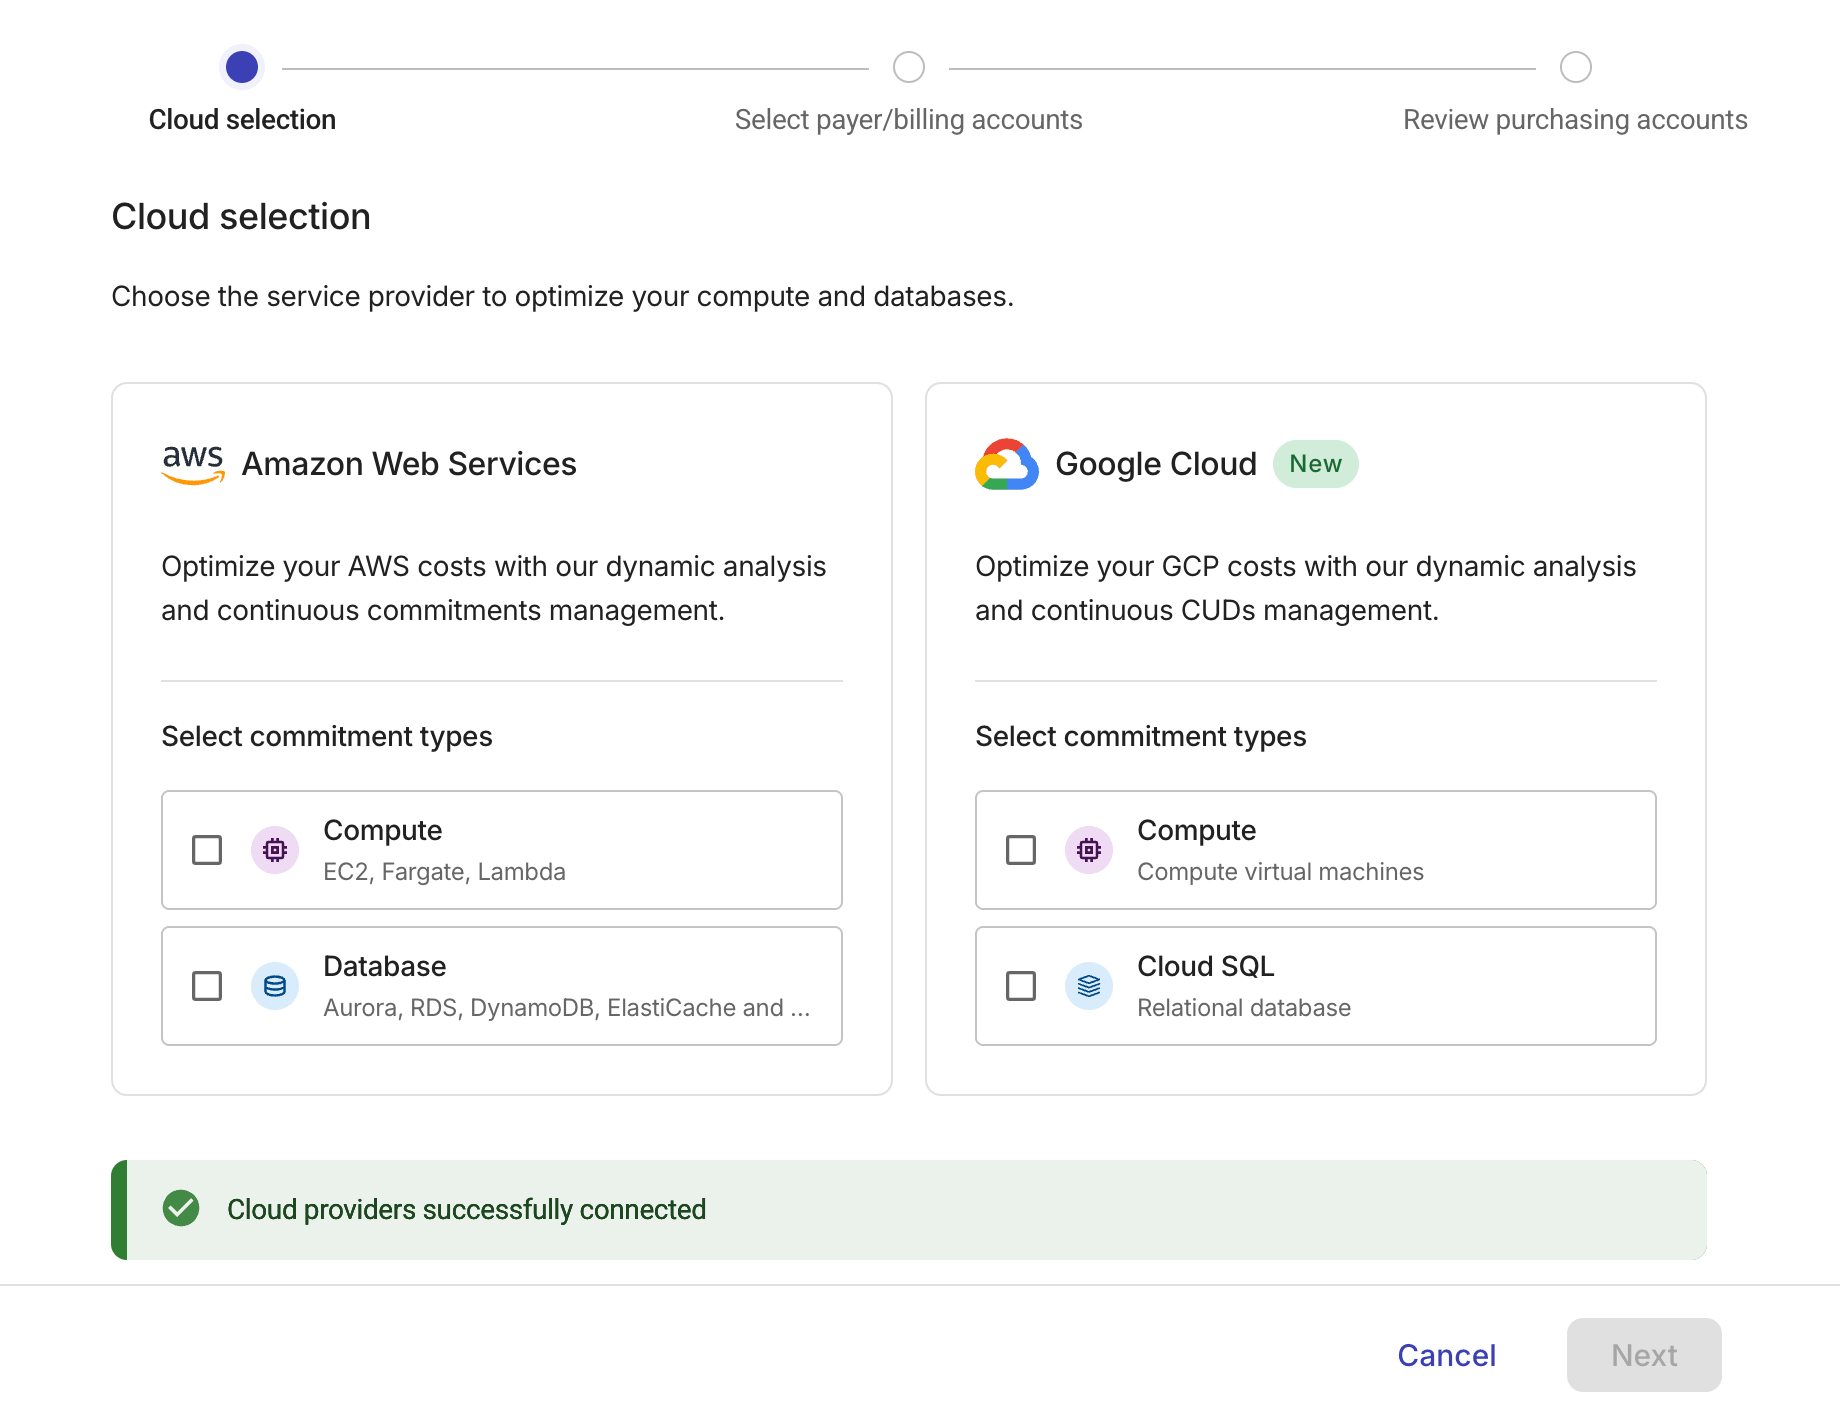
In this step, you choose the cloud providers and commitment types to optimize your compute and database.
-
AWS: Compute Savings Plans, Database Savings Plans
-
Google Cloud: Compute flexible CUDs, Cloud SQL CUDs
If the selected cloud providers are successfully connected, select Next to continue.
Step 2: Select payer/billing accounts
-
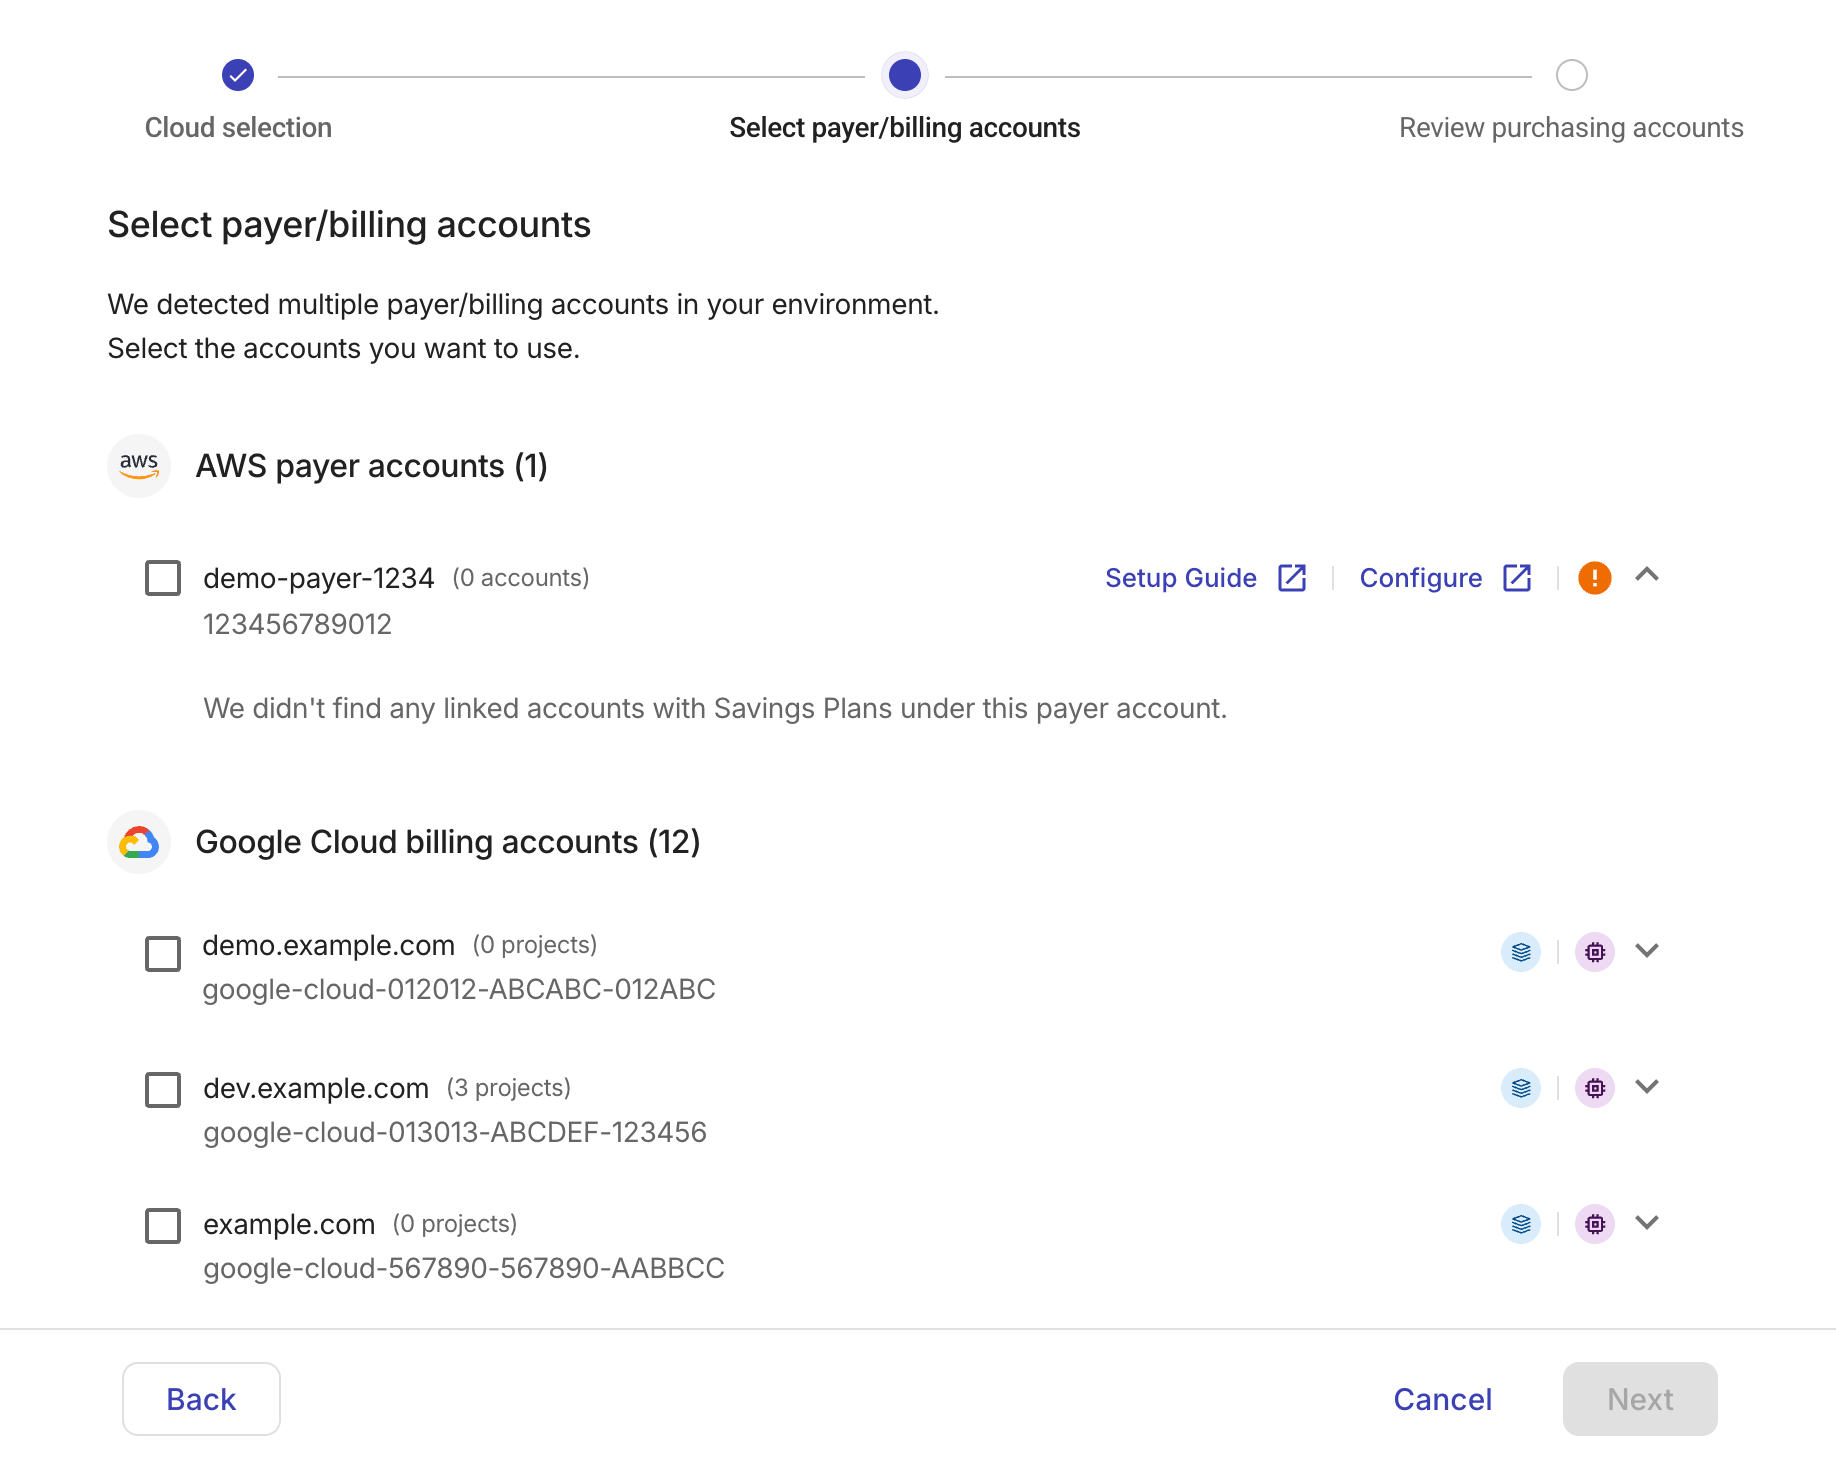
Review the account list.
The list shows all the payer/billing accounts DoiT detected in your environment that have not yet been onboarded (if no accounts appear, either DoiT has not detected any AWS payer accounts or Google Cloud Billing accounts, or all accounts are already onboarded).
You can expand an account to view more information.
-
Select the accounts you want to use with PerfectScale for Commitments.
-
Review the health check results of each selected account and take actions if needed.
- AWS
- Google Cloud
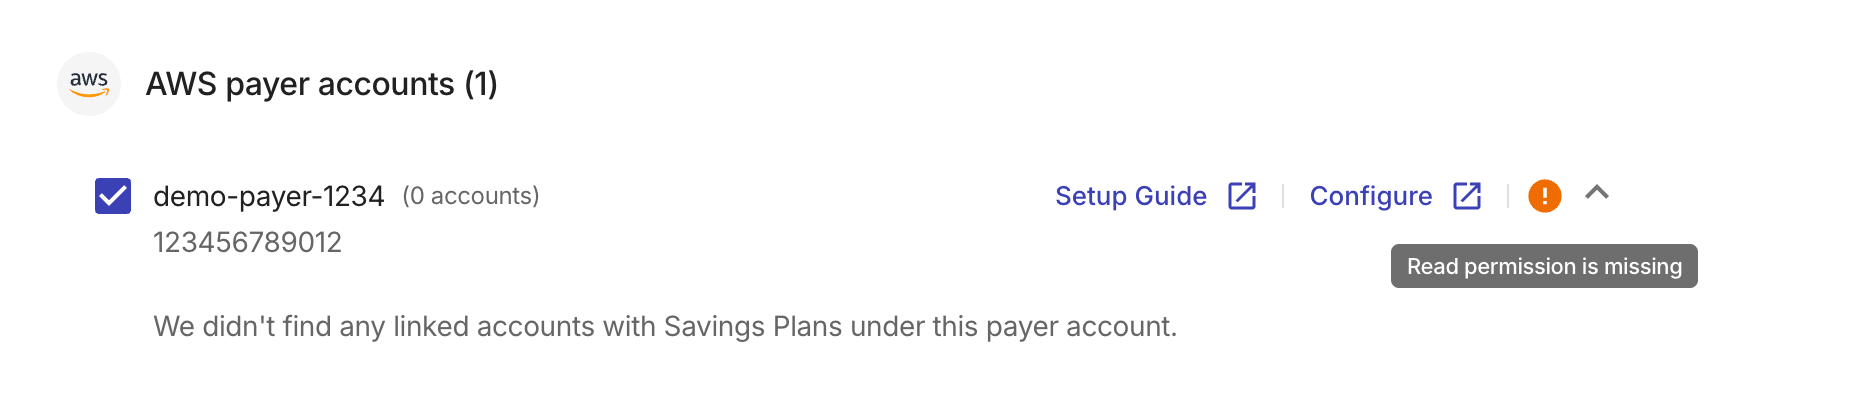
AWS payer accounts must pass the read permission check.
-
Read permission is missing: The payer account is missing the read permission. Select Configure to enable the feature via DoiT console. -
Linked accounts read permission is missing: Select Configure to enable the feature via DoiT console. You can also configure linked accounts' permissions at a later stage.
See AWS enablement and Link AWS accounts for more information.
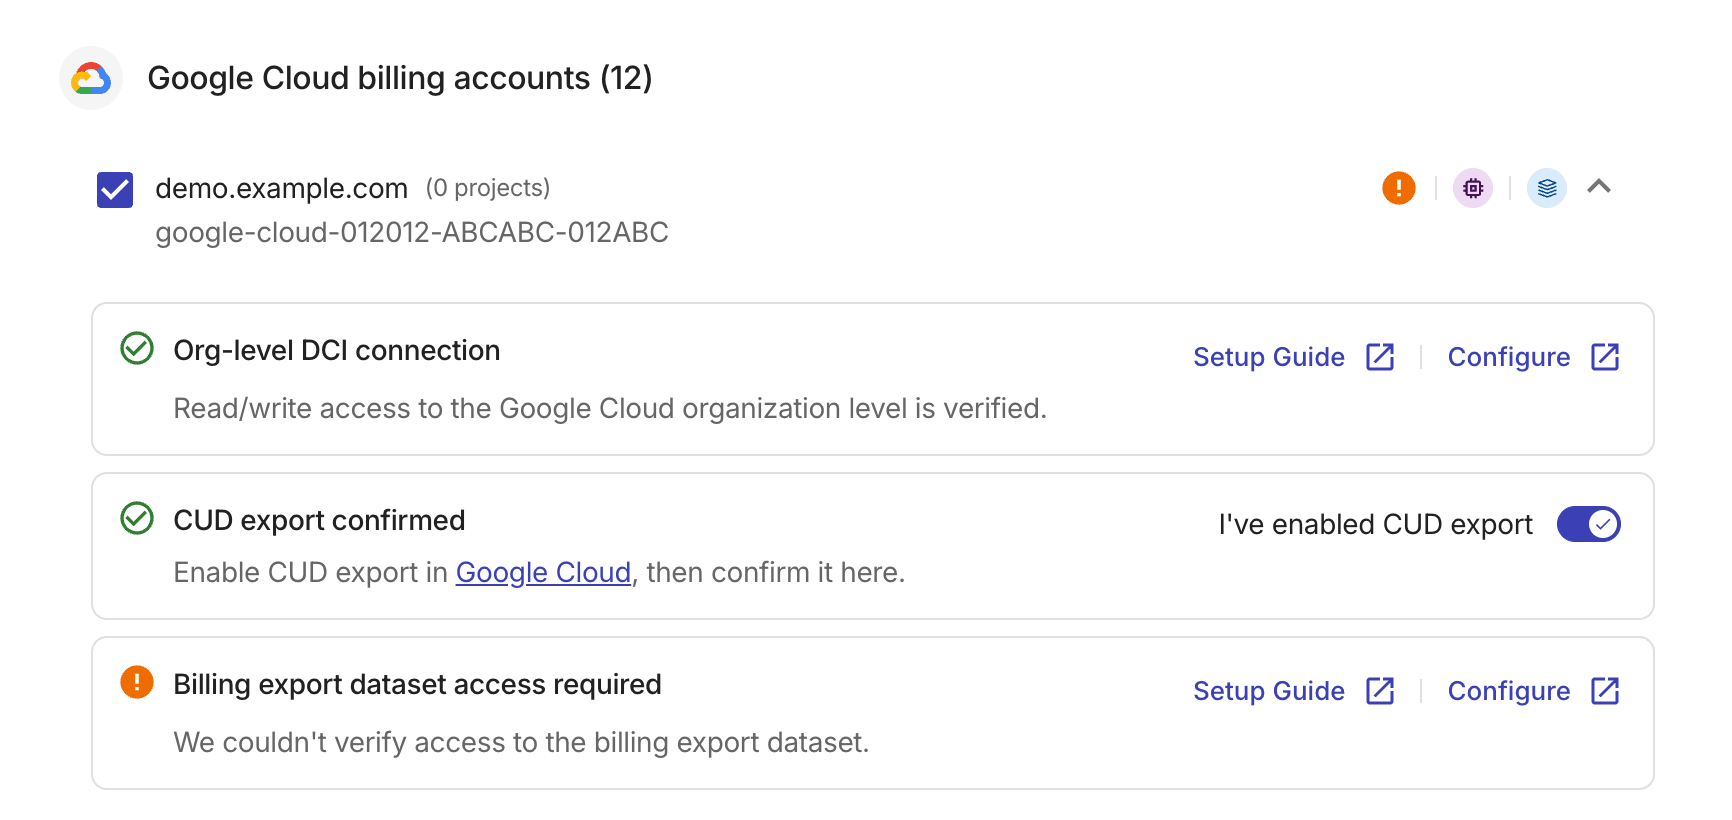
Google Cloud Billing accounts must pass all health checks listed below.
-
Org-level DCI connection: This check verifies the read/write access to the organization level.
-
CUD export: Make sure to Enable CUD export in Google Cloud console, then select the I've enabled CUD export toggle to confirm.
-
Billing export dataset access: This check verifies DoiT's read access to the linked dataset of the exported CUD metadata. The check fails if no read access or the connection is not healthy.
See Google Cloud enablement and Connect Google Cloud resources for more information.
-
Select Next when the following conditions are satisfied for the selected cloud providers:
-
AWS: At least one payer account is selected. All selected payer accounts pass the permission check.
-
Google Cloud: At least one Cloud Billing account is selected. All selected billing accounts pass the health checks.
-
Step 3: Review purchasing accounts
-
Review the listed accounts and the enabled commitment types.
- AWS
- Google Cloud
To enable purchases, specify a Commitments purchasing account for each payer account. You can use the payer account itself.
-
The purchasing account needs write permission (
PerfectScale for Commitments - Purchases) for auto-purchasing to work. See AWS enablement. -
Prefer a purchasing account with little or no eligible compute usage. AWS applies Savings Plans to the purchasing account first, which can leave less discount for linked accounts.
You can set up purchases later in Account Settings and leave the settings empty for now.
Google Cloud CUDs are purchased at the billing account level; no additional project-level configuration is required.
Discounts are shared dynamically across all projects under the billing account (see Share resource-based CUDs across projects).
-
Select Next to complete onboarding.
What's next
Once your selected accounts are onboarded, PerfectScale for Commitments begins analyzing your usage.
Recommendation and dashboard data can take up to 90 minutes to appear on AWS, and a few hours on Google Cloud.