Create and manage notifications
This page explains how to create and manage notifications.
Required permissions
-
For organization-wide notifications: Manage settings.
-
For New invoice, Due or overdue payments, and Credit utilization notifications: Invoice viewer.
-
For Quota utilization, Cloud cost anomalies, and Digests notifications: Cloud Analytics.
-
For Cloud incidents notifications: Issues viewer.
-
For Insights and Third-party insights notifications: Insights Manager.
-
For Data integration sync failures notifications: Assets Manager.
Access notifications
To access notifications, sign in to the DoiT console, select the gear icon () from the top navigation bar, and select Notifications. You can also select the notification icon in the top navigation bar, and then select Settings.
The Notifications page has the following sections:
-
Personal: Select Personal to view and configure your personal notification preferences. Notification types are organized into collapsible groups. Expand a group to view and configure individual notifications.
-
Organization: View and manage organization-wide notifications sent via Slack, Microsoft Teams, or email. If your DoiT account does not have the Manage settings permission, this section shows a read-only list.
Select Contact an expert button to open an expert inquiry.
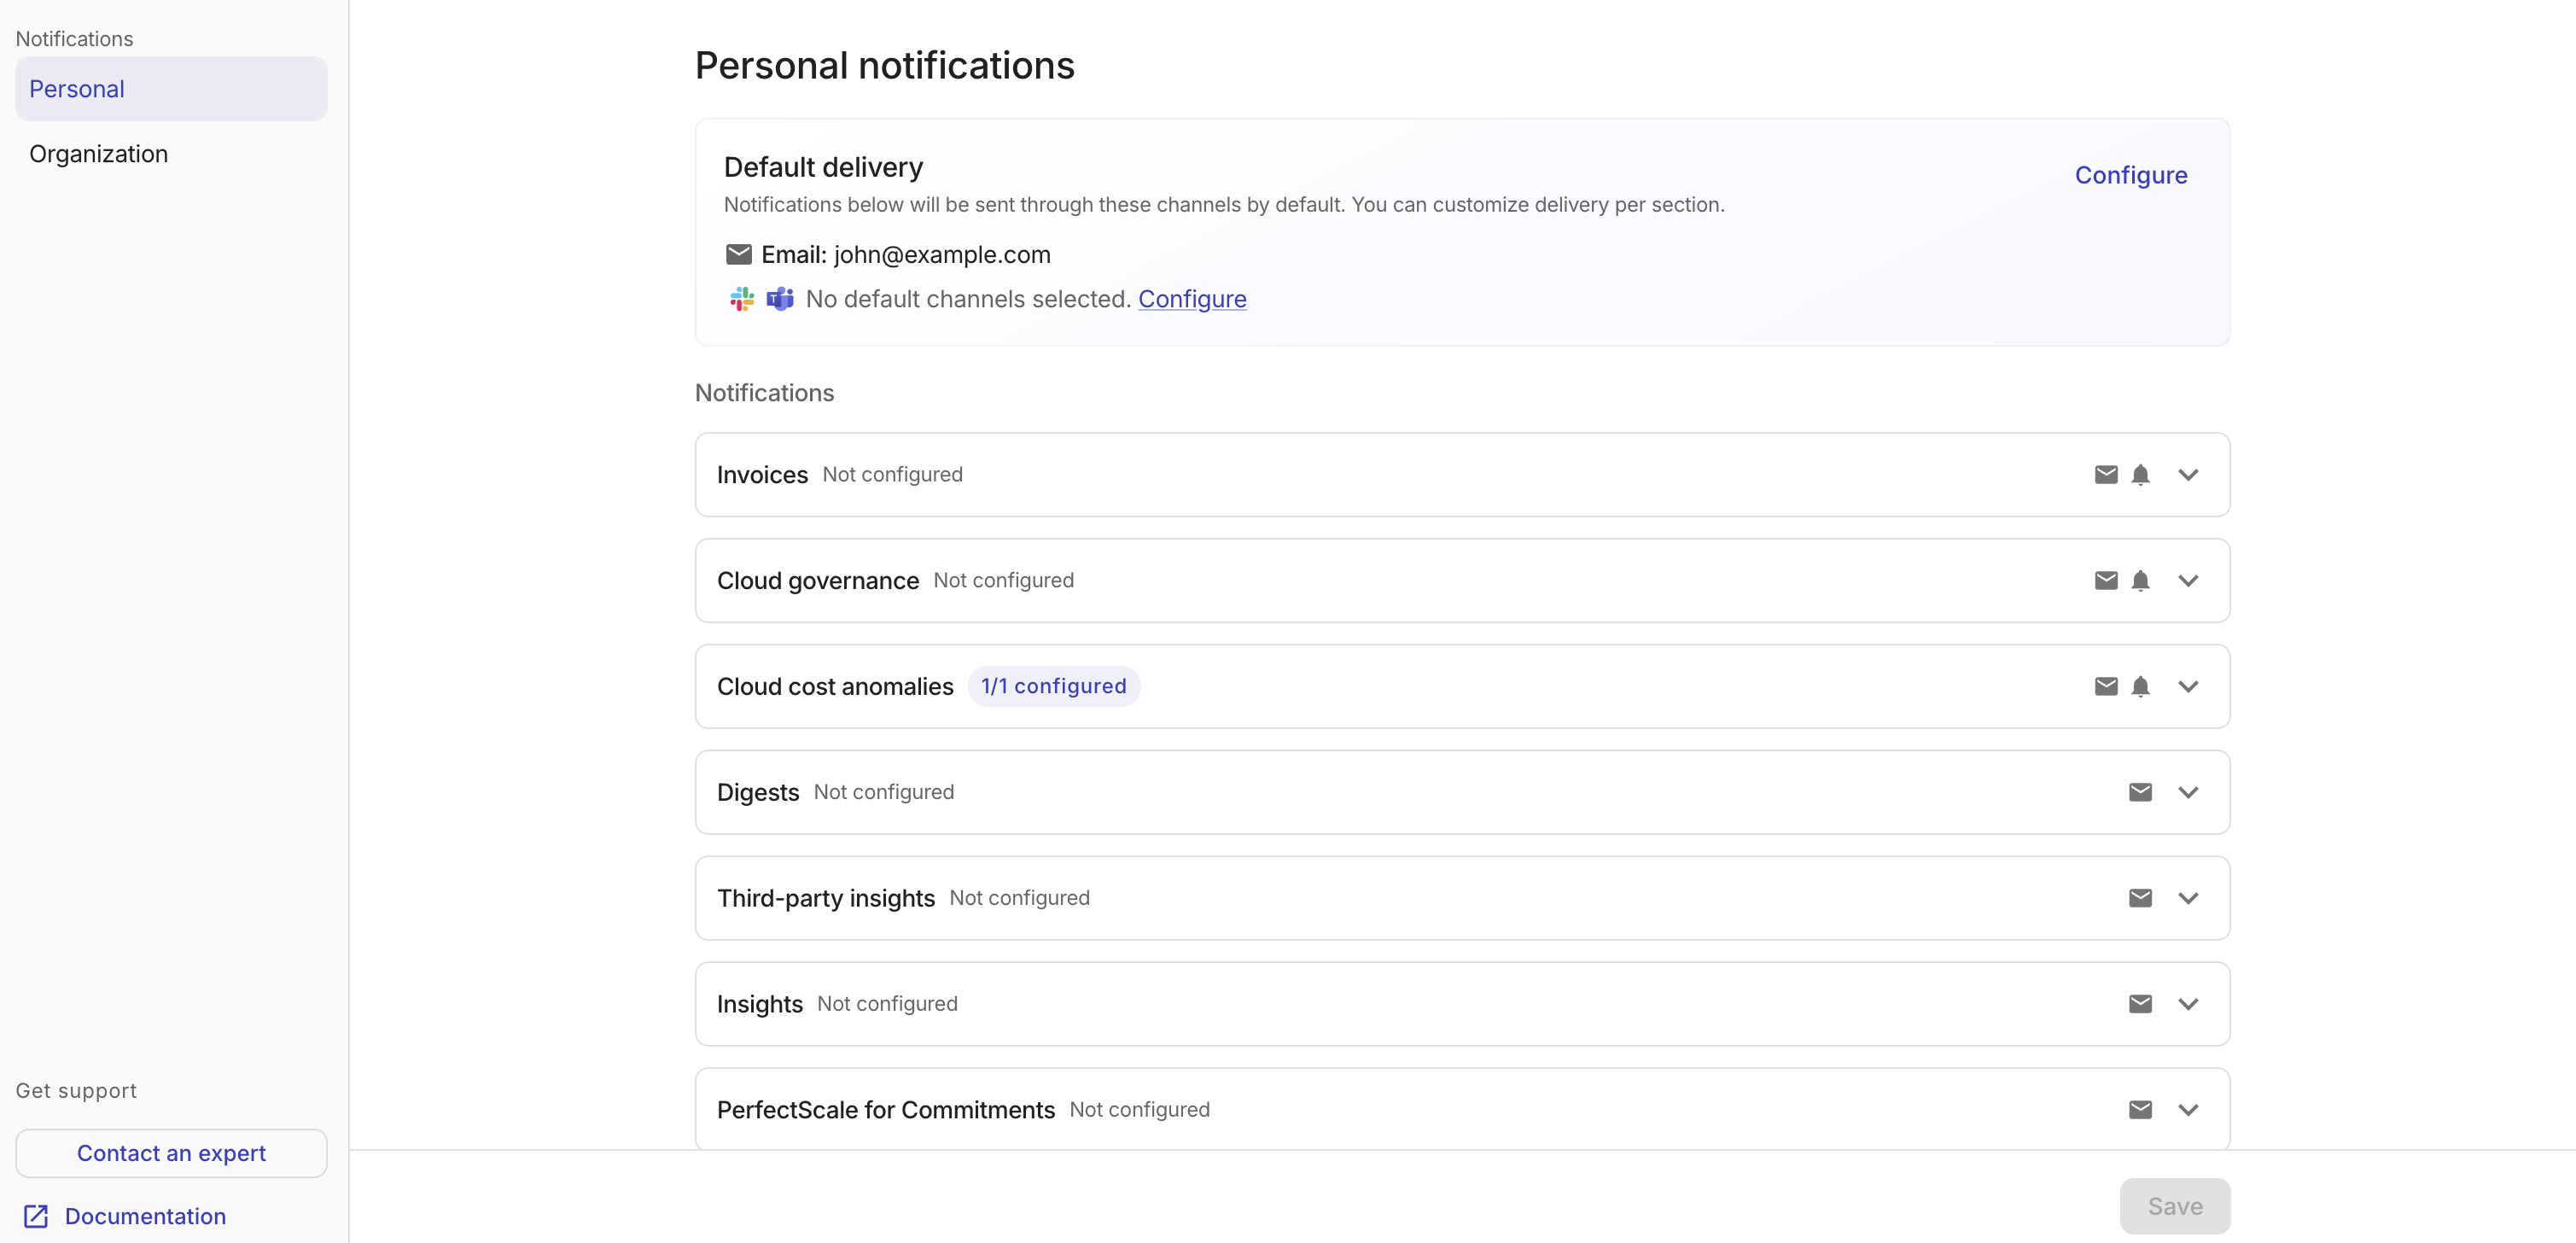
Edit personal notifications
To edit your personal notifications:
-
On the Personal notifications page, select the notification type group you want to configure.
-
Expand the group and select or clear the checkboxes for the notification types you want to receive.
-
Select Save.
Configure default delivery channels
Default delivery channels determine where your personal notifications are sent. You can configure email, in-app (shown in the notification bell in the DoiT console), Slack, and Microsoft Teams as default channels. These defaults apply to all notification groups unless you set a per-group override. For example, if your team works in Slack, add a Slack channel as a default so you see notifications there as well as in your inbox.
To configure default delivery channels:
-
On the Personal notifications page, select Configure in the Default delivery banner. This opens the Default delivery settings page.
-
Connect the messaging providers you want to use:
-
Slack: Select Connect Slack to connect your Slack workspace. Once connected, select the channels where you want to receive notifications. To send notifications to a private channel, invite the DoiT app to the channel first by running
/invite @DoiTInternationalin that channel. -
Microsoft Teams: Select Connect Teams to connect a Microsoft Teams team. Once connected, select channels from the connected team. To add channels from a different team, select Connect new channel.
-
-
Configure the In-app delivery channel:
-
Toggle the In-app switch to enable or disable in-app notifications by default. When enabled, notifications appear in the console notification bell for supported notification groups.
-
Toggle Enable real-time notifications to display notifications as they happen while you are using the console. Select Notification preview to see how real-time notifications appear.
-
-
Select Save.
Your email address is always included as a delivery channel. The Default delivery banner on the Personal notifications page displays a summary of your current default channels.
If you have not connected a Slack workspace or Microsoft Teams team, the Default delivery banner displays a prompt to connect a provider. Select Configure to get started.
Customize delivery per notification group
Each notification group on the Personal notifications page includes a Send via section where you can override the default delivery channels for that specific group. Use an override when a group needs different handling from the rest. For example, you might send cost anomaly notifications to a Slack channel your team monitors, while leaving invoice notifications to email only.
To customize delivery for a notification group:
-
Expand the notification group you want to customize.
-
In Send via, toggle the delivery channels you want to use for this group:
-
Email: Toggle to enable or disable email delivery.
-
In-app: Toggle to enable or disable in-app delivery for this group. The in-app toggle is available for notification groups that support the console notifications, including invoices, cloud cost anomalies, and cloud governance incidents. For cloud governance, in-app delivery applies to incidents only.
-
Slack: Toggle to enable Slack delivery and select specific channels. Select All defaults to use the channels from your default delivery settings.
-
Microsoft Teams: Toggle to enable Teams delivery and select specific channels. Select All defaults to use the channels from your default delivery settings.
-
-
Select Save.
Notification groups without a Send via override use your default delivery channels. The Send via section is disabled for groups where no notifications are selected.
To select Slack or Microsoft Teams channels in the Send via section, first connect the provider on the default delivery settings page. Select Configure in Send via to navigate there.
In-app-only notification groups
Some notification groups on the Personal notifications page are delivered only in the DoiT console, through the notification bell in the top navigation bar. These groups appear alongside other notification groups but do not support email, Slack, or Microsoft Teams delivery. Each group has a checkbox to enable or disable notifications and an in-app toggle in Send via.
The following in-app-only groups are available:
-
Mentions: When someone mentions you in a comment.
-
AI assistant: Observations the AI assistant surfaces for you.
-
Reports: When a report you requested is ready.
-
Expert inquiry: When an expert replies to your inquiry.
Manage subscriptions
Subscriptions on the Personal notifications page lists all per-item notifications you are subscribed to. Subscriptions are grouped by type: Alerts, Budgets, Reports, Dashboards, and Commitments. Each group shows the number of active subscriptions and can be expanded to view individual items.
Each subscription displays the item name, summary details, and delivery channel icons indicating how notifications for that item are sent (email, in-app, Slack, or Microsoft Teams). Alert and budget subscriptions display the DoiT console bell icon when in-app delivery is enabled for those notification types. Hover over a channel icon to see the specific address or channel name.
Subscriptions is hidden when you have no active subscriptions.
Unsubscribe from an item
To stop receiving notifications for a specific item:
-
On the Personal notifications page, scroll to the Subscriptions section.
-
Expand the group containing the item you want to unsubscribe from.
-
Select Unsubscribe on the item row.
-
In the confirmation dialog, review the item name. For alerts and budgets, unsubscribing removes both email and in-app notifications for the item. For other subscription types, if Slack or Microsoft Teams channels are configured for the item and you have edit access, you can optionally select Also stop notifications to Slack/Teams to remove those destinations as well.
-
Select Unsubscribe to confirm.
You can resubscribe at any time by navigating to the item (for example, an alert or budget) and adding yourself as a recipient.
Create organization-wide notifications
You can set up organization-wide notifications that are delivered to Slack, Microsoft Teams, email, or any combination of these providers. A single notification can include multiple channels across different providers.
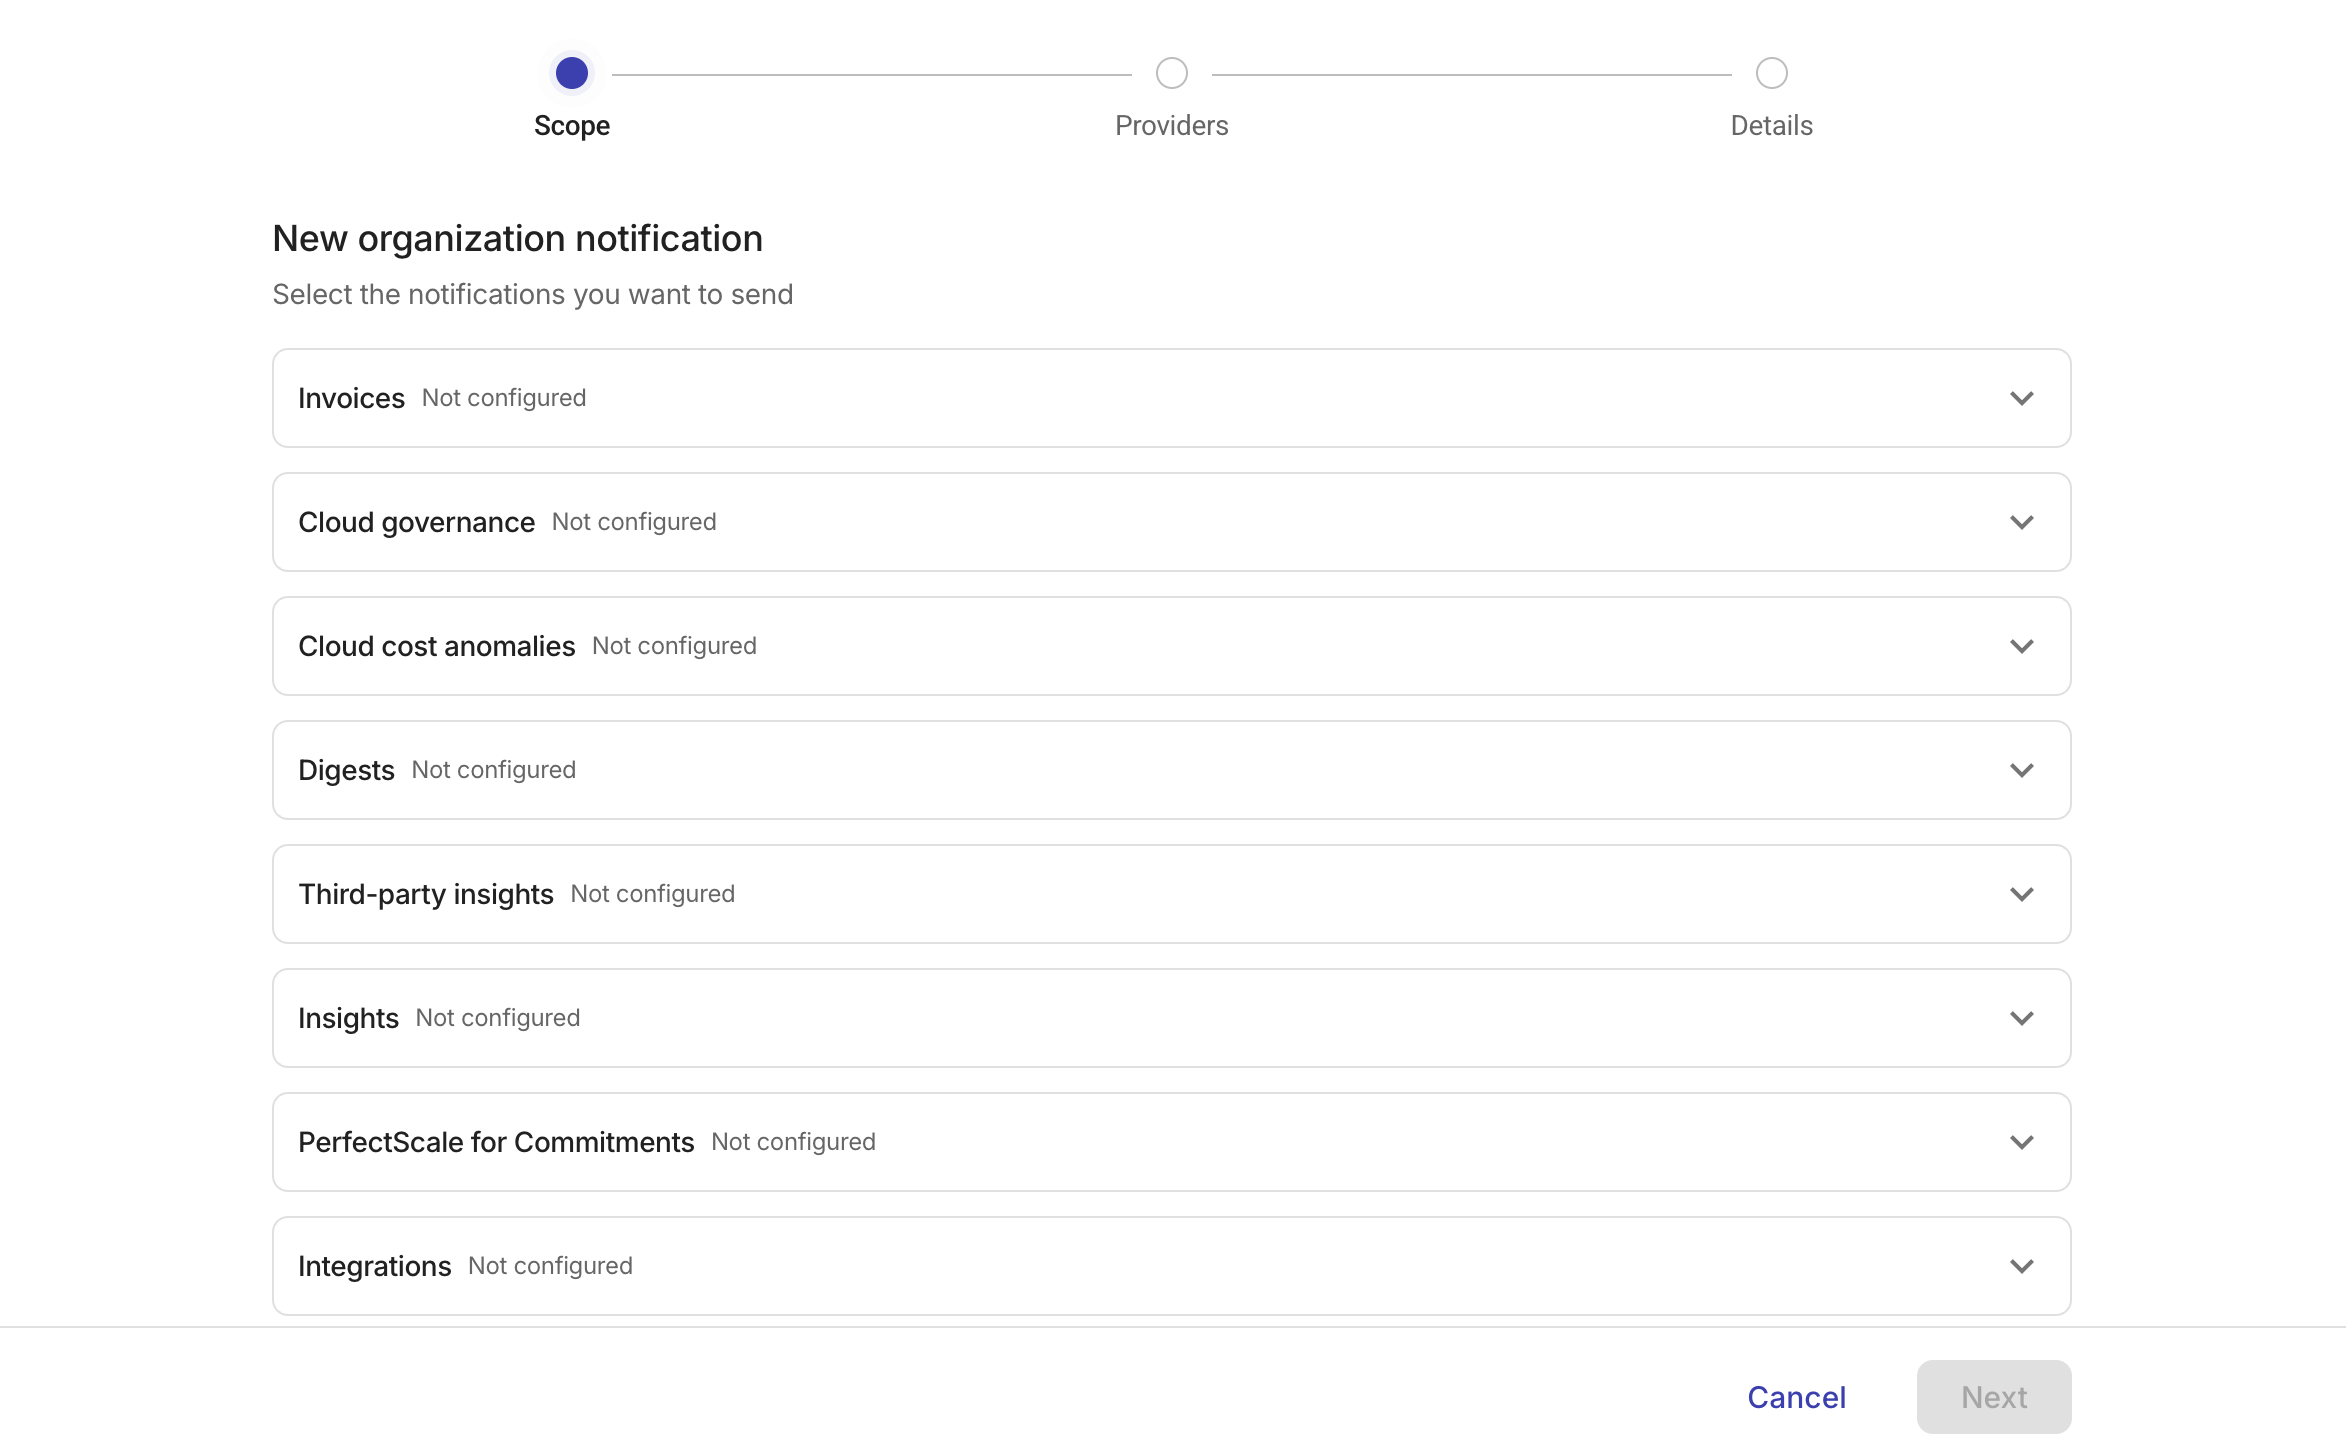
-
Select Organization.
-
Select Create new. There are three steps to create a new notification.
-
Scope: Select the notification types you want to include. Expand each notification group and select or clear the checkboxes for individual types.
-
Providers: Add the channels where you want to receive notifications. You can select channels from multiple providers within the same notification:
-
Slack: Select Connect Slack to connect your Slack workspace, then choose shared, public, or private Slack channels. You can select multiple Slack channels.
-
Microsoft Teams: Select Connect Teams to connect a Microsoft Teams team, then choose channels from the connected team. To add channels from a different team, select Connect new channel. See DoiT app for Microsoft Teams.
-
Email: Enter one or more email addresses. Press Enter to add each address.
NoteSome notification types can only be delivered through specific channels. If your selection in the Scope step does not support a provider, that provider is hidden and an informational message explains which channels are available.
-
-
Details: Enter a name for the notification. Choose a descriptive name to help you identify and manage the notification later.
-
Select Save to create the notification.
Send to private Slack channels
To send notifications to a private channel, you must be a member of that channel.
Run the following command inside the channel to allow it to receive notifications:
/invite @DoiTInternational
If you can't find the private channel after running the command, refresh the page in the console.
Once the DoiT app has been invited to a private Slack channel, anyone in your organization with the Manage settings permission can select that channel as a destination for organization-wide notifications, in the same way as a shared or public channel.
Edit a notification
To edit a notification:
-
On the Notifications page, find the notification of interest, select its name, or select the kebab menu (⋮) at the rightmost end of the notification entry and choose Edit notification.
-
Update the notification. For organization-wide notifications, the same stepper opens with your existing settings. You can change the notification scope, update provider channels, or rename the notification.
-
Save your changes.
Remove a notification
To remove an organization-wide notification:
-
On the Notifications page, select the kebab menu (⋮) at the rightmost end of the notification entry, and select Remove notification.
-
Confirm that you want to remove the notification.