Optimal commitment
With an AWS Savings Plan, you commit to spending a fixed amount per hour (e.g., $10/hr) for 1 or 3 years. In return, the usage covered by that commitment is billed at a discounted rate instead of full on-demand pricing.
The question is: how much should you commit?
-
Commit too little, more of your usage stays on-demand, paying full price.
-
Commit too much, you're locked into paying for hours you never use.
This page explains how Commitment Simulator calculates the optimal commitment, and why it's a ceiling to stay below, not a number to commit to.
Optimal commitment calculation
Commitment Simulator calculates every possible commitment amount to find the one with the lowest cost. It takes a full month of billing data and replays it at each commitment amount, from $0/hr upward in $0.10 steps. For each step, it tries to answer: If I had committed this much, what would I have paid compared to on-demand?
At each commitment amount and for every hour in the month, every dollar of spend lands in one of three buckets:
-
SP Covered. Usage that fell within your commitment budget. Instead of paying full price, this usage is billed at discounted SP rates. Every dollar here is a dollar saved compared to on-demand.
-
SP Uncovered (under-commitment). Usage that ran past your commitment budget for that hour. Once your committed dollars run out, the remaining usage gets no discount and is billed at the full on-demand rate. The less you commit, the more usage ends up in this bucket.
-
SP Wasted (over-commitment). Commitment budget that had no usage to apply to. For example, if your usage only consumed $6 of your $10/hr commitment budget, while the remaining $4 sits idle, AWS still charges you the full $10. The more you over-commit, the more money you lose here with nothing to show for it.
The total cost at any commitment amount is: SP Cost = SP Covered + SP Uncovered + SP Wasted.
Commitment Simulator picks the commitment with the lowest SP Cost, which is the optimal commitment.
To explore this process, check out the interactive simulation below or open it in a new tab.
Illustrated example
The following example walks through the calculation using simplified data. The purpose is to demonstrate how covered, uncovered, and wasted spend emerge, and how the optimal commitment is decided.
Step 1: Usage without a Savings Plan
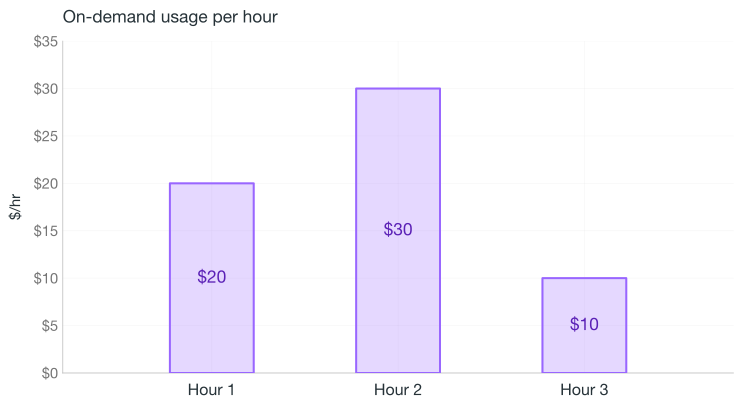
Suppose you have three hours of usage, billed at on-demand rates.
Without any Savings Plan, you'd pay $60 total ($20 + $30 + $10). Every dollar is billed at full price.
Step 2: Apply a $10/hr commitment
Now you buy a Savings Plan for $10/hr with a 50% discount. With the 50% discount, every $1 of on-demand usage costs $0.50 under the Savings Plan. Therefore, your $10/hr budget can cover up to $20/hr of on-demand usage.
The 50% discount is chosen for simplicity. The actual discount rate depends on multiple factors, such as the AWS region, service, instance type, and more. See Compute Savings Plans pricing, Database Savings Plans pricing, and SageMaker Savings Plans pricing for details.
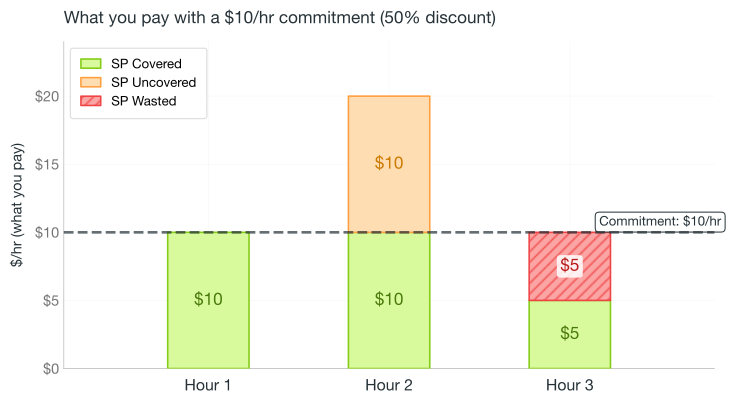
The diagram below illustrates what you actually pay each hour:
-
Hour 1. Usage: $20/hr. Your $10 budget fully covers it (20 × 0.50 = $10). You pay
$10. The commitment is fully utilized with zero waste. -
Hour 2. Usage: $30/hr. Your budget covers the first $20 of usage (consuming $10 commitment). The remaining $10 of usage is beyond the commitment, so you pay the on-demand rate for it. Total:
$20($10 covered + $10 uncovered).Scenario: Under-commitment. You save on the first $20 of usage, while the remaining $10 receives no discount.
-
Hour 3. Usage: $10/hr. Your budget only needs $5 to cover this ($10 × $0.50 = $5). The other $5 of your commitment is not used, but you still pay for it. Total:
$10(full commitment).Scenario: Over-commitment. You purchased more commitment than needed; the unused portion represents waste.
Step 3: Cost breakdown
| Hour (usage) | No Savings Plan (on-demand) | SP Covered | SP Uncovered | SP Wasted | With Savings Plan |
|---|---|---|---|---|---|
| Hour 1 ($20/hr usage) | $20 | $10 | — | — | $10 |
| Hour 2 ($30/hr usage) | $30 | $10 | $10 | — | $20 |
| Hour 3 ($10/hr usage) | $10 | $5 | — | $5 | $10 |
| Total | $60 | $25 | $10 | $5 | $40 |
The Savings Plan saves $20 ($40 with the Savings Plan vs $60 at on-demand rates). $5 was wasted in Hour 3, which is the cost of over-committing. Finding the right commitment amount means balancing the discount you gain against the waste you risk.
Over a full month, every hour falls into one of these three patterns, and the optimal commitment is the $/hr amount where the total comes out lowest.
Compare different commitments
The three-hour example above used a fixed $10/hr. But what if you tried every possible commitment: $0/hr, then $0.10/hr, then $0.20/hr, all the way up? Which would give you the lowest total cost? That's exactly what Commitment Simulator calculates for you.
The chart below shows how the three cost buckets shift as the commitment grows, using a full month of sample data ($10,000/month on-demand):
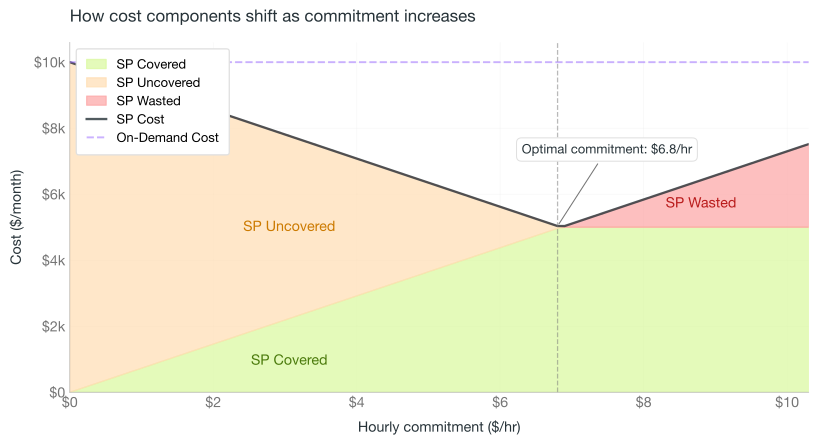
From left to right:
-
Start at $0/hr. No Savings Plan at all. Everything is SP Uncovered (orange). You're paying full on-demand.
-
Increase the commitment. The green area (SP Covered) grows as more usage shifts to discounted rates. The orange area (SP Uncovered) shrinks.
-
At $6.80/hr. All eligible usage is covered. SP Uncovered hits zero. This is the optimal commitment, the point where total cost would have been lowest for the analyzed month.
-
Go past $6.80/hr. There's no more usage to cover, so the extra commitment is wasted (red). Total cost starts climbing again.
This is the pattern Commitment Simulator looks for: the commitment amount where covered spend is maximized and waste hasn't started yet.
Find the optimal point
The stacked area chart above shows all three buckets separately. On the cost curve, the total cost of SP Covered + SP Uncovered + SP Wasted is plotted as a single amount, the SP Cost.
Using the same sample data, the curve bottoms out at $6.80/hr: $5,036/month, a $4,964 saving (~50%) compared to on-demand. That bottom is the optimal commitment, which Commitment Simulator marks with the vertical dashed line on the dashboard.
What's next
So you've found the bottom of the cost curve, the commitment that would have saved the most in the selected month. Should you go buy that amount right now? No. And here's why.
-
It's a retrospective analysis.
The optimal commitment is calculated from past usage, specifically, the month you selected. It shows you what would have been best for that month, not what will be best going forward.
More importantly, Savings Plans cannot be canceled. Once you commit, you're paying that amount per hour for 1 or 3 years, regardless of whether you use it.
-
Most savings come before the optimal point.
AWS Savings Plans don't provide a flat discount; they're applied to the usage with the deepest discount first.
The first dollars of commitment cover instances, regions, and services with the largest savings (typically 40–66% off), while additional dollars gradually cover usage with smaller discounts (typically 17–30%), so each extra dollar saves less than the previous one.
This creates a curve that drops steeply at first, then flattens as you approach the optimal.
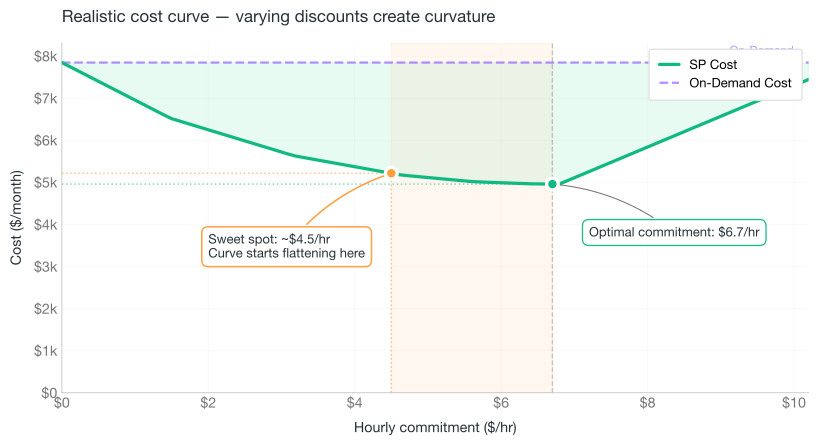
Notice the two markers on the curve:
-
The orange dot is where the curve is visibly flattening. Most of the savings have already been captured, with far less risk. This is the range you should aim for when purchasing a Savings Plan.
-
The green dot is the optimal commitment, the absolute bottom of the curve.
Between those two points is the optimal zone, where a Savings Plan offers the best balance of savings and risk. It's generally better to choose a commitment toward the left of this area, where you're less likely to overcommit and pay for unused hours if your actual usage falls short in the coming months.
The curve's shape matters more than its lowest point. The steep part on the left is where commitment pays off the most. The flat part near the optimal is where you're trading safety for marginal gains.
For details on how AWS decides which usage gets covered first, see Understanding how Savings Plans apply to your AWS usage.
-
Best practices
Think of the optimal commitment as a ceiling, not a target. You don't want to reach it; you want to stay safely below it, somewhere in the steep part of the curve where every committed dollar is still doing real work.
-
Look at the curve, not the number.
Go back to the cost curve and find where the green line (SP Cost) has already dropped most of the way down but is still well to the left of the bottom. That's your sweet spot: most of the savings, almost none of the risk.
-
Hover to explore.
In the Commitment Simulator dashboard, you can check the exact cost at any commitment level. The tooltip shows the optimal zone. Choose a commitment that falls within that range.
-
Start with your baseline.
Think about the minimum usage your organization will have, the workloads that never go away. Commit to that level first. If you're not sure about the baseline, commit less. You can always add more later.
-
Compare several months.
Don't base your decision on a single data point. Use the month selector in Commitment Simulator to see how the optimal commitment moved over time. Has the optimal commitment stayed steady month over month, or has it swung dramatically? A stable trend means you can commit with more confidence. A volatile one means your baseline is still shifting. Stay conservative and commit less than you think you need.
-
Revisit monthly.
Your usage will evolve, and so should your commitment strategy. Each month, check whether your current commitment still makes sense. If your usage has grown consistently, you can purchase an additional Savings Plan to cover the gap. Keep in mind that you cannot reduce or cancel a commitment once made. It's safer to add in small increments rather than committing to a larger amount upfront.
-
Factor in the term.
A 3-Year No Upfront plan gives the deepest discount without tying up cash. But the longer the term, the more conservative you should be. Your usage has more time to change, and you're locked in for every hour of it.
You can always add more commitment later. When in doubt, commit less. You cannot reduce or cancel a commitment once made.