Configure SSO with Microsoft Entra ID
Follow the step-by-step instructions below or check out the ▶️ interactive demo for a visual walkthrough.
Required permissions
-
You must have the Users Manager permission for the DoiT console.
-
You must have one of the following roles in Microsoft Entra ID(formerly Azure Active Directory): Global Administrator, Cloud Application Administrator, Application Administrator, or owner of the service principal.
SAML setup
The following section describes how to use SAML to configure SSO with Microsoft Entra (Azure).
Step 1: Enable SSO in the DoiT console
Enable SSO in the DoiT console:
-
In the DoiT console, select the gear icon () from the top navigation bar, and then select Users and access.
-
Select Single sign-on from the left-hand menu.
-
Use the Enable SSO toggle button to enable SSO.
-
Select SAML sand then select Configure.
-
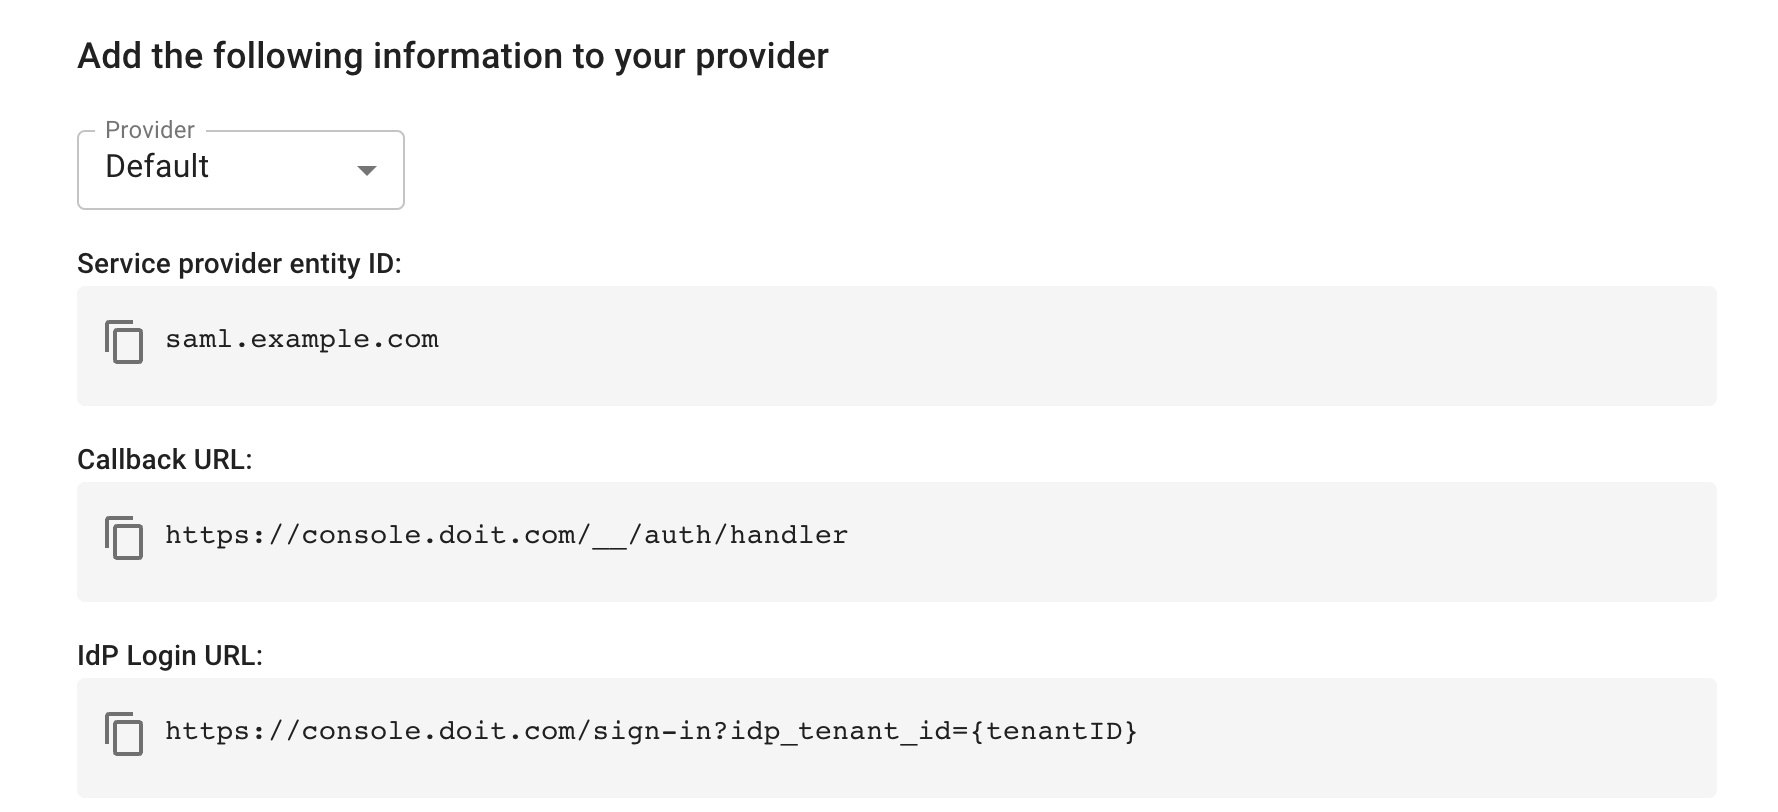
In Add the following information to your provider, select Default from the Provider list.
-
The information required by Azure is displayed. Copy the information as you will need to add this to the enterprise application you create in Azure. This is the information that tells Azure where to send users and who its talking to.
-
Callback URL: The address or endpoint of the DoiT console.
-
Service provider entity ID: The unique ID of the DoiT console.
-
IdP Login URL: This link allows users to bypass the standard login screen and authenticate directly through your organization's Azure portal.
-
Step 2: Create a SAML application
Note that steps below might vary slightly based on the portal you start from.
To create a SAML application in Microsoft Entra ID:
-
Sign in to the Microsoft Entra admin center.
-
Select Enterprise application. This will open the All applications pane with the list of applications in your Microsoft Entra tenant.
-
Select New application, and then select Create your own application.
-
Enter a name for the new application, select Integrate any other application you don't find in the gallery (Non-gallery), and then select Create.
-
In the Getting Started section, select 2. Set up single sign on, and then choose
SAMLas the single sign-on method. -
On the Set up Single Sign-On with SAML pane, select Edit in Basic SAML Configuration.
-
Paste the information that you copied from step 1 as follows:
-
Identifier (Entity ID): The Service provider entity ID provided in the DoiT console.
-
Reply URL (Assertion Consumer Service URL): The Callback URL provided in the DoiT console.
-
Sign on URL: The IdP Login URL provided in the DoiT console.
-
-
On the SAML Certificates pane, select Download next to Certificate (Base64).
-
On the Set up {appName} pane, copy the following information. You will need this information when you configure SSO in the DoiT console. This is the identity information provided by Microsoft Entra ID (Azure).
-
Login URL: The digital location of your Microsoft login page.
-
Microsoft Entra Identifier: The global ID of your specific Azure/Entra directory.
-
-
Save the configuration.
Step 3: Assign application to users
To access the application, you must assign groups or individual users to the application. We recommend adding users to your Groups before assigning them to the application. However, you can manage group membership while assigning users.
-
In the Microsoft Entra admin center, create your users and groups.
-
Assign your users to your groups.
-
Grant groups and users access to your custom application:
-
In Enterprise Applications, select your custom application.
-
From the Manage section in the left-hand menu, select Users and groups.
-
Select Add user/group.
-
Select None Selected to open the selection pane.
-
Select users and groups and assign them to the application.
-
-
(Applies to groups only) Configure Azure to include group claims in the SAML assertion during login.
-
In Enterprise Applications, select your custom application.
-
Select Single sign-on.
-
Edit the Attributes & Claims section.
-
Select Add a group claim and select which groups that should be sent, usually Security groups or Groups assigned to the application.
-
From the Source attribute list, select Group ID.
-
Select Save.
-
Step 4: Configure SAML in the DoiT console
This step uses the application settings generated by Microsoft Entra ID in the previous step to configure SAML in the DoiT console.
-
Sign in to the DoiT console, select the gear icon () from the top navigation bar, and then select Users and access.
-
Select Single sign-on from the left-hand menu.
-
(Optional) In Group ID Mapping, assign your SSO Group IDs to specific DoiT roles and organizations in the DoiT console. In Group ID attribute key, enter the name of the SAML claim that contains the group IDs in the assertion. This is the claim name Microsoft Entra ID sends for the group claim you configured in Attributes & Claims.
-
In Group ID, enter the group ID of a specific group that you want to map to a DoiT role and organization.
-
In DoiT Role, select the DoiT role to which you want to map this group.
-
In Organization, select the organization to which you want to map this group.
-
Select + Add mapping to map another group.
-
Repeat these steps for each group you want to map.
NoteWhen a user's group memberships match multiple groups, the mapping rule that appears first in the list is applied. Subsequent mapping rules are ignored.
-
-
Select Edit configuration in SAML.
-
Paste the information that you copied in step 2 to the corresponding fields in the DoiT console.
-
Entity ID: The Microsoft Entra ID Identifier provided in the Set up {appName} section in the Microsoft Entra admin center.
-
SSO URL: The Login URL provided in the Set up {appName} section in the Microsoft Entra admin center.
-
Certificate: The SAML certificate in Base64 format that you downloaded in the SAML Certificates section in the Microsoft Entra admin center.
-
-
Save the configurations. SAML will be automatically enabled when you press Confirm.
Step 5: Verify the SSO configuration
To verify the SSO configuration:
-
Navigate to the DoiT console sign-in page.
-
Select Sign in with SSO. You'll be redirected to the Microsoft Entra ID website.
-
Authenticate with your credentials as an end user.
If successful, you'll land on the DoiT console Home page.
▶️ Interactive demo
Try out our interactive demo for a hands-on walk-through experience.
If the demo doesn't display properly, try expanding your browser window or opening the demo in a new tab.