Connect Databricks
This page describes how to connect and manage your Databricks account from the DoiT console. Once connected, you can use your Databricks usage and cost data within the DoiT console. See Working with Databricks data.
Read the content below or check out the ▶️ interactive demo for a visual walkthrough.
Before you begin
To integrate Databricks with DoiT:
-
You must be a Databricks Account Admin and a metastore admin.
-
Your Databricks warehouses must be enabled for Unity catalog.
-
A SQL warehouse is required for this integration even if you don't use Databricks SQL for your own workloads. DoiT uses it as a compute endpoint to query system tables multiple times daily.
-
If you already have a warehouse available (including the auto-created Serverless Starter Warehouse), you can use it.
-
If you don't have one, create a small dedicated classic SQL warehouse for better workload separation and more predictable costs. We recommend the following settings:
- Type: Classic
- Cluster size: 2X-small
- Auto stop: 5 minutes
-
Required permissions
To connect your Databricks account with DoiT, your DoiT account must have the Billing Profiles Admin permission.
Connect your Databricks account
You can connect one or more Databricks accounts. To do this, repeat the connection steps for each account you want to connect.
To help you connect your Databricks accounts, the DoiT console provides a step-by-step wizard, which you can launch in multiple ways:
-
Navigate to the Home page, scroll down to the Connect your cloud section, and then choose Connect your Databricks account.
-
Navigate to the Integrations catalog. Find the Databricks integration card, select Connect + if you're adding the first account; or select Manage and then select Connect new account.
-
Navigate to the Databricks Intelligence dashboard and then select Connect your Databricks.
The wizard contains three steps:

Configure your account
When integrating with Databricks, you must provide the details of your Databricks account.
-
Sign in to the Databricks Workspace UI as an Account Admin.
-
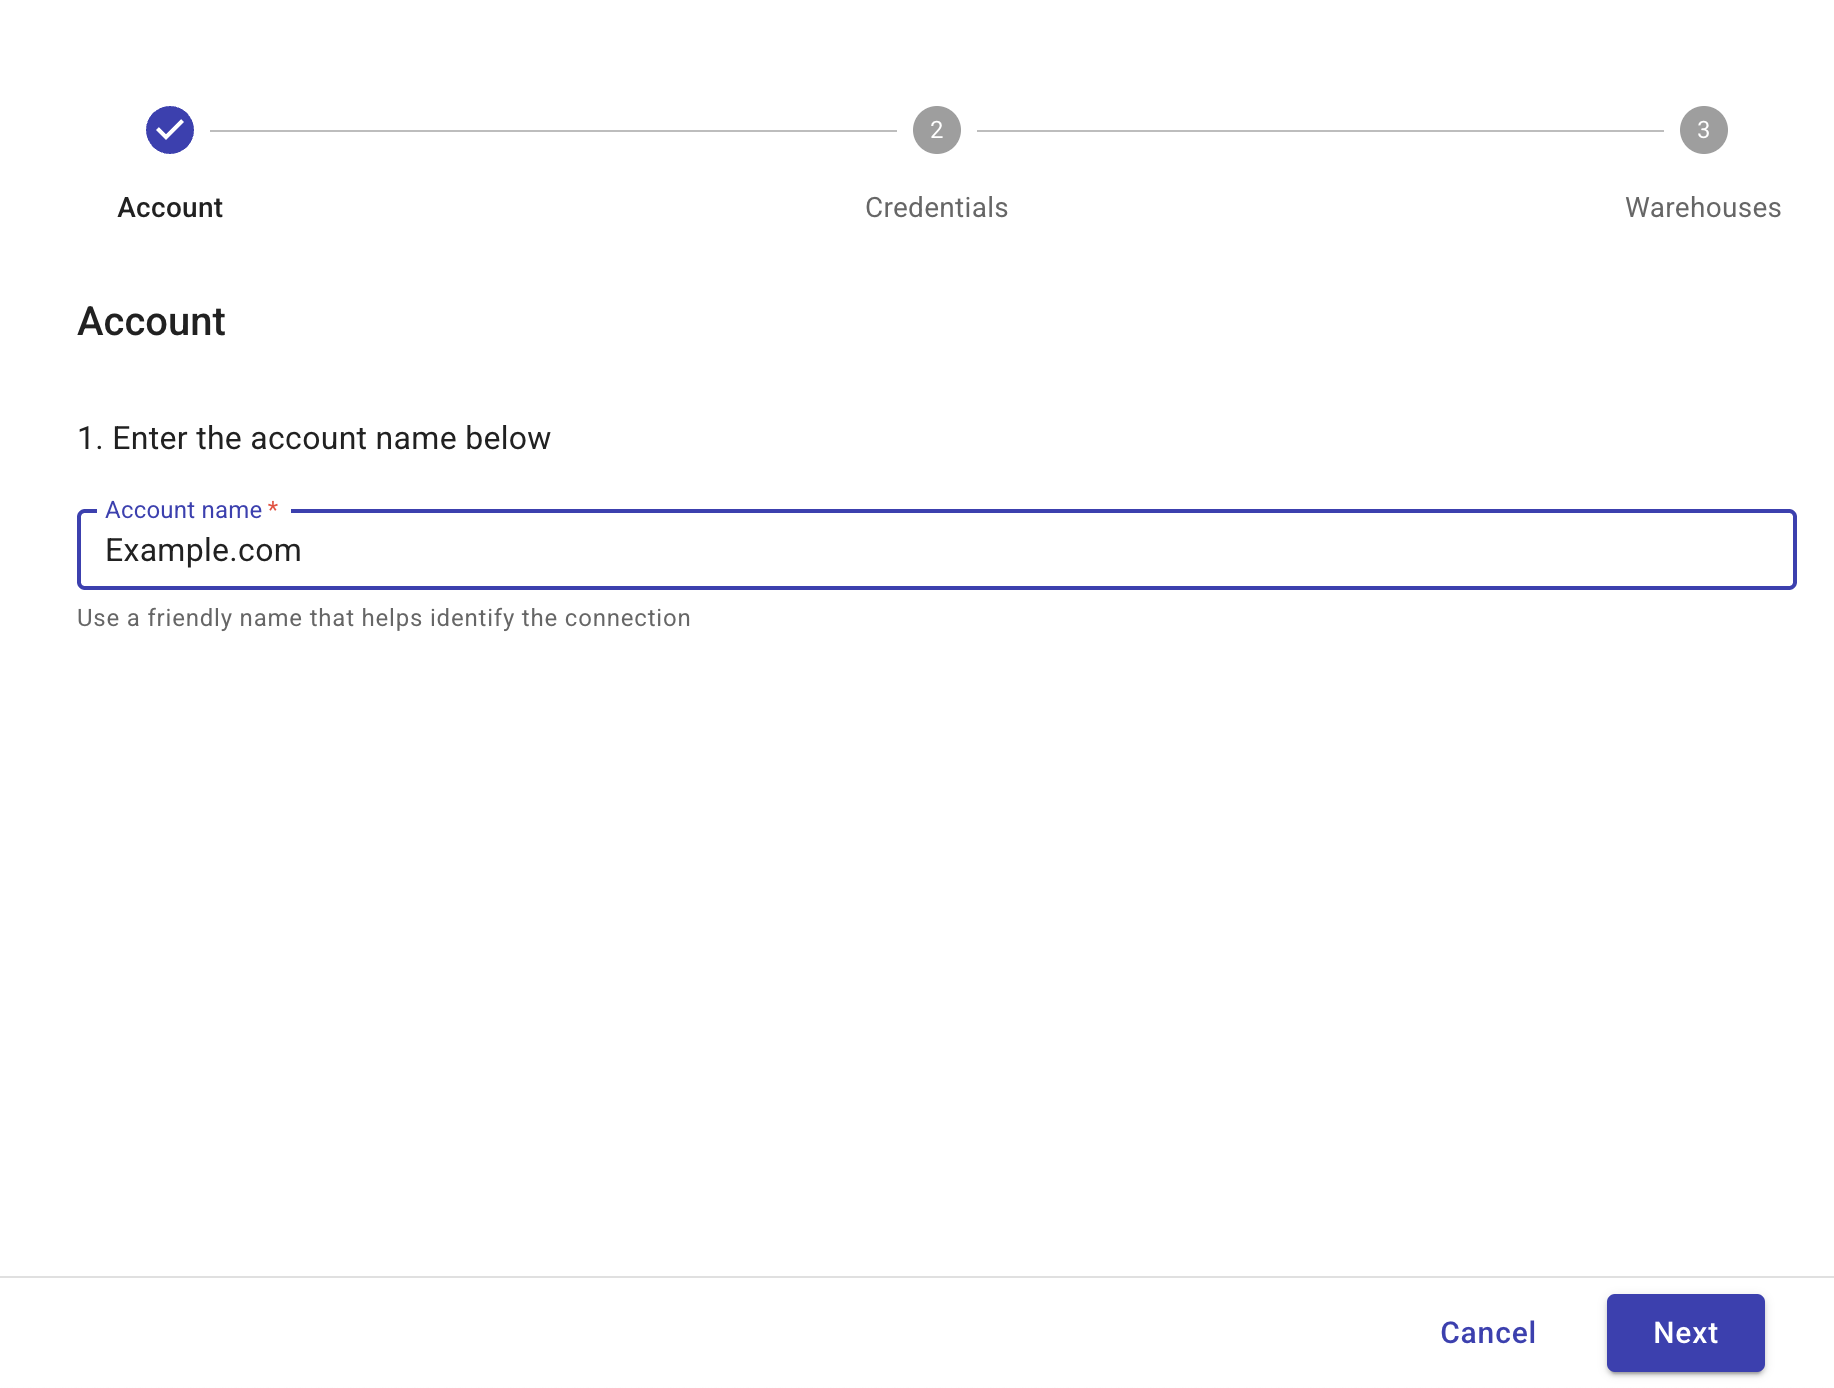
Navigate to Account Settings and copy your Databricks account name.
-
Go to the DoiT console and, in Account name, enter your Databricks account name.
-
Select Next to configure your credentials.
Configure your credentials
To enable DoiT to programmatically access Databricks, you must create one Databricks service principal per Databricks account and generate a secret. There are four parts to configuring your credentials.
-
Create a Databricks service principal and generate a secret.
-
Grant the service principal access to the Databricks warehouse you want to integrate with DoiT.
-
Enable the Databricks SQL access entitlement for the service principal.
-
Provide the service principal secret to the DoiT wizard.
Create a service principal
To enable DoiT access to your Databricks environment, create a dedicated Databricks service principal and generate a secret.
-
Sign in to the Databricks Workspace UI.
-
Select User Management.
-
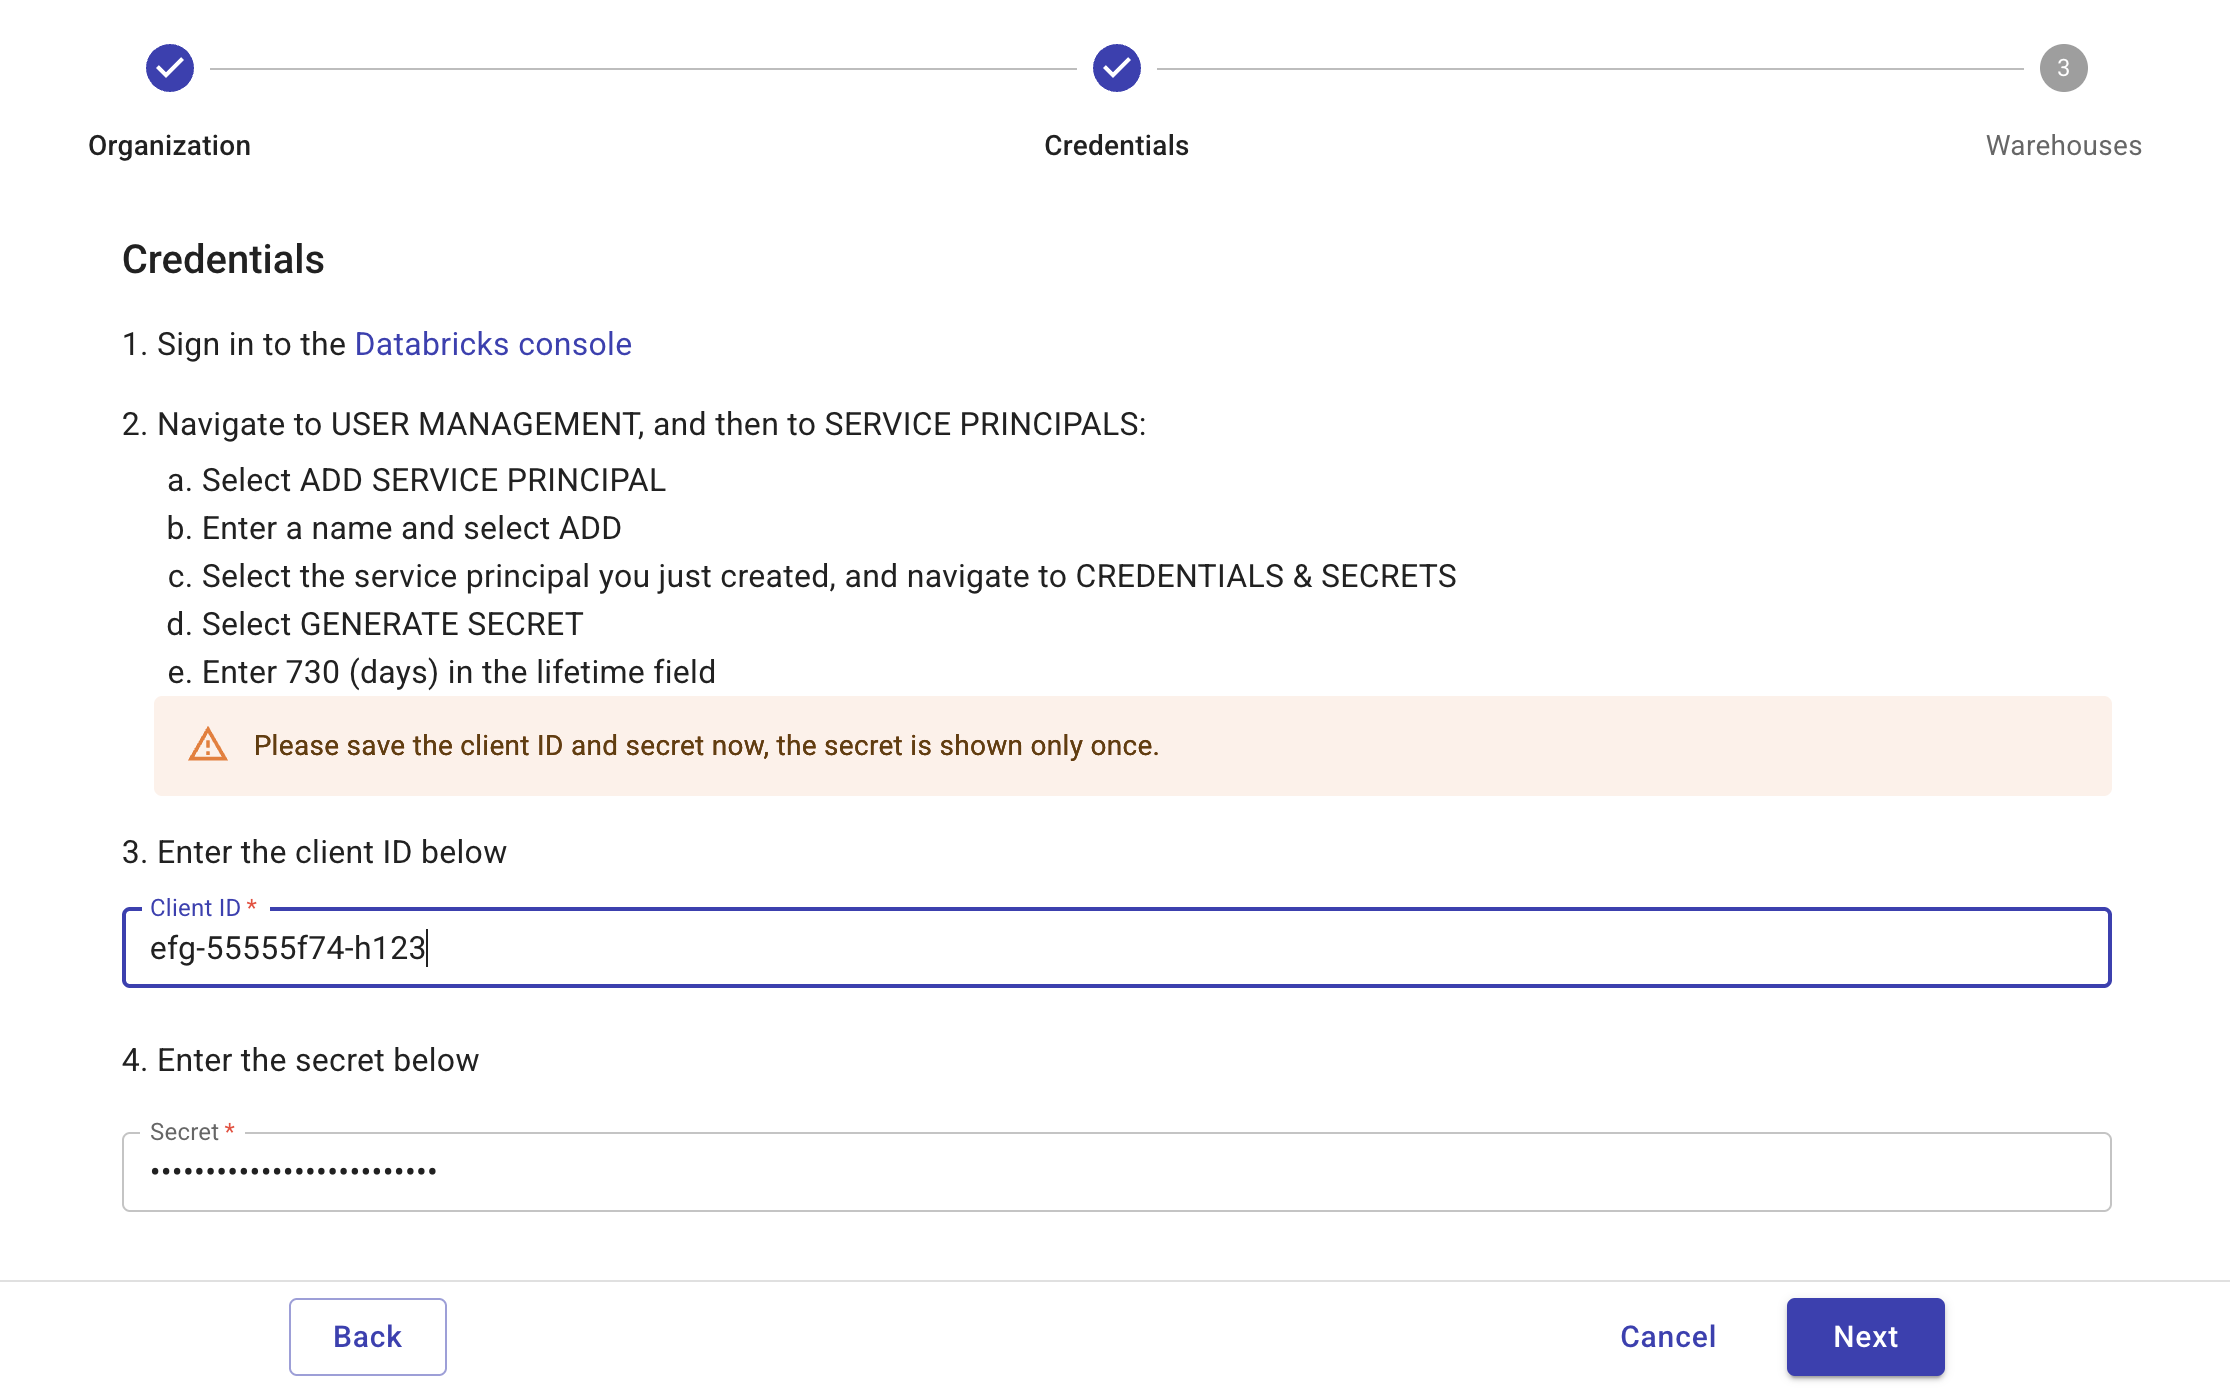
Select the Service principals tab and select Add service principal.
-
Enter a name for your service principal and select Add. The service principal is created.
-
Select the Credentials & secrets tab and select Generate secret. The Generate OAuth secret pane is displayed.
-
In Lifetime (days), enter 730 and select Generate.
NoteWe recommend setting the service principal's secret lifetime to 730 days to ensure the longest possible continuous connection between DoiT and Databricks. However, you can set this duration to align with your organization's security policies. Once your Databricks account is connected, you can refresh your Databricks service principal secret using the DoiT wizard.
-
Copy both the secret and the Client ID.
CautionThe secret is only visible once. Please ensure you copy the secret before closing the browser window.
-
Select Done to close the Generate OAuth secret pane.
Grant service principal warehouse access
You must give the service principal you created above access to the Databricks warehouse that you want to integrate with DoiT.
-
In the Databricks Workspace UI, select Workspaces.
-
Locate the workspace you want to connect to DoiT and select Update from the kebab menu (⋮) at the rightmost end of the workspace entry.
NoteThe workspace must have billing and compute schemas enabled.
-
Select the Permissions tab and select Add permissions. The Add permissions pane is displayed.
-
In User, group, or service principal, search for the service principal you created above and select it.
-
In Permission, make sure User is selected and select Save.
-
Select the Configuration tab and then select Open workspace.
-
Select SQL editor.
-
Copy the following and paste it into the New query tab.
GRANT USE CATALOG ON CATALOG system TO `<client_id>`;

GRANT USE SCHEMA ON SCHEMA system.access TO `<client_id>`;
GRANT SELECT ON TABLE system.access.workspaces_latest TO `<client_id>`;

GRANT USE SCHEMA ON SCHEMA system.billing TO `<client_id>`;
GRANT SELECT ON TABLE system.billing.usage TO `<client_id>`;
GRANT SELECT ON TABLE system.billing.list_prices TO `<client_id>`;

GRANT USE SCHEMA ON SCHEMA system.compute TO `<client_id>`;
GRANT SELECT ON TABLE system.compute.clusters TO `<client_id>`;
GRANT SELECT ON TABLE system.compute.node_timeline TO `<client_id>`;
GRANT SELECT ON TABLE system.compute.warehouses TO `<client_id>`;
Replace
client_idwith the ID of the service principal you created above. -
Run the statement.
-
Repeat these steps for each warehouse you want to integrate with DoiT.
Service principal Databricks SQL access
You must enable the Databricks SQL access entitlement for the service principal you created above.
-
In the Databricks Workspace UI, select your username in the top bar of the Databricks workspace and select Settings.
-
Select the Identity and access tab.
-
From Service principals, select Manage.
-
Select your service principal to open its details page.
-
Select the Configurations tab. Select the Databricks SQL access entitlement.
-
Select Update. Go back to the DoiT console to add your service principal client ID and secret to the DoiT wizard.
Provide the service principal secret
Once you have created the Databricks service principal and generated the secret, you must add it to the DoiT wizard.
-
Go to the DoiT console and paste the client ID and secret of the service principal you created above.
-
Select Next to add your warehouses.
Add your warehouses
A Databricks warehouse is a SQL warehouse where you can run SQL queries on data stored in your Databricks workspace. To integrate Databricks, you must add at least one warehouse belonging to your Databricks account.
You can connect warehouses from multiple workspaces, but this is only necessary if your workspaces are spread across multiple AWS regions. In that case, connecting a warehouse in each region provides more comprehensive cluster utilization reporting. Databricks billing data is account-level and covers all workspaces, so a single warehouse is sufficient for full billing coverage regardless of how many workspaces you have.
Once your Databricks account is connected, you can add new warehouses from the Databricks integration card in the Integrations catalog.
-
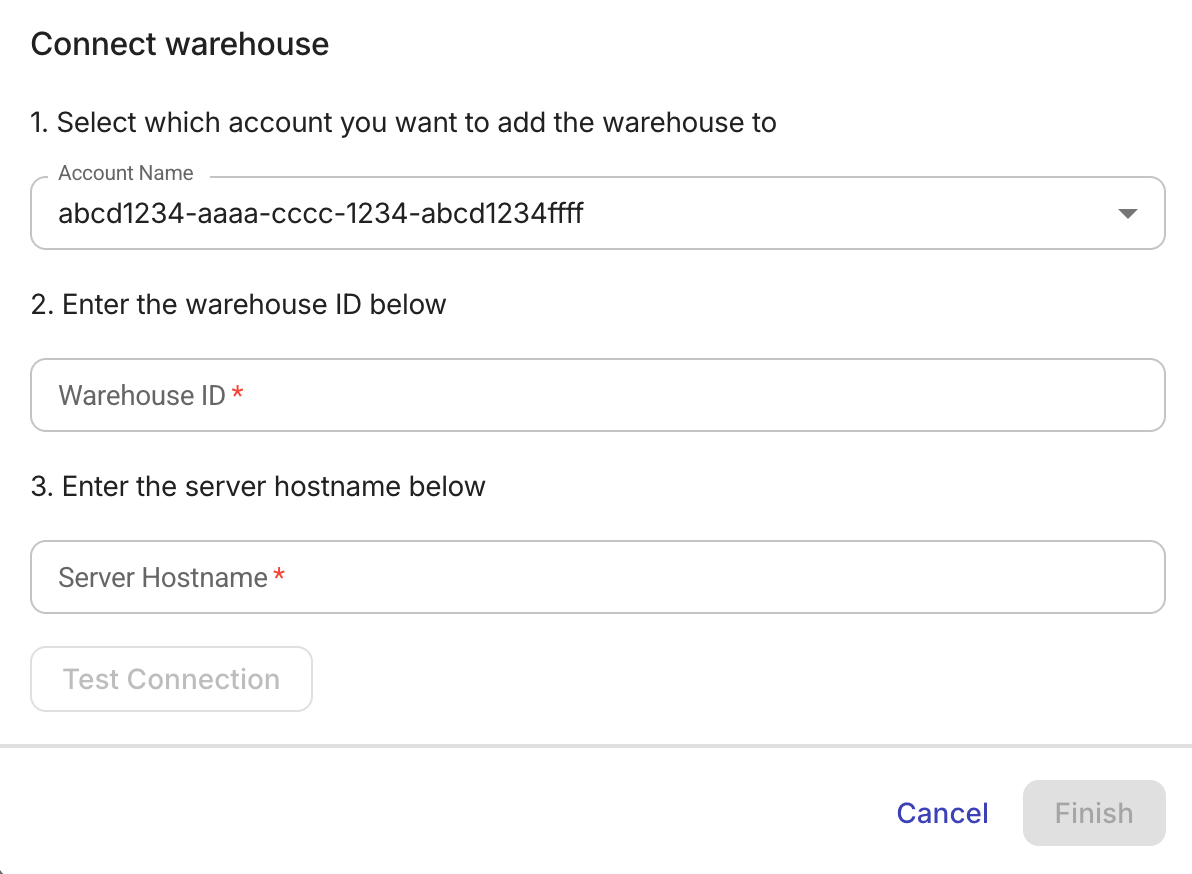
Select Connect warehouse.
-
Select the account name to which you want to add the warehouse.
-
Enter the warehouse ID.
To find your warehouse ID, sign into Databricks Workspace UI, navigate to SQL warehouses, and select the name of the specific warehouse to open its details page.
-
Enter the server hostname of the Databricks workspace that the warehouse belongs to.
To find your server hostname, sign into Databricks Workspace UI, navigate to SQL warehouses, and select the name of the specific warehouse to open its details page. Select the Connection details tab. From Server hostname, copy the server hostname.
-
Select Test connection. Once the test is successful, select Add.
-
Repeat these steps for each warehouse you want to add.
-
Once you have added all your warehouses, select Finish.
Upon initial connection, DoiT ingests the last 6 months of historical billing and usage data for each added warehouse.
After you successfully connected your Databricks accounts, we start importing your Databricks billing and usage data. The process can take a few hours. You'll receive an email when the data for each warehouse is available for Cloud Analytics and other DoiT features.
Manage Databricks
This page explains how to manage your Databricks account in the DoiT console, including adding warehouses and deleting your Databricks account from the DoiT platform.
Connect new Databricks warehouses
You can connect new Databricks warehouses for your Databricks accounts integrated with DoiT.
-
Sign in to the DoiT console, select Data ingestion and integrations > Integrations from the top navigation mega menu.
-
On the Databricks integration card, select Manage.
-
Select Connect warehouse.
-
In Account name, select the Databricks account for which you want to connect a new warehouse.
-
In Warehouse ID, enter a warehouse ID.
To find your warehouse ID, sign into Databricks Workspace UI, navigate to SQL warehouses, and select the name of the specific warehouse to open its details page.
-
In Server Hostname, enter the server hostname of the Databricks workspace that the warehouse belongs to.
To find your server hostname, sign into Databricks Workspace UI, navigate to SQL warehouses, and select the name of the specific warehouse to open its details page. Select the Connection details tab. From Server hostname, copy the server hostname.
-
Select Test connection. Once the test is successful, select Add.
-
Once you have added all your warehouses, select Finish. After you successfully connected your Databricks warehouses, we start importing your Databricks billing and usage data. The process can take a few hours. You'll receive an email when the data for the warehouse is available for Cloud Analytics and other DoiT features.
Deleting your Databricks account
You can delete your Databricks cost and usage data from the DoiT console by deleting your Databricks warehouses.
-
Sign in to the DoiT console, select Data ingestion and integrations > Integrations from the top navigation mega menu.
-
On the Databricks integration card, select Manage.
-
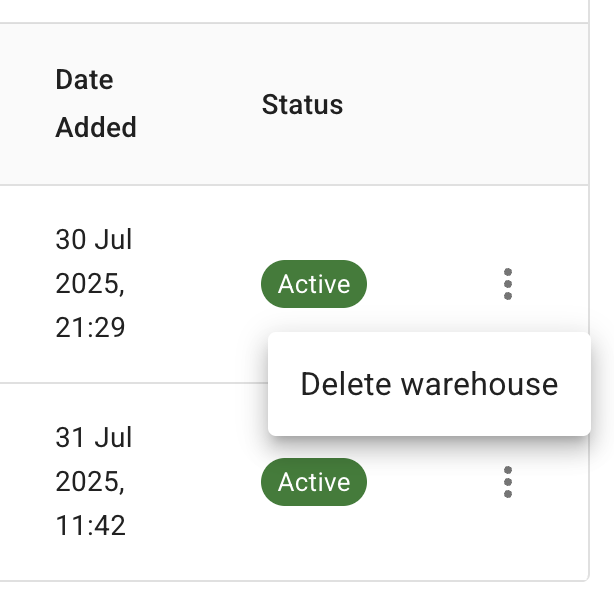
Select the Databricks account whose data you want to delete.
-
Select the kebab menu (⋮) at the rightmost end of the Databricks account and select Delete warehouse.
-
Select Delete to delete the Databricks account from DoiT.
▶️ Interactive demo
Try out our interactive demo for a hands-on walk-through experience.
If the demo doesn't display properly, try expanding your browser window or opening the demo in a new tab.