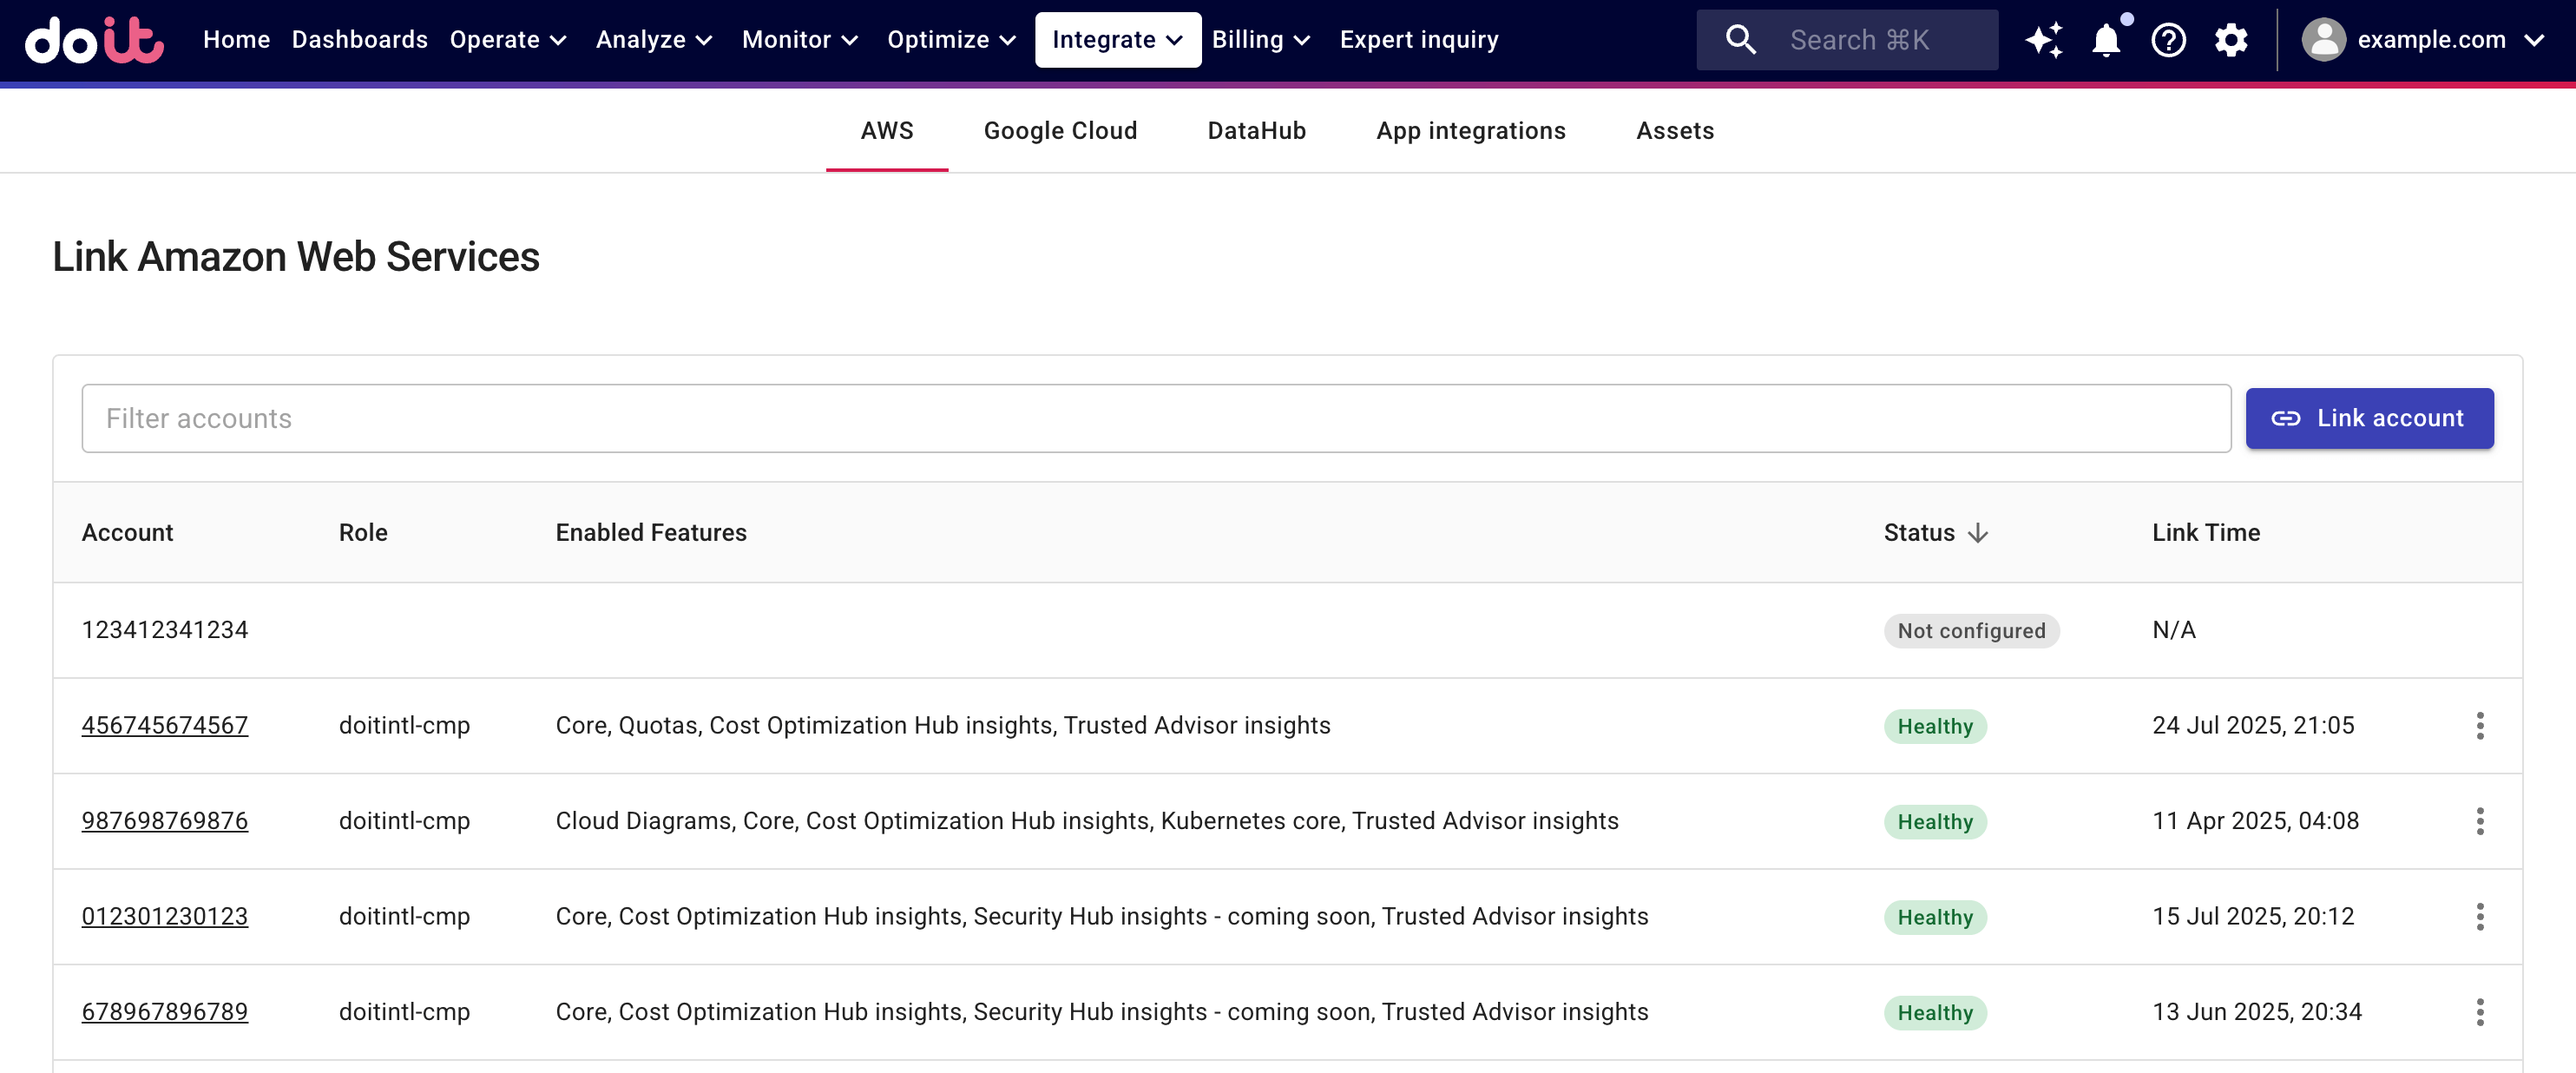
Link your AWS account
Link your AWS account to unlock advanced functionalities such as proactive resource quota monitoring, PerfectScale for Spot, real-time anomaly detection, Cloud Diagrams, Kubernetes Intelligence, various AWS insights, and more.
Required permission
- Manage Settings
Link an account
To link an AWS account to DoiT:
-
Sign in to the DoiT console, select Integrate from the top navigation bar, and then select Amazon Web Services.
-
On the Link Amazon Web Services page, select Link New account.
Proceed to create a cross-account AWS IAM Role with the required policies. You can choose to Create a role automatically or Create a role manually.
AWS Identity and Access Management (IAM) sets a default quota of 10 managed policies per role. If you need to increase the limit to enable multiple features on an account, you must submit a quota increase request with AWS. See IAM object quotas for more information.
Create a role automatically
-
Select Create a role automatically.
-
Select features to enable on your AWS account. You can expand a feature to review its required AWS policies.
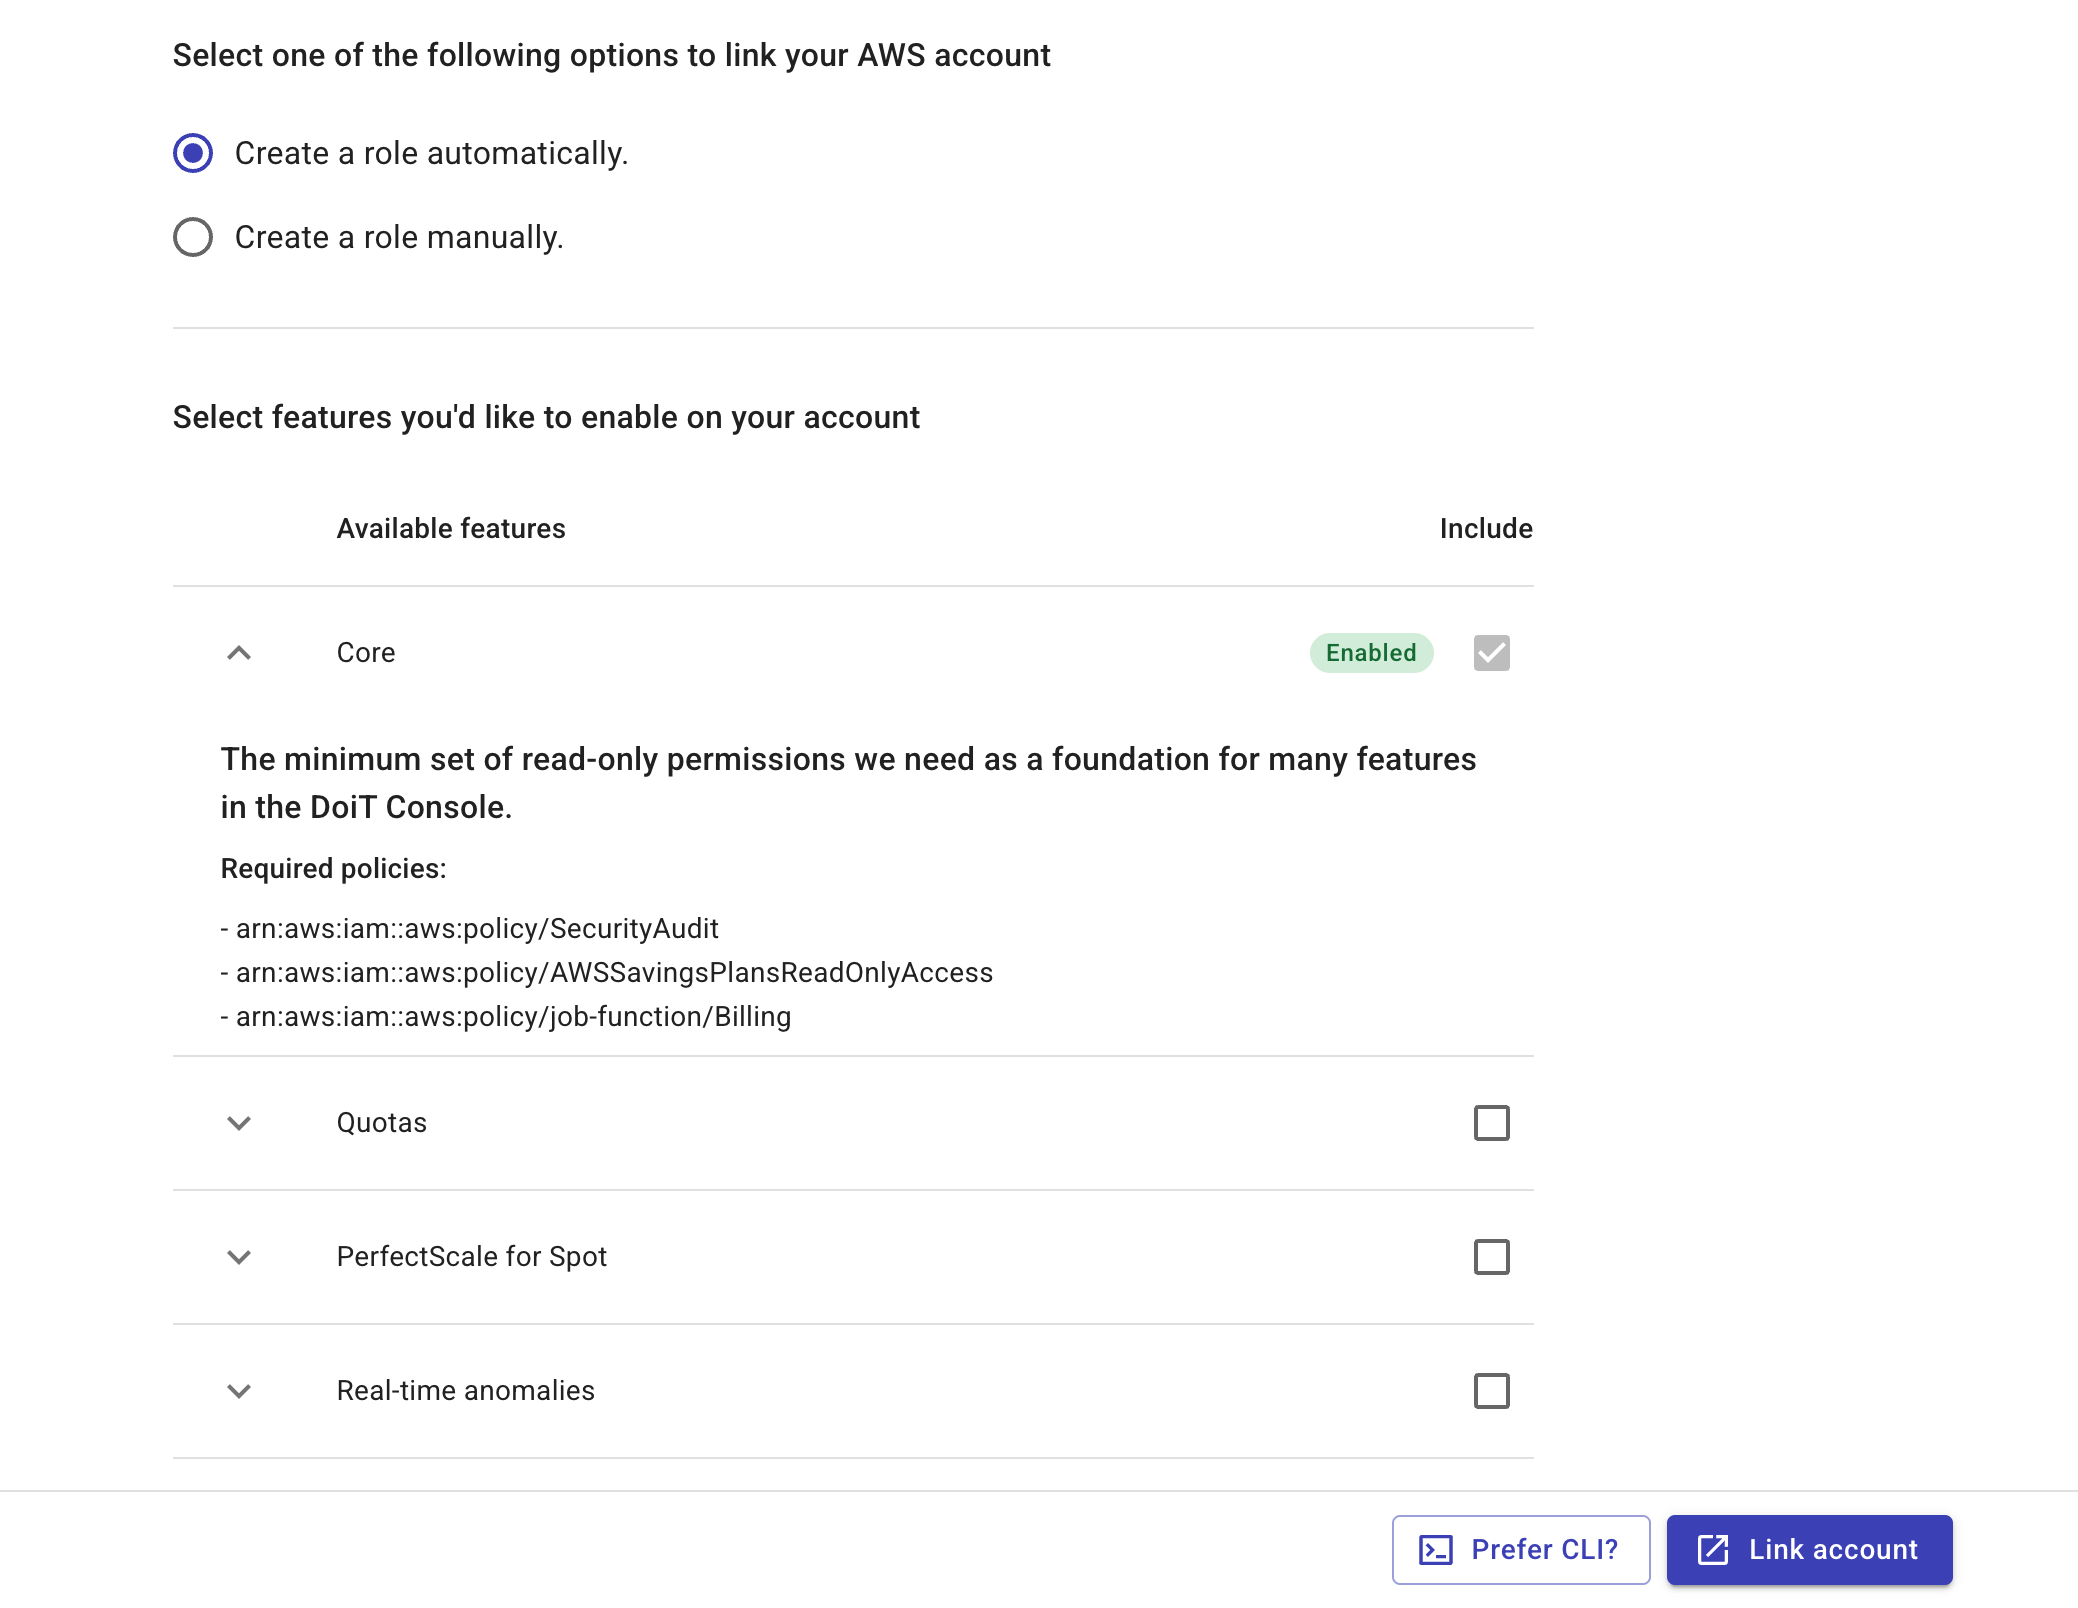 Note
NoteIf you select the Real-time anomalies feature, you'll be asked to provide an S3 bucket that contains CloudTrail event files. See Enable real-time anomaly on AWS accounts for more information.
-
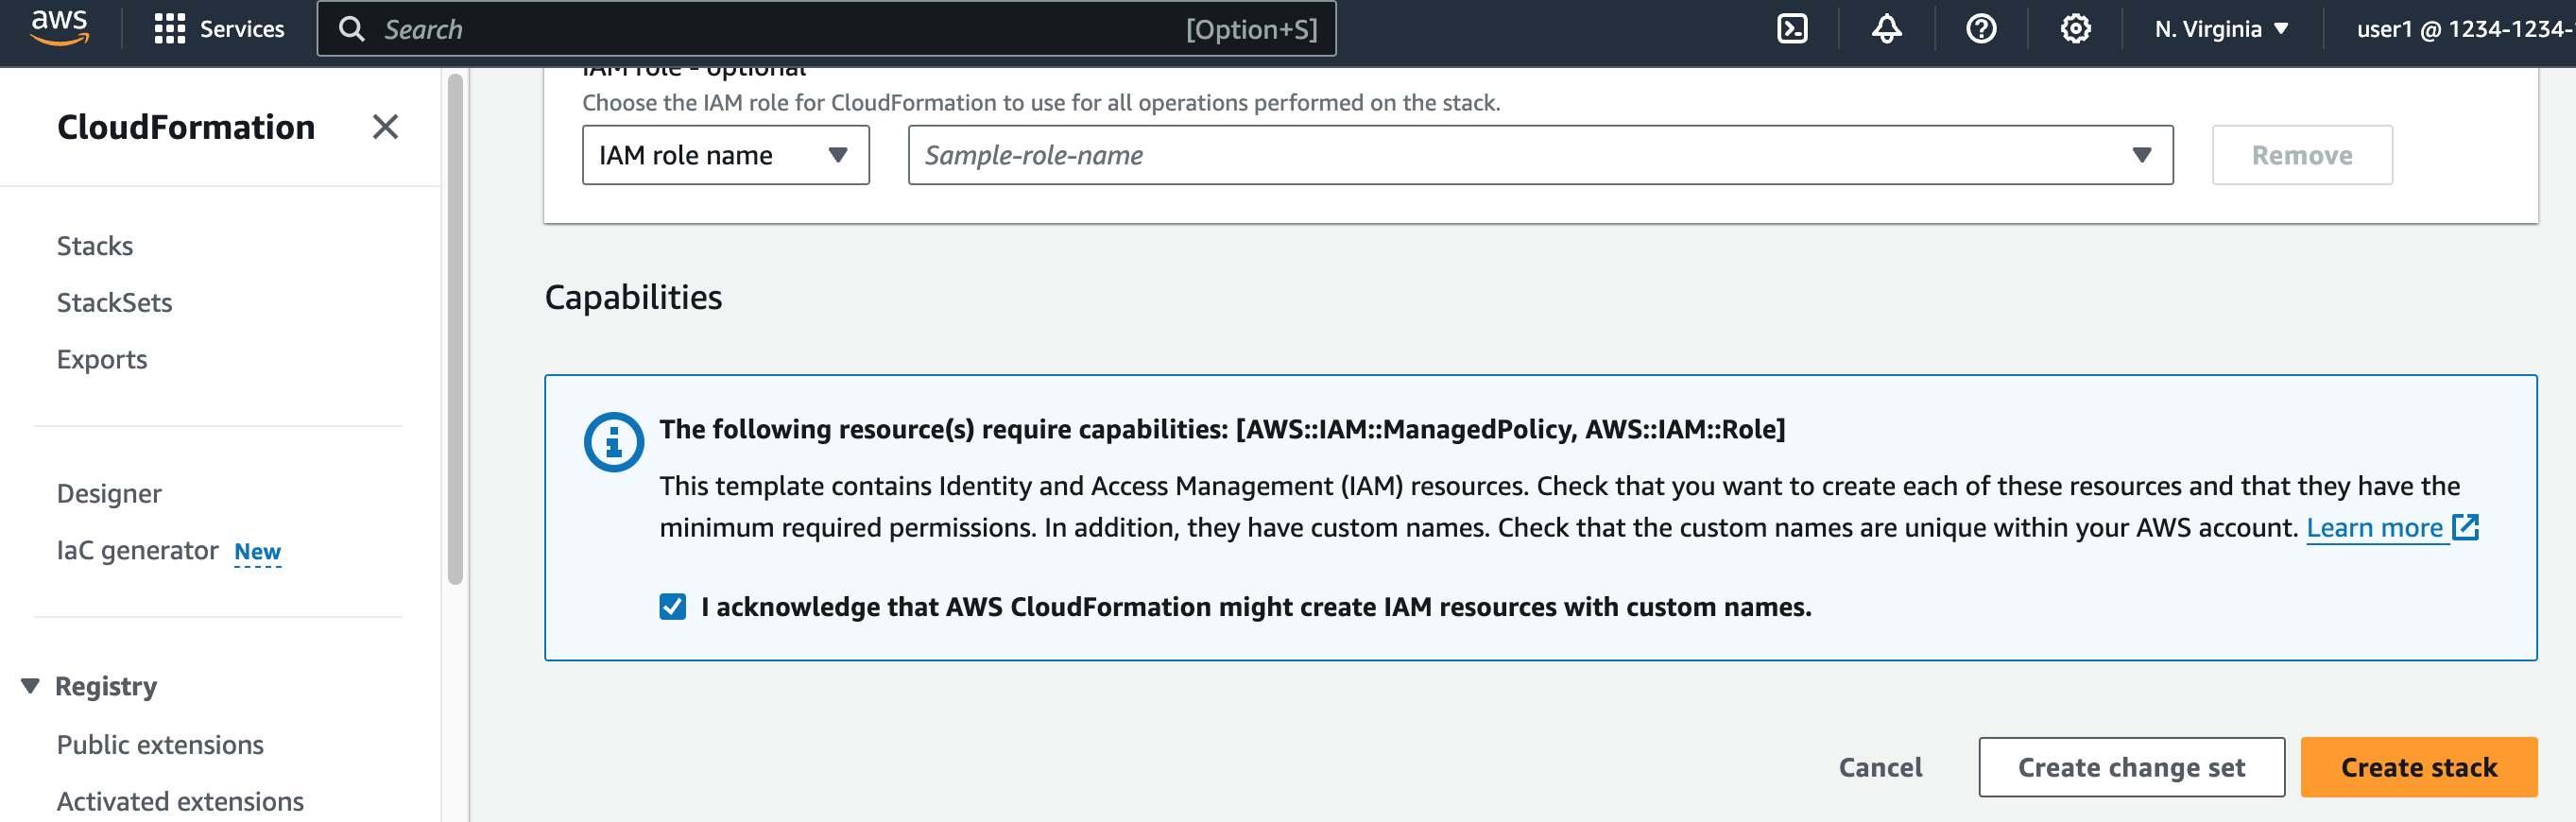
Create a CloudFormation stack for the IAM role, using AWS CloudFormation console or AWS CloudShell.
- AWS CloudFormation console
- AWS CloudShell
-
Select Link New account to launch the DoiT stack template in the AWS CloudFormation console.
-
Make sure that you are in the
US East (N. Virginia) us-east-1region.
-
Select the checkbox at the bottom of the page to acknowledge that AWS CloudFormation might create IAM resources with custom names.
-
Create the stack. (See also cross-account AWS IAM Role.)
-
Select Prefer CLI.
-
Copy the command from the pop-up window.
CautionIf you edit the CLI command before execution, you must keep the region to
us-east-1. -
Run the command in AWS CloudShell to create the specified CloudFormation stack.
After creating the stack, it can take up to 30 seconds for the account to link to the DoiT Platform. If successful, your linked AWS account will show a Healthy status.
Create a role manually
-
Select Create a role manually.
-
Note down the values of
Our AWS AccountandYour External IDdisplayed in the DoiT console.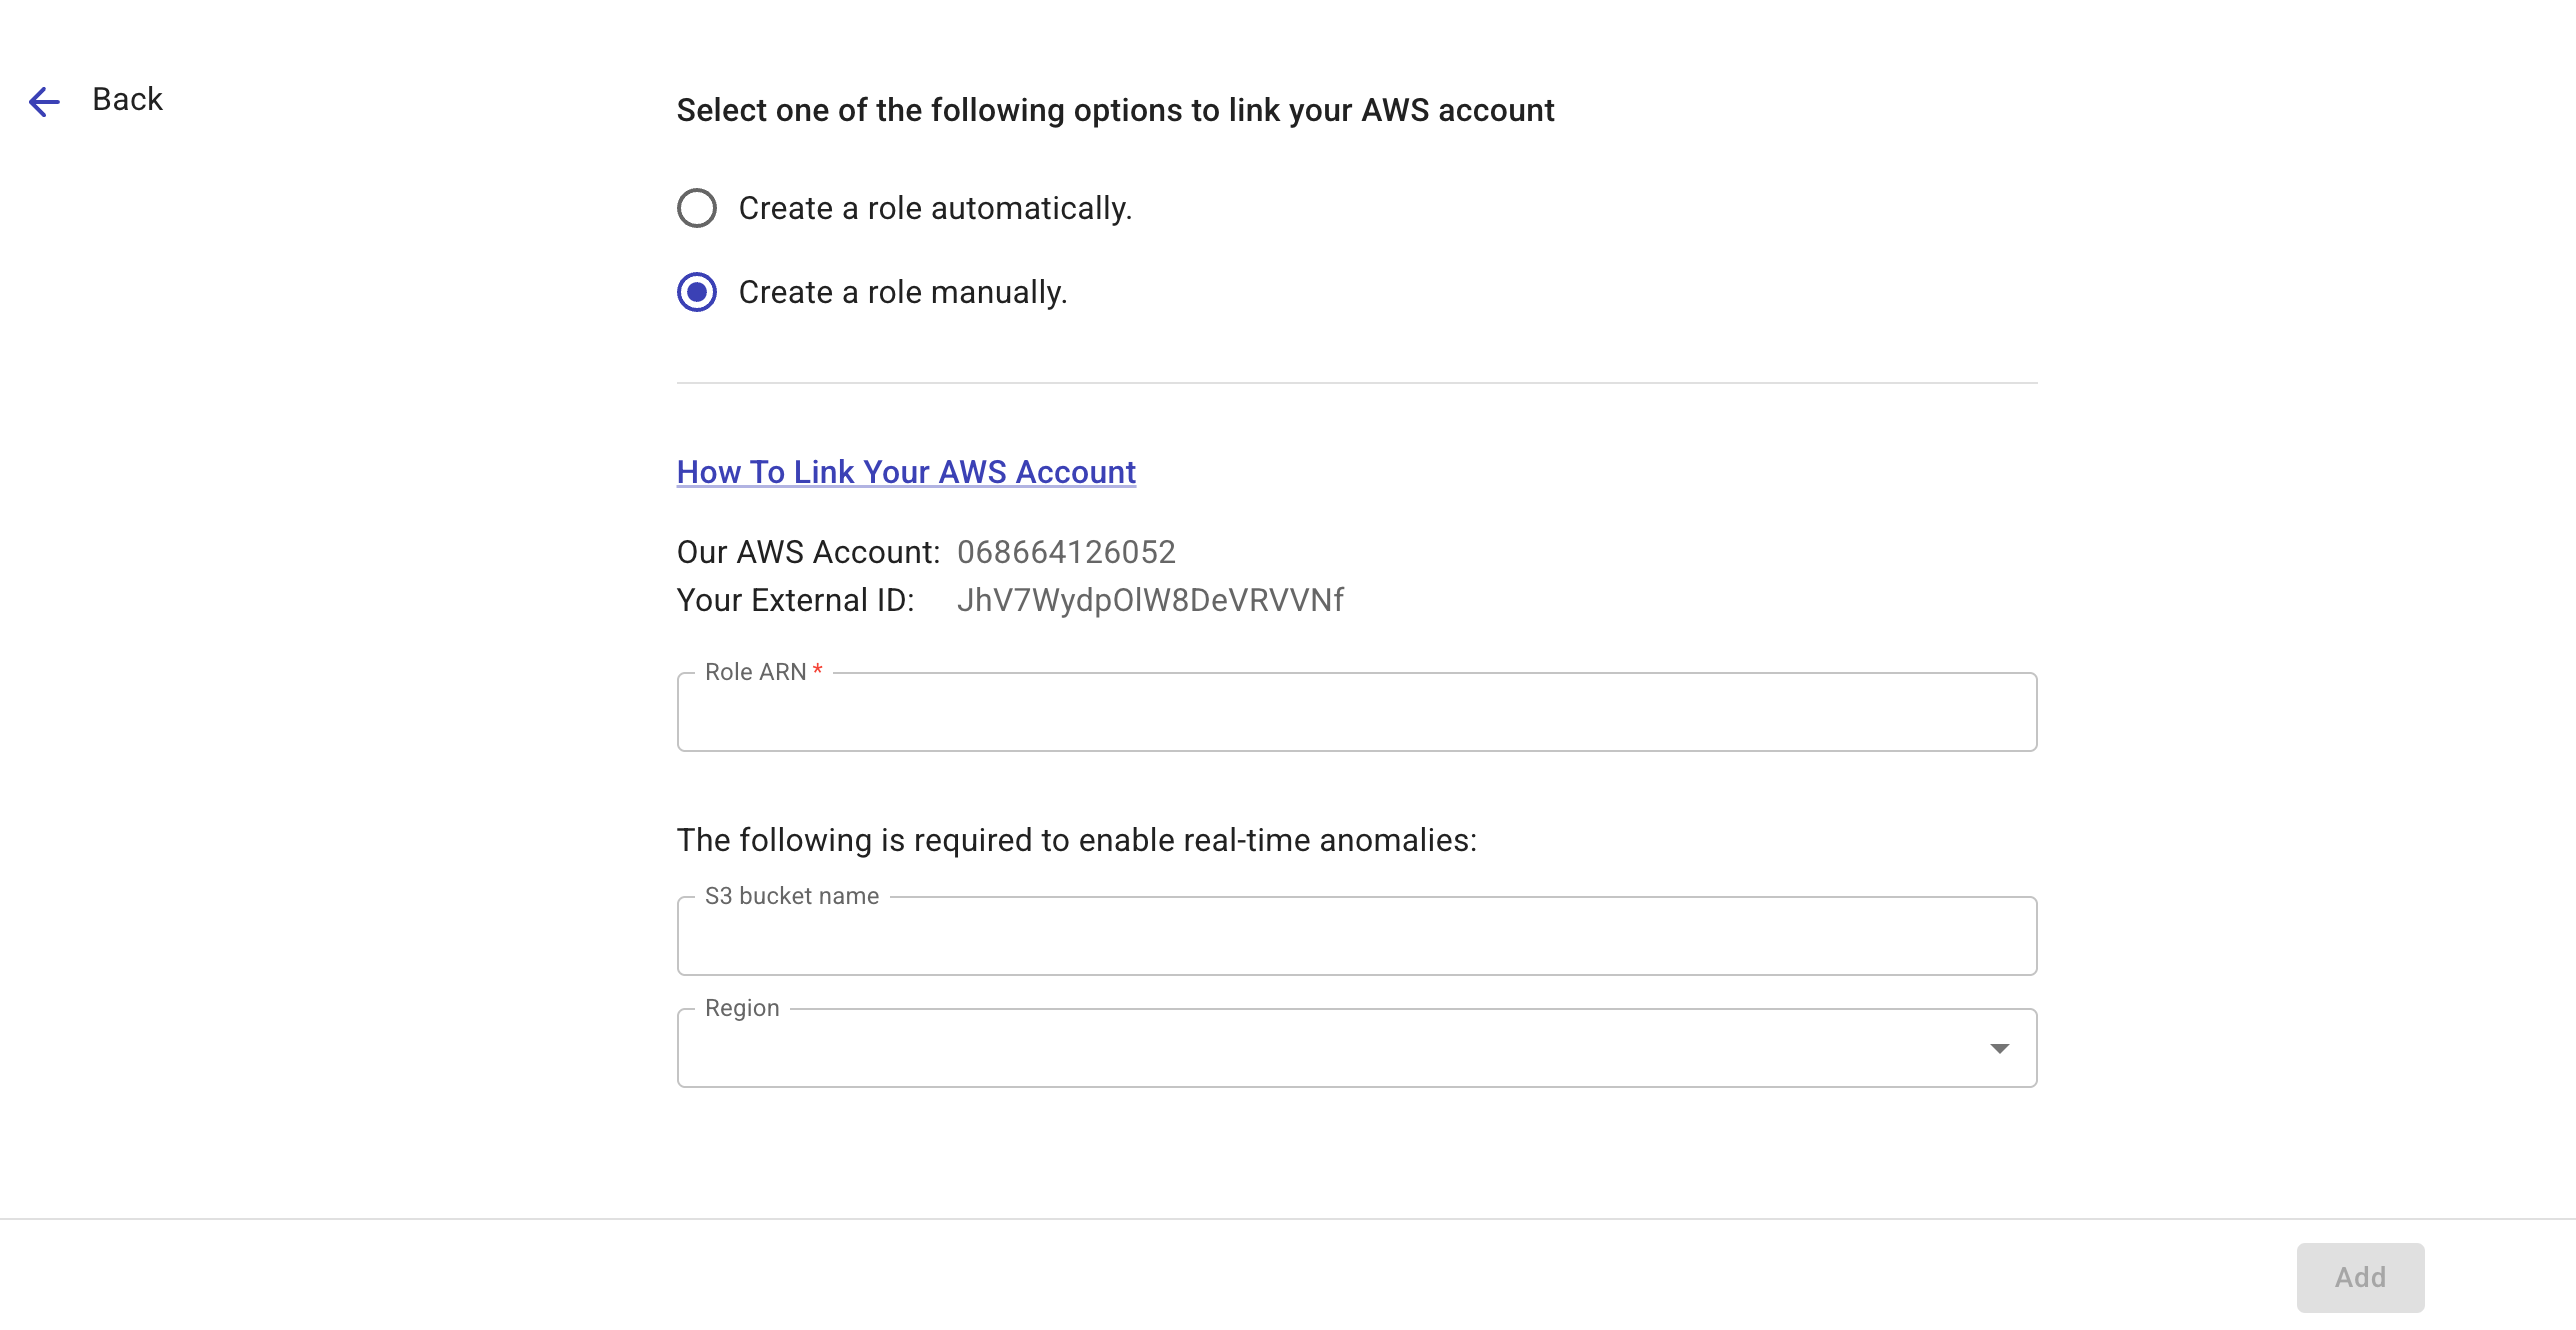
-
(Optional) If you want to enable real-time anomaly detection on the account, enter the AWS CloudTrail S3 bucket name and specify the region where the bucket resides (the bucket must reside in one of the supported regions).
-
Create an AWS IAM Role in the AWS Management Console. (See also Creating an IAM role (console).)
-
Navigate to the AWS IAM console, select Roles in the left-hand side navigation pane, and then select Create role.
-
Select AWS account as the trusted entity.
-
Select Another AWS account, enter the DoiT AWS account ID (the
Our AWS Accountprovided in the DoiT console). -
Select the checkbox
Require external ID, enter your external ID. -
Select Next to add permissions.
Choose policies in accordance with the features to enable:
-
For Core, add specific AWS managed policies to your role.
-
For other features, create custom policies by selecting Create policy, switching to the JSON tab, and then pasting the relevant feature permissions.
See alsoAWS Documentation: Creating IAM policies (console)
-
-
Once the policies are created, go back to your original tab. You may need to refresh to see the new policies in the search list.
-
Select all the new policies for the features you want to enable in addition to the three built-in policies required for Core features.
-
Select Next, give the Role a name, review the selected policies, and then select Create role.
-
-
After creating the role, select the role name to open its summary page, copy the value of the role's ARN, and paste the Role ARN to the DoiT console.
-
Select Add to link your AWS account.
If successfully, the status of your AWS account will show as Healthy in the DoiT console.
Feature permissions
Below are the required permissions of the core functionality and various features you can enable on a linked account. See also Security and data access policy: Amazon Web Services.
Core, Quota Monitoring, and more:
- Core
- PerfectScale for Spot
- Quota Monitoring
- Kubernetes core
- Real-time anomalies
Core permissions are a minimum set of read-only permissions for many DoiT platform features. It consists of three AWS managed policies:
| AWS managed policy | Description |
|---|---|
SecurityAudit | Grants access to read security configuration metadata. |
AWSSavingsPlansReadOnlyAccess | Provides read-only access to Savings Plans service. |
Billing | Grants permissions for billing and cost management. |
{
  "Version": "2012-10-17",
  "Statement": [
    {
      "Action": [
        "ec2:Describe*",
        "ec2:CreateLaunchTemplate",
        "ec2:CreateLaunchTemplateVersion",
        "ec2:ModifyLaunchTemplate",
        "ec2:RunInstances",
        "ec2:TerminateInstances",
        "ec2:CreateTags",
        "ec2:DeleteTags",
        "ec2:CreateLaunchTemplateVersion",
        "ec2:CancelSpotInstanceRequests",
        "autoscaling:CreateOrUpdateTags",
        "autoscaling:UpdateAutoScalingGroup",
        "autoscaling:Describe*",
        "autoscaling:AttachInstances",
        "autoscaling:BatchDeleteScheduledAction",
        "autoscaling:BatchPutScheduledUpdateGroupAction",
        "cloudformation:ListStacks",
        "cloudformation:Describe*",
        "iam:PassRole",
        "events:PutRule",
        "events:PutTargets",
        "events:PutEvents"
      ],
      "Resource": "*",
      "Effect": "Allow"
    }
  ]
}
{
  "Version": "2012-10-17",
  "Statement": [
    {
      "Effect": "Allow",
      "Action": [
        "support:DescribeTrustedAdvisorCheckSummaries",
        "support:DescribeTrustedAdvisorCheckRefreshStatuses",
        "support:DescribeTrustedAdvisorChecks",
        "support:DescribeSeverityLevels",
        "support:RefreshTrustedAdvisorCheck",
        "support:DescribeSupportLevel",
        "support:DescribeCommunications",
        "support:DescribeServices",
        "support:DescribeIssueTypes",
        "support:DescribeTrustedAdvisorCheckResult",
        "trustedadvisor:DescribeNotificationPreferences",
        "trustedadvisor:DescribeCheckRefreshStatuses",
        "trustedadvisor:DescribeCheckItems",
        "trustedadvisor:DescribeAccount",
        "trustedadvisor:DescribeAccountAccess",
        "trustedadvisor:DescribeChecks",
        "trustedadvisor:DescribeCheckSummaries"
      ],
      "Resource": "*"
    }
  ]
}
{
  "Version": "2012-10-17",
  "Statement": [
    {
      "Effect": "Allow",
      "Action": [
        "eks:ListAccessPolicies",
        "eks:ListAccessEntries",
        "eks:DescribeCluster",
        "eks:ListClusters"
      ],
      "Resource": "*"
    }
  ]
}
For real-time anomalies, in addition to the IAM policy, you also need to configure an Amazon S3 event notification for the CloudTrail bucket, targeting the real-time anomaly SNS topic.
IAM Policy
This policy allows the cross-account role to describe EC2 AMIs, decrypt KMS-encrypted data, and access the S3 bucket that hosts the CloudTrail logs.
{
  "Version": "2012-10-17",
  "Statement": [
    {
      "Sid": "AllowDescribeImagesForRealtimeData",
      "Effect": "Allow",
      "Action": "ec2:DescribeImages",
      "Resource": "*"
    },
    {
      "Sid": "AllowAccessToEncryptedS3Buckets",
      "Effect": "Allow",
      "Action": "kms:Decrypt",
      "Resource": "*"
    },
    {
      "Sid": "AllowCloudTrailBucketLevelAccess",
      "Effect": "Allow",
      "Action": [
        "s3:ListBucket",
        "s3:GetBucketNotification"
      ],
      "Resource": "arn:aws:s3:::YOUR_CLOUDTRAIL_BUCKET_NAME"
    },
    {
      "Sid": "AllowCloudTrailObjectLevelAccess",
      "Effect": "Allow",
      "Action": "s3:GetObject",
      "Resource": "arn:aws:s3:::YOUR_CLOUDTRAIL_BUCKET_NAME/*"
    }
  ]
}
CloudTrail S3 bucket notification
See Configure S3 bucket event notification for detailed instructions.
Note that AWS supports only a single destination for each event notification type. Ensure that the CloudTrail S3 bucket does not already have the s3:ObjectCreated:* event type configured for another destination.
DoiT Insights:
- Trusted Advisor insights
- Cost Optimization Hub insights
- Security Hub insights
{
  "Version": "2012-10-17",
  "Statement": [
    {
      "Effect": "Allow",
      "Action": [
        "trustedadvisor:GetRecommendation",
        "trustedadvisor:ListRecommendations",
        "trustedadvisor:ListRecommendationResources"
      ],
      "Resource": "*"
    }
  ]
}
{
  "Version": "2012-10-17",
  "Statement": [
    {
      "Effect": "Allow",
      "Action": [
        "cost-optimization-hub:ListRecommendations"
      ],
      "Resource": "*"
    }
  ]
}
{
  "Version": "2012-10-17",
  "Statement": [
    {
      "Effect": "Allow",
      "Action": [
        "securityhub:GetFindings"
      ],
      "Resource": "*"
    }
  ]
}
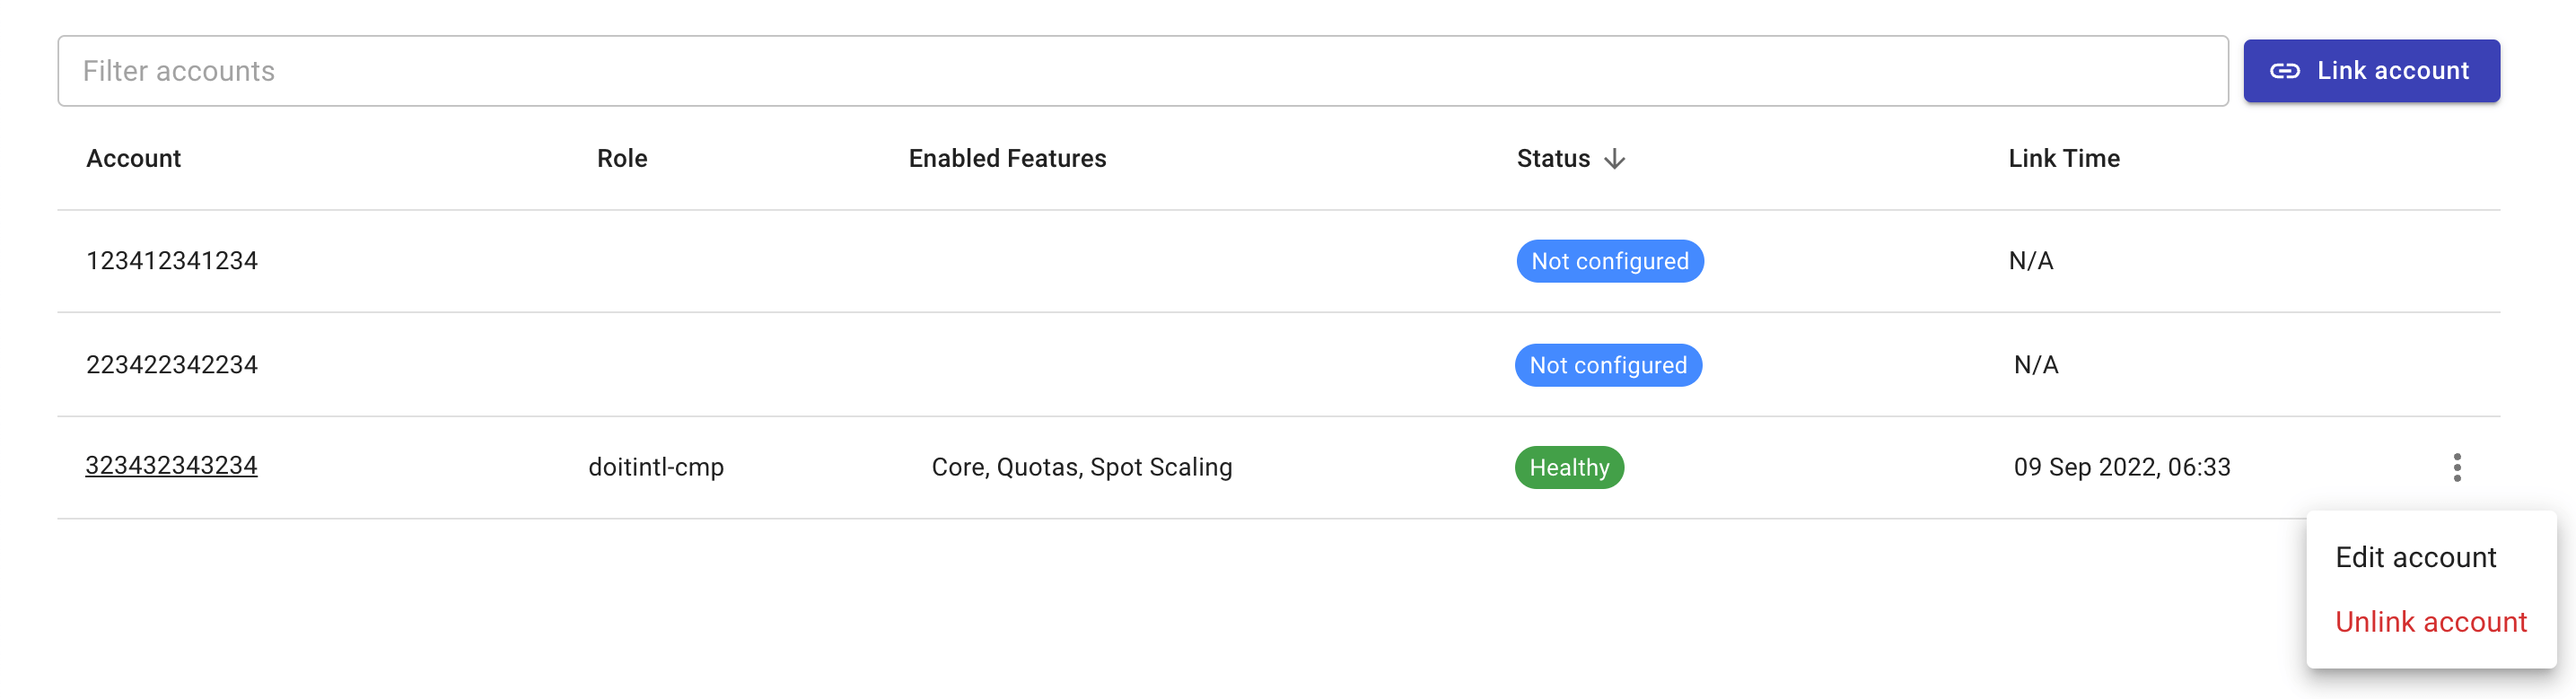
Edit linked accounts
Unlink an account
To unlink an account:
-
Navigate to the Link Amazon Web Services page.
-
Locate the account of interest.
-
Select the kebab menu (⋮) at the rightmost end of the account entry.
-
Select Unlink account.
Modify feature access
Add a feature
To add a new feature, you need to update the IAM role of the linked account with additional permissions:
-
Select the kebab menu (⋮) at the rightmost end of the account entry.
-
Select Edit account.
-
Select the checkbox of the new feature.
-
Update the IAM role with the new permissions by using one of the following options.
-
Select Update account to create a CloudFormation stack in the AWS console.
-
Select Prefer CLI to get the command to create the CloudFormation stack via AWS CloudShell.
See Create a role automatically for more information.
-
Remove a feature
To remove a feature:
-
Open the IAM page in the AWS console.
-
Detach the policies associated with the feature in the linked account's role.
Cross-account role
DoiT's CloudFormation stack template deploys a cross-account IAM role that grants a set of required permissions to DoiT Cloud Intelligence. The definition of this IAM role consists of the following sections:
-
Three AWS managed policies: See core functionality permissions.
-
A trust policy that allows DoiT to assume the cross-account role and securely access your AWS resources.
-
An inline policy:
{
  "Version": "2012-10-17",
  "Statement": [
    {
      "Action": [
        "iam:List*",
        "iam:Get*"
        ],
        "Effect": "Allow",
        "Resource": "*"
    }
  ]
}-
iam:List*: This permission allows access to IAM actions that begin withList. These are non-mutating actions typically used to view an inventory of IAM resources, such as the names of users, roles, or policies within the account. -
iam:Get*: This permission allows access to IAM actions that begin withGet. These actions are read-only and are typically used to retrieve configuration metadata for visibility, compliance, and auditing purposes. -
"Resource": "*": AWS IAM does not support resource-level scoping for almost alliam:List*actions. As IAM is a global service, resource-level scoping forGetactions is often impractical. Using"Resource": "*"is a common pattern for account-wide visibility and is consistent with AWS-recommended partner access patterns.
-
-
Additional policies that grant the required permissions for the features you choose to enable on the account. See Security and data access policy: Amazon Web Services.