Connect Azure accounts with one-click onboarding
-
To connect your Azure account to DoiT, you need an active Azure subscription.
-
You must have a Cloud Intelligence Enhanced or Enterprise plan to connect Azure accounts.
-
You'll be charged a percentage of your monthly cloud spend, subject to the terms of your agreement.
This guide applies only when One-click Azure onboarding is enabled for your organization. If it isn't enabled, follow the standard Azure onboarding guide.
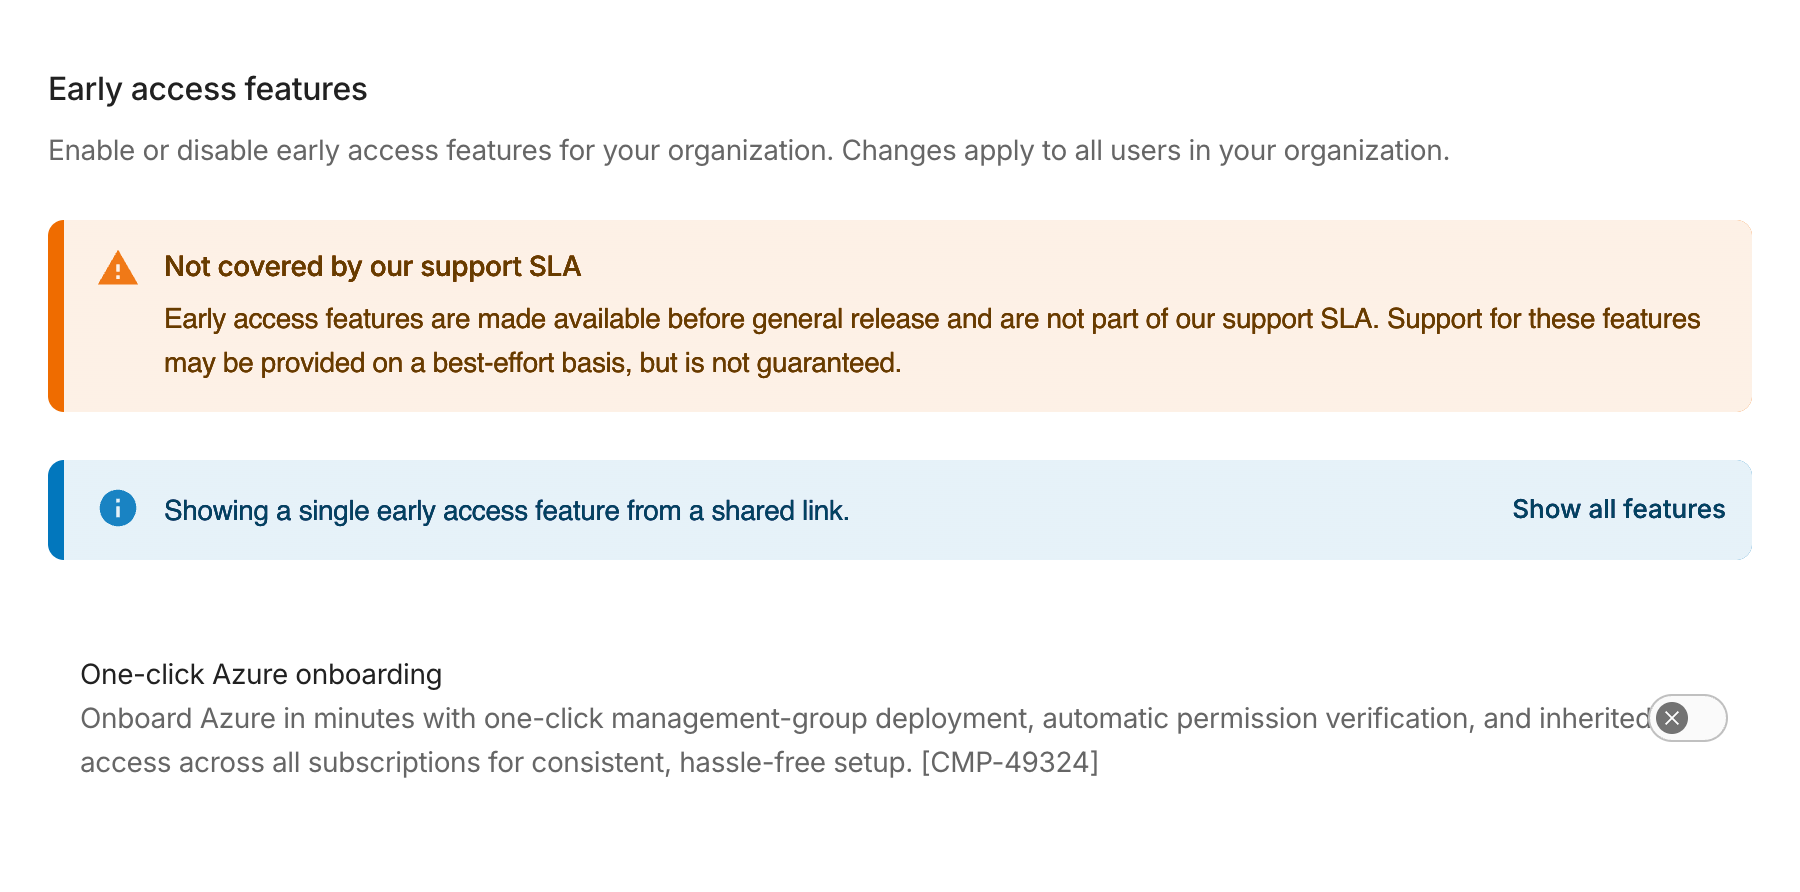
One-click Azure onboarding is available in early preview and isn't covered by the DoiT support SLA. Users with the Admin role can enable it from the Early access features page.
To open the feature directly, replace <customer-id> in the following URL with your DoiT customer ID:
https://console.doit.com/customers/<customer-id>/early-access-features?feature=CMP-49324
Required permissions
Your DoiT account needs:
-
The Admin role to enable the early access feature.
-
The Billing Profile Admin permission to configure billing data access.
Your Azure account needs:
-
Permission to register the Cloud Intelligence enterprise application in Microsoft Entra ID.
-
The Owner role on the selected management group to use Deploy to Azure.
-
Alternatively, permission to create role assignments at the selected management group to use the Azure Cloud Shell setup. A Microsoft Entra Global Administrator can explicitly elevate access when prompted by the script.
The onboarding flow grants the Cloud Intelligence service principal the Reader and Monitoring Reader roles on one management group. Assignments at the tenant root management group are inherited by all current and future subscriptions in the tenant.
To configure billing exports, your Azure account also needs:
Microsoft.Resources/subscriptions/resourceGroups/writeMicrosoft.Storage/storageAccounts/writeMicrosoft.CostManagement/exports/writeMicrosoft.Storage/storageAccounts/blobServices/containers/writeMicrosoft.ManagedServices/registrationAssignments/write
Connect your Azure tenant
Launch the wizard
-
Sign in to the DoiT console.
-
Launch the connection wizard:
-
If you're just starting with DoiT, select Microsoft Azure as the cloud provider on the welcome page.
-
From the Home page, find Connect your cloud, and then select Connect your Azure account.
-
From the Integrations catalog, find the Microsoft Azure integration, select Assets, and then select Connect new account.
-
The wizard contains three steps.
Step 1: Select features
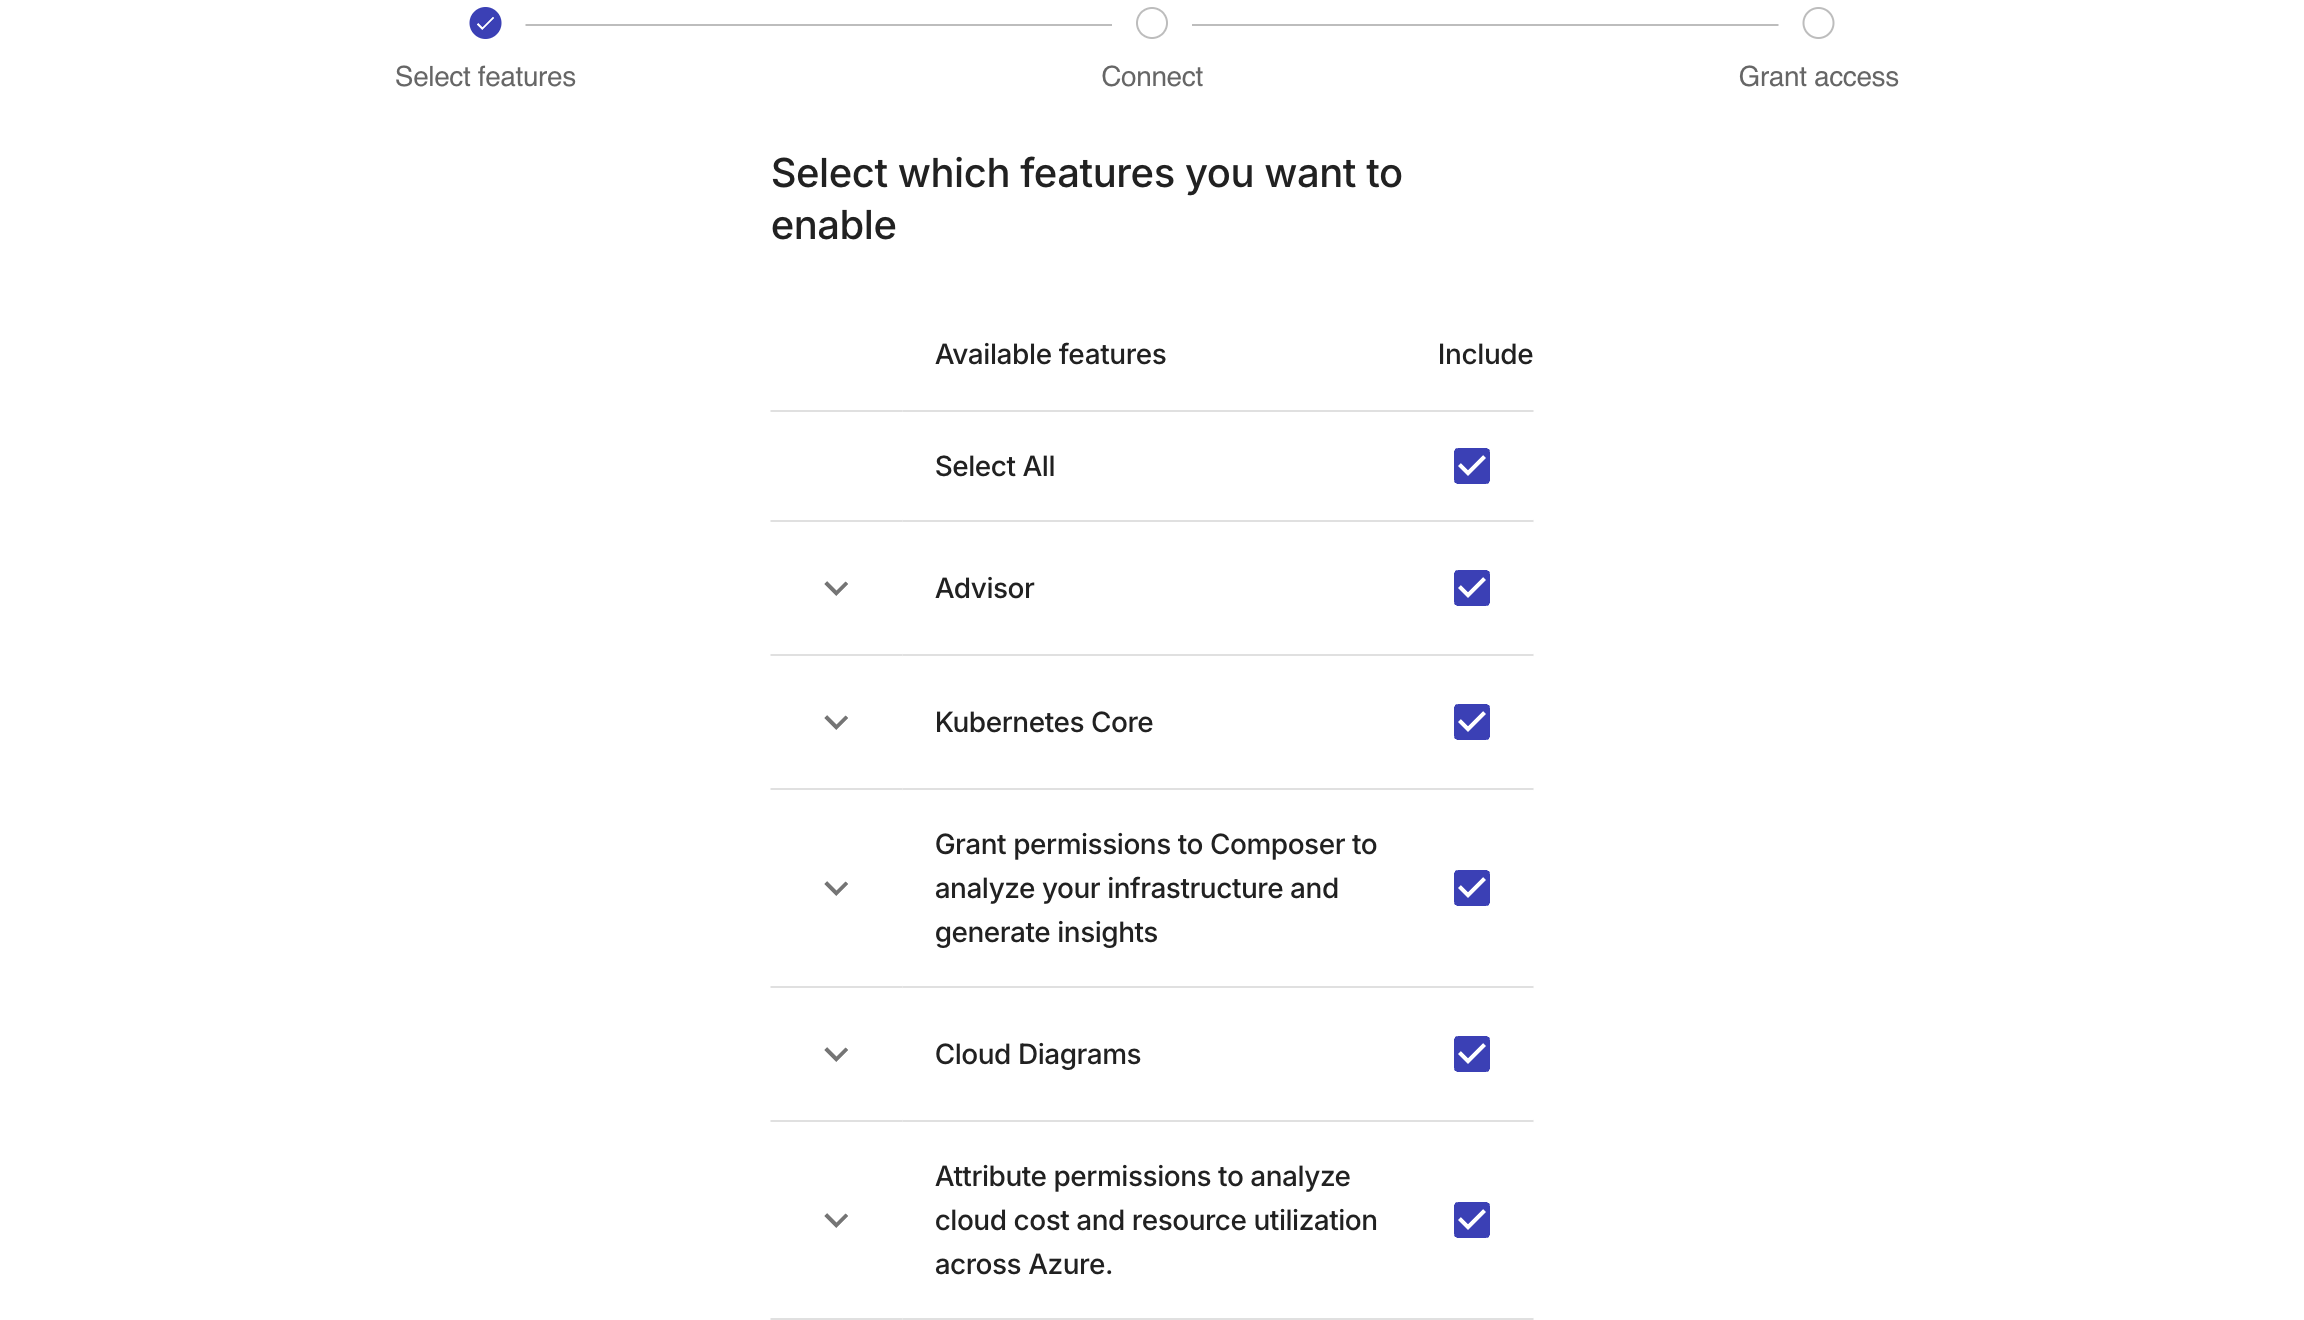
All available Cloud Intelligence features are selected by default. Clear Select All or individual features if you don't want to enable them, and then select Next.
Step 2: Connect the tenant
-
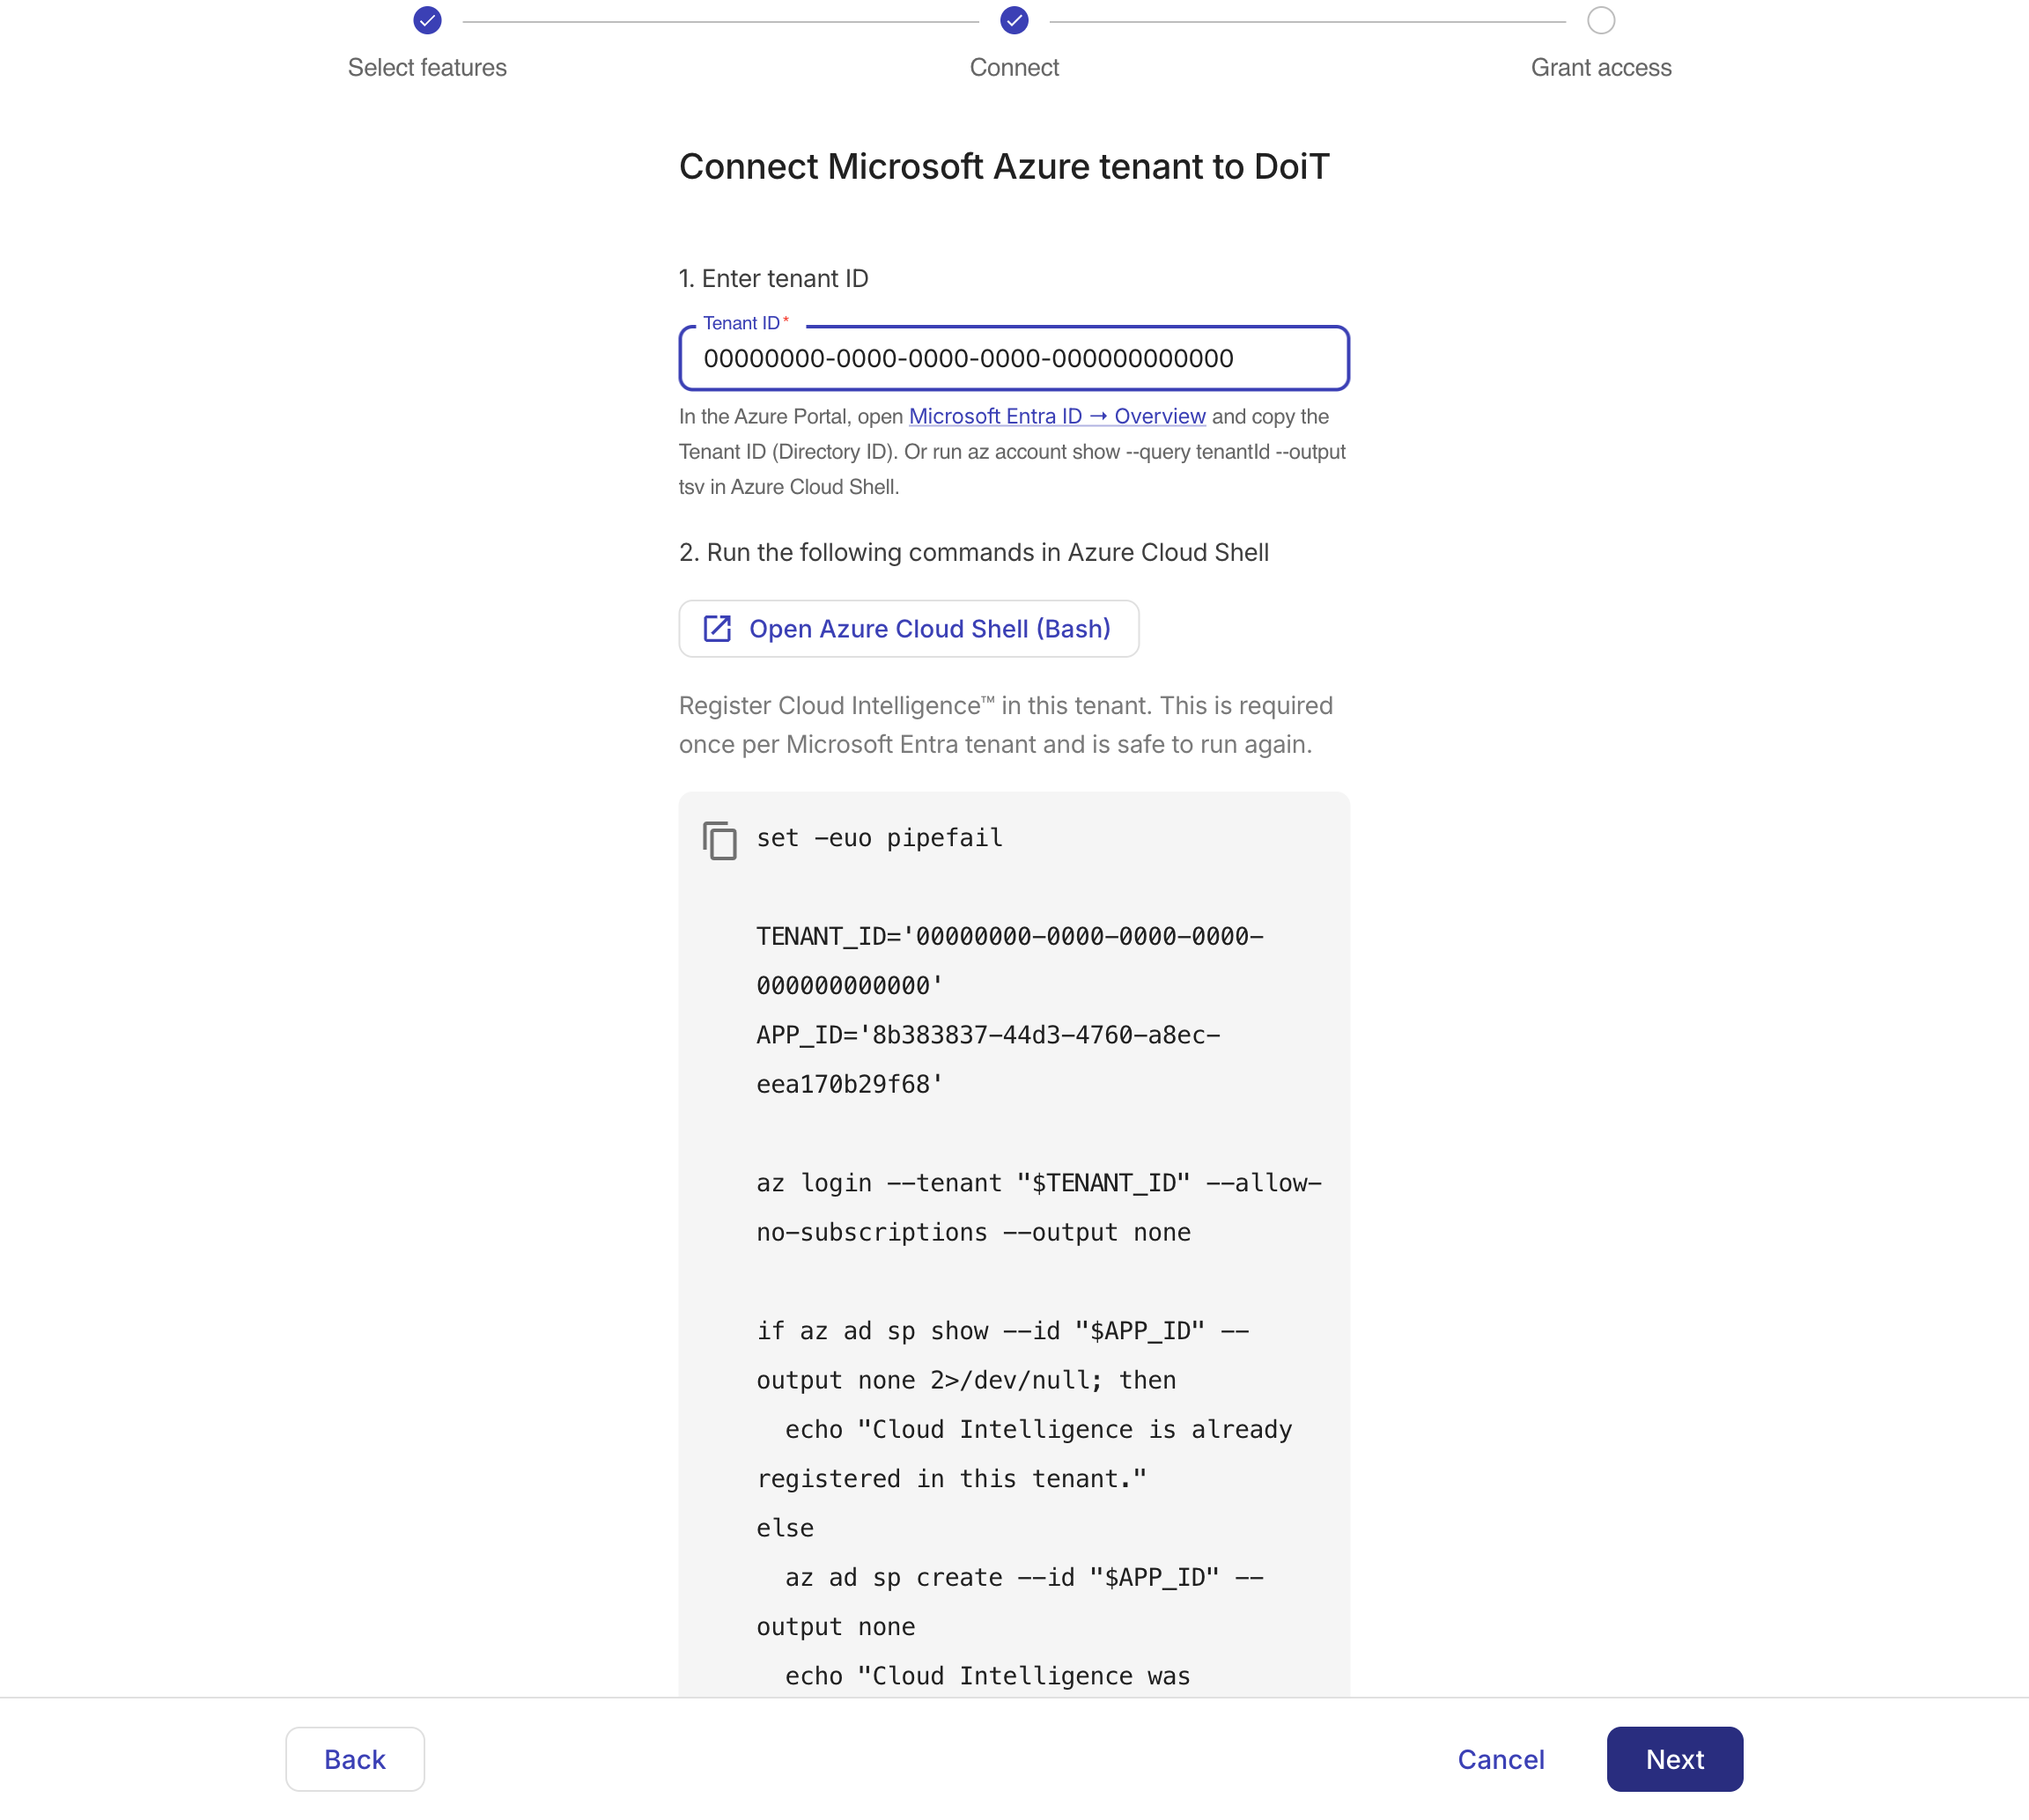
Enter your Microsoft Entra tenant ID. To find it, open Microsoft Entra ID > Overview in Azure Portal and copy the Tenant ID.
-
Select Open Azure Cloud Shell (Bash).
-
Copy the generated script from the DoiT console, paste it into Azure Cloud Shell, and run it.
The script signs in to the specified tenant and registers Cloud Intelligence as an enterprise application. It is safe to run again if the application is already registered.
-
Return to the DoiT console and select Next.
Step 3: Grant access
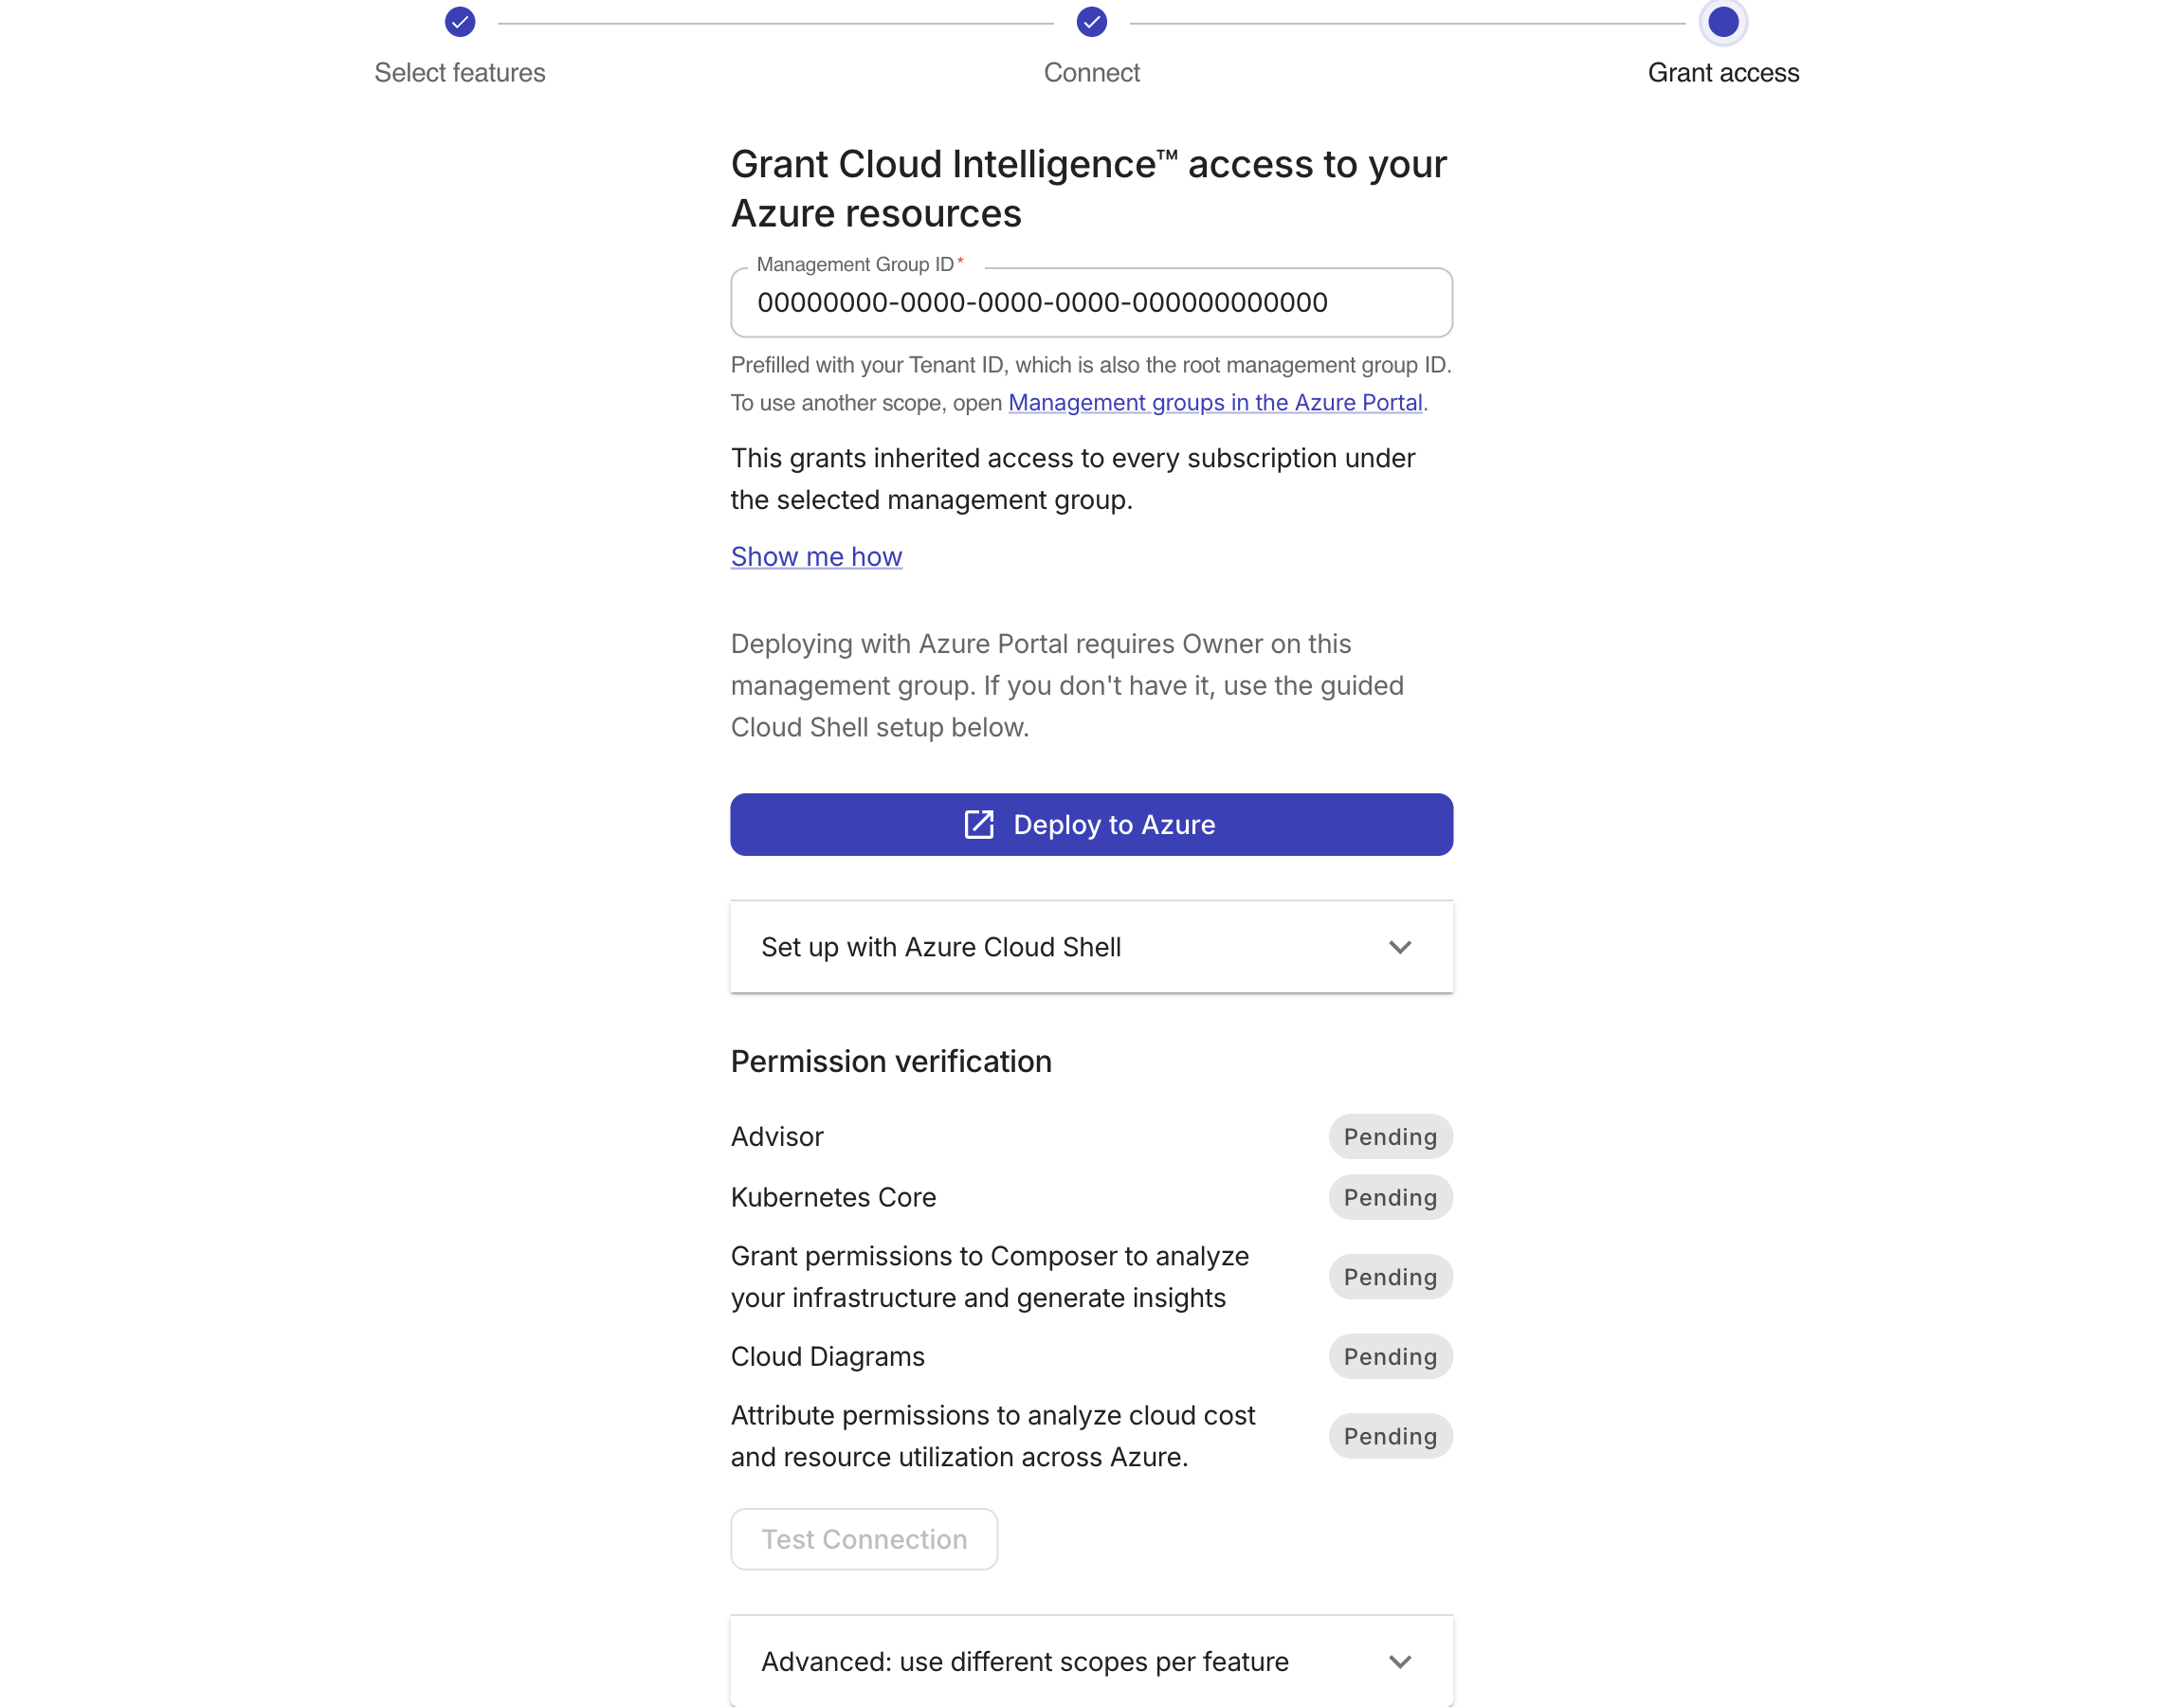
The management group ID is prefilled with your tenant ID, which is also the ID of the tenant root management group. This scope grants inherited access to all subscriptions under the management group, so you don't need to onboard subscriptions individually.
To use another management group, replace the prefilled value with its ID.
Deploy with Azure Portal
This option requires the Owner role on the selected management group.
-
Select Deploy to Azure.
-
In Azure Portal, select the management group that matches the ID shown in the DoiT console.
-
Select a deployment region. Leave the management group and principal ID parameters unchanged.
-
Select Review + create, and then select Create after validation succeeds.
-
Return to the DoiT console. Permission verification continues automatically while Azure Portal is open in another tab.
Azure role assignments can take several minutes to propagate. If a feature remains Pending after the deployment completes, select Test Connection.
Set up with Azure Cloud Shell
Use the guided Cloud Shell setup if you don't already have Owner on the management group.
-
Expand Set up with Azure Cloud Shell and select Open Azure Cloud Shell (Bash).
-
Copy and run the generated script.
-
If Azure denies permission to create role assignments and you're a Microsoft Entra Global Administrator, type
ELEVATEwhen prompted. The script requests elevated access, waits for Azure RBAC propagation, and creates only missing role assignments. -
Return to the DoiT console and wait for all selected features to show Connected. Select Test Connection to check immediately.
If you enabled elevated access only for onboarding, disable Access management for Azure resources in Microsoft Entra ID > Properties after setup.
Create a billing export
Export Azure billing data to DoiT after connecting the tenant:
-
In Azure Portal, search for Cost Management and select it, then select a billing scope.
TipMake sure to select the correct billing account. If the scope for the billing account covers multiple subscriptions, billing data for all of them will be exported to your Azure storage.
-
(Optional) Enable tag inheritance if you want tags to be present in the billing exports.
When enabled, child resource usage records inherit billing, resource group, and subscription tags, regardless of whether the resource supports tags or passes them to the cost report. See Tag support for Azure resources and Group and allocate costs using tag inheritance for details.
After tag inheritance is enabled, tags are applied to child resource usage records for the current month within 24 hours.
-
In the left navigation menu, search for Exports and select it.
-
Select Create, and then select Create your own export on the Basics tab.
-
Fill out the required fields:
- Type of data: Choose
Cost and usage details (actual). - Export name: Enter a name for the export, for example,
BillingDataExport. - Dataset version: Choose
2021-10-01. - Frequency: Choose
Daily export of month-to-date costs.
- Type of data: Choose
-
Select Add, enter
DoiTin the Export prefix field, and then select Next.
-
-
On the Destination tab, fill out the required fields:
- Storage type: Choose
Azure blob storage. - Destination and storage: Select
Use existing. - Subscription: Choose the subscription that contains the storage account.
- Storage account: Choose the storage account named after your DoiT customer ID.
- Container: Enter
exportcontainer. - Directory: Enter
exportfiles. - Format: Choose
CSV. - Compression Type: Choose
None. - Keep the Overwrite data checkbox selected.
- Storage type: Choose
-
Select Next.
-
On the Review + create tab, select Create.
-
Back to the Exports page, select the export you just created, and then select Run now to deploy the export and send billing data to the DoiT console.
What's next
After you successfully connect your Azure account, we start importing your billing data. The process can take up to 24 hours, depending on the size and complexity of your Azure environment. We notify you when the data is available for Cloud Analytics and other DoiT features.
Backfill historical data
DoiT supports backfilling Azure billing data for the past 12 months. To backfill your historical data, follow the steps below:
-
Retrieve historical data via Azure portal (see Azure tutorial on historical data for details).
-
Create a billing export. Refer to Create a billing export for the required export configurations.
-
After saving the export, return to the Exports page and select the export you just created.
-
Select Export selected dates. Data can be retrieved one month at a time.
-
-
Ensure the backfill files are placed in the same Azure blob storage path used in Create a billing export.
For example, if your current export files are located at
exportfiles/DoiT-BillingDataExport/20260101-20260131/, your backfill folders should be organized as follows:exportfiles/DoiT-BillingDataExport/20251201-20251231exportfiles/DoiT-BillingDataExport/20251101-20251130... -
In the backfill folders, update the data path in the
manifest.jsonfile to point to the correct blob storage folder. -
Once the CSV and manifest files are correctly placed, open an expert inquiry to request a backfilling.
Billing update frequency
Azure Cost Management exports are updated daily. Depending on the timing of your Azure export and DoiT's import, changes may take up to 24 hours to appear in the DoiT console. Within the DoiT console, Cloud Analytics refreshes the billing data every hour.
For how often Azure Cost Management receives usage data, see Cost and usage data updates and retention.
Offboarding
If you decide not to continue with DoiT:
-
In Azure Cost Management, delete the billing export you created during onboarding to stop sending new billing data to DoiT.
-
Revoke DoiT's Azure role assignments by following the instructions below.
-
In the DoiT console, open the Azure integration and remove the tenant.
Deleting the billing export doesn't delete data already stored in Azure Blob Storage. Retain or delete that data according to your organization's retention requirements.
Revoke DoiT access
The following script removes the Reader and Monitoring Reader role assignments created by the DoiT onboarding flow at a specific management group. It preserves the Cloud Intelligence service principal and role assignments at other Azure scopes.
Before running the script, confirm that the tenant ID and management group ID match the Azure connection you want to remove. Removing these assignments revokes DoiT's access from the management group and its descendants.
-
Open Azure Cloud Shell and select Bash.
-
Paste the following script, replace
<tenant-id>and<management-group-id>, and run it. For the tenant root group, the management group ID is the tenant ID.#!/usr/bin/env bashset -euo pipefailTENANT_ID="<tenant-id>"MANAGEMENT_GROUP_ID="<management-group-id>"APP_ID="15c1455a-e8eb-4479-ab5b-cea01e7aeede"MG_SCOPE="/providers/Microsoft.Management/managementGroups/$MANAGEMENT_GROUP_ID"az login --tenant "$TENANT_ID" --allow-no-subscriptionsACTIVE_TENANT_ID="$(az account show --query tenantId --output tsv)"if [[ "$ACTIVE_TENANT_ID" != "$TENANT_ID" ]]; thenecho "The active Azure tenant does not match TENANT_ID."exit 1fiSP_ID="$(az ad sp show --id "$APP_ID" --query id --output tsv 2>/dev/null || true)"if [[ -z "$SP_ID" ]]; thenecho "The Cloud Intelligence service principal does not exist in this tenant."exit 0fiASSIGNMENTS_JSON="$(az role assignment list \--assignee-object-id "$SP_ID" \--fill-principal-name false \--scope "$MG_SCOPE" \--output json)"CANDIDATES_JSON="$(jq --arg scope "$MG_SCOPE" '[.[]| select((.scope | ascii_downcase) == ($scope | ascii_downcase))| select((.roleDefinitionId | ascii_downcase | endswith("acdd72a7-3385-48ef-bd42-f606fba81ae7")) or(.roleDefinitionId | ascii_downcase | endswith("43d0d8ad-25c7-4714-9337-8ba259a9fe05")))]' <<< "$ASSIGNMENTS_JSON")"mapfile -t ASSIGNMENT_IDS < <(jq -r '.[].id' <<< "$CANDIDATES_JSON")if [[ "${#ASSIGNMENT_IDS[@]}" -eq 0 ]]; thenecho "No DoiT onboarding role assignments were found at $MG_SCOPE."exit 0fiecho "Role assignments to remove:"jq -r '.[] | "\(.roleDefinitionName): \(.id)"' <<< "$CANDIDATES_JSON"read -r -p "Enter the tenant ID to confirm: " CONFIRMATIONif [[ "$CONFIRMATION" != "$TENANT_ID" ]]; thenecho "Confirmation did not match. No assignments were removed."exit 1fifor ASSIGNMENT_ID in "${ASSIGNMENT_IDS[@]}"; doaz role assignment delete --ids "$ASSIGNMENT_ID"doneecho "DoiT onboarding role assignments removed."
The script doesn't delete the Cloud Intelligence enterprise application. The application has no access to Azure resources after its role assignments are removed, and preserving it avoids affecting DoiT connections at other scopes.
Verify offboarding
Allow several minutes for Azure role assignment changes to propagate. Then run the script again. A successful cleanup returns:
No DoiT onboarding role assignments were found at <management-group-scope>.
Running the script repeatedly is safe. It only removes the Reader and Monitoring Reader assignments for the Cloud Intelligence service principal at the specified management group.