Attribute EC2 Sensor Installation
Introduction
The Attribute EC2 sensor is an eBPF sensor that runs as a systemd service on a Linux-based virtual machine.
It provides deep visibility and real-time monitoring of EC2 instances using eBPF (Extended Berkeley Packet Filter) technology, capturing network and system-level events without changes to application code and without kernel modules. The sensor operates as a passive observer, so overhead and performance impact on the monitored instance remain minimal.
Requirements
| Requirement | Details |
|---|---|
| Kernel version | 5.10 or newer |
| Architecture | x86_64 and arm64 |
| Privileges | sudo access on the instance |
Before You Begin
Obtain your installation token from Attribute. The token is unique per account and is used for both installation and later upgrades.
Installation Methods
There are two ways to install the sensor. Choose the one that matches how your instances are provisioned.
| Method | When to Use It |
|---|---|
| Image or launch template install | Instances are created from a golden AMI, a launch template, or an Auto Scaling group. Install once during image creation and every instance launched from it carries the sensor. |
| Runtime install | Instances are long-lived and managed individually. Install directly on the running instance. |
Both methods run the same installation script; they differ only in whether the sensor is started as part of the installation.
Installing in a Machine Image or Launch Template
Use this method when baking the sensor into an AMI, a launch template's user data, or any image-build pipeline (for example Packer or EC2 Image Builder).
-
On the build instance, download the installation script and make it executable:
wget https://storage.googleapis.com/attrb-artifacts/standalone-install.shchmod +x ./standalone-install.sh -
Run the script with your workload name, memory limit, and token:
sudo ./standalone-install.sh <workload_name> 524288000 <token>Argument Description <workload_name>Name of the service that will run on instances launched from this image. 524288000Memory limit for the sensor, in bytes (500 MiB). <token>Installation token provided by Attribute. -
Finish the image build as usual and create the AMI.
Do not start the sensor on the build instance. The installation script enables the zprobe systemd service, so it starts automatically on the first boot of every instance launched from the image. Verify the sensor on a launched instance rather than in the image itself, as described in Verifying the Installation.
Installing on a Running Instance
Use this method to add the sensor to an instance that is already in service.
-
Download the installation script and make it executable:
wget https://storage.googleapis.com/attrb-artifacts/standalone-install.shchmod +x ./standalone-install.sh -
Run the script with your workload name, memory limit, and token:
sudo ./standalone-install.sh <workload_name> 524288000 <token>Argument Description <workload_name>Name of the service running on the instance. 524288000Memory limit for the sensor, in bytes (500 MiB). <token>Installation token provided by Attribute. -
Start the sensor. The installer enables the
zprobesystemdservice but does not start it, so without this step the sensor only begins reporting after the next reboot:sudo systemctl start zprobe
Verifying the Installation
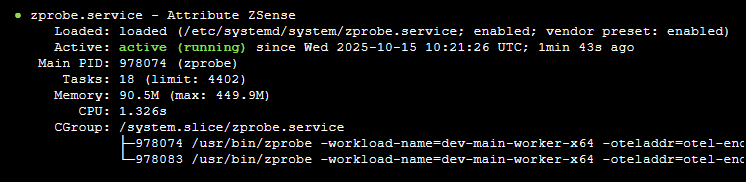
On a running instance, check the service status:
sudo systemctl status zprobe
The service should report active (running), as in the example below:
Upgrading the Sensor
The installation script always fetches the latest sensor version, so upgrading means re-running it with the same per-account token.
For image-based deployments, re-run the installation script in your image build and roll out the new image; instances launched from it start the updated sensor on first boot.
For a running instance:
-
Run the installation script again:
sudo ./standalone-install.sh <workload_name> 524288000 <token> -
Restart the sensor to load the new version:
sudo systemctl restart zprobe
Trademarks: AWS is a trademark of Amazon.com, Inc. or its affiliates. All other trademarks are the property of their respective owners.