ArgoCD install of PerfectScale Exporter — SaaS
Prerequisites
Vocabulary
PerfectScale Exporter is a software agent that collects telemetry data related to scaling, aggregates it, and periodically exports the aggregated data to the PerfectScale SaaS Platform.
PerfectScale Exporter is a helm chart's helm repo that deploys a kubernetes deployment named perfectscale-exporter, along with other components.
helm search repo perfectscale | egrep "NAME|perfectscale/exporter"
NAME                  CHART V. APP V. DESCRIPTION
perfectscale/exporter v1.1.8   1.0.0  PerfectScale data exporter
PerfectScale Agent is the helm chart's upstream git repo.
App CR is shorthand for ArgoCD Custom Resource (yaml object) of kind: Application.
Helm Charts are stored in Helm Repos.
Helm Chart
- A collection of files and folders on a file system.
- A named-chart-x.y.z.tgz compressed archive of files and folders (a Gzip compressed tar archive).
Helm Repo
- Helm Chart in a Git Repo, meaning helm chart is just a collection of files and folders that exist in a git repo. By convention, Git branches are commonly used to represent different versions of a Helm chart.
- A classic Helm repository is a simple HTTP server that follows a convention-based file storage pattern, using an
index.yamlfile and packaged chart archives namedchart-name-x.y.z.tgz. - A Helm chart in an OCI repository is stored in an Open Container Initiative repository, which is a REST API-based HTTP server that implements the OCI Distribution Specification. Helm chart packages, such as
chart-name-x.y.z.tgz, can be stored and distributed through these repositories.
The clarification above makes the following points easier to understand:
App CRs can reference Helm charts stored in Git repositories, classic Helm repositories, and OCI repositories. Because of this, an App CR’s targetRevision field, either spec.sources.0.targetRevision or spec.source.targetRevision , can have two distinct meanings:
- A Git branch or Git tag
- A Helm chart version
Installation Methods 1 and 2 refer to a classic Helm repository.
Installation Method 3 involves pulling a specific version of a packaged Helm chart, such as chart-name-x.y.z.tgz, from a classic Helm repository and converting it into a file-and-folder-based Helm chart stored in a private Git repository.
Configuration info and tips
The perfectscale-exporter helm chart's helm values require 3 mandatory input parameters.
The PerfectScale Agent will not work if the following values are not provided:
- clientId
- clientSecret
- clusterName
If the PerfectScale exporter was previously manually installed using helm, and you want to convert the manual deployment to be managed by ArgoCD, you need to look up the current live deployment's values.
kubectl -n perfectscale get secret perfectscale-exporter-secret -o jsonpath="{.data.clientId}" | base64 --decode
kubectl -n perfectscale get secret perfectscale-exporter-secret -o jsonpath="{.data.clientSecret}" | base64 --decode
kubectl -n perfectscale describe deployment perfectscale-exporter | grep CLUSTER_NAME
Tip for deploying the PerfectScale exporter to multiple clusters
- If you only have a few clusters, each cluster can use unique values for
clientId,clientSecret, andclusterName. - If you need to deploy the PerfectScale Agent across multiple clusters, you can reuse the same
clientIdandclientSecretfor each cluster, as long as each cluster has a uniqueclusterName.
Helm has 2 common usage patterns:
- Deployment tool
- YAML templating engine
FluxCD uses helm as a deployment tool, while ArgoCD uses helm as a templating engine:
-
When FluxCD deploys a Helm chart, the resulting release is managed by both FluxCD and Helm. As a result, the release appears in the output of:
helm list --all-namespaces -
When Argo CD deploys a Helm chart, it uses Helm as a YAML templating engine and then immediately applies the rendered manifests. As a result, the deployment is managed only by Argo CD and does not appear in the output of:
helm list -A
Preparation
Step 1
Verify ArgoCD is installed and configured correct.
Step 2
Check the latest PerfectScale exporter version
Method 1: Manual Lookup
Look for the most recent release of perfectscale-agent-vx.y.z here
Method 2: Run the following command:
helm repo add perfectscale https://perfectscale-io.github.io --force-update && helm search repo perfectscale | egrep "NAME|perfectscale/exporter"
Example output, where the latest version is v1.1.8
NAME                  CHART V. APP V. DESCRIPTION
perfectscale/exporter v1.1.8   1.0.0  PerfectScale data exporter
Step 3
Identify the Helm values that need to be passed into the chart.
Start by reviewing Onboarding a cluster.
In addition to providing guidance, this page includes an example helm upgrade --install ... command with flags that can be converted into Helm values.
For example:
--set secret.create=true \
--set secret.clientId=**** \
--set secret.clientSecret=**** \
--set settings.clusterName=name
These Helm command flags are equivalent to the following values:
secret:
  create: true
  clientId: ****
  clientSecret: ****

settings:
  clusterName: name
Verify that you have at least the three mandatory input parameters:
clientIdclientSecretclusterName
What handles the CR
As a general rule of thumb, you can expect an App CR to handle the following Kubernetes application deployment tasks:
- Create the Kubernetes namespace, if needed
- Fetch a cached copy of the Helm chart
- Deploy a Kubernetes Job to handle the initial installation or upgrade of any CRDs used by the Kubernetes application
- Use the provided Helm values with the Helm chart to deploy the Kubernetes application
This general logic applies to all three installation methods. However, each method begins with an Overview of Method # section that summarizes the individual nuances of that method.
Installing PerfectScale Agent with ArgoCD
Method 1: Single CR (Recommended)
Overview of Method 1:
A single ArgoCD application is deployed, which:
- Follows the normal App CR Handling logic.
- Fetches the perfectscale-exporter helm chart from a classic helm repo.
- Uses helm-values that exist within the App CR yaml object.
Since the resulting YAML file contains sensitive data, it must be stored securely. At a minimum, store it in a private Git repository.
- Create a perfectscale-exporter.yaml file based on the example below.
Ensure you replace and update values as needed.
apiVersion: argoproj.io/v1alpha1
kind: Application
metadata:
  name: perfectscale-exporter
  namespace: argocd # Namespace where ArgoCD's Applications are stored
spec:        # ^-- This is the conventional value, yours may differ.
  project: default
  syncPolicy:
    automated:
      enabled: true # <- Makes it so you don't need to sync in Web UI
    syncOptions:
    - CreateNamespace=true
    - Validate=true
    - ServerSideApply=true
  destination:
    server: https://kubernetes.default.svc
    namespace: perfectscale
  sources:
  - repoURL: https://perfectscale-io.github.io # (Classic Helm Repo)
    chart: exporter
    targetRevision: v1.1.8 # Helm chart version, Replace with latest
    helm:
      valuesObject:
        secret:
          create: true
          clientId: xxxxxxxx-xxxx-xxxx-xxxx-xxxxxxxxxxxx #Replace
          clientSecret: xxxxxxxx-xxxx-xxxx-xxxx-xxxxxxxxxxxx #Replace
        settings:
          clusterName: your-clusters-name #Replace
          corootNodeAgent: # <- JVM Metric collection
            enabled: false
- Apply the following command in the cluster application.
kubectl apply -f perfectscale-exporter.yaml
- A new application should appear in the ArgoCD Web UI.
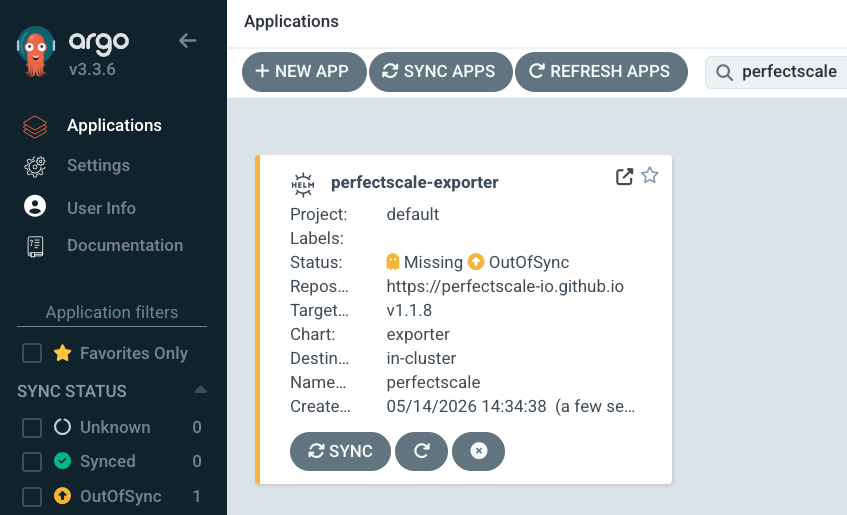
New application in ArgoCD
- If you set
spec.syncPolicy.automated.enabled: falsein the App CR, you may need to access the Argo CD web UI to perform a manual sync.
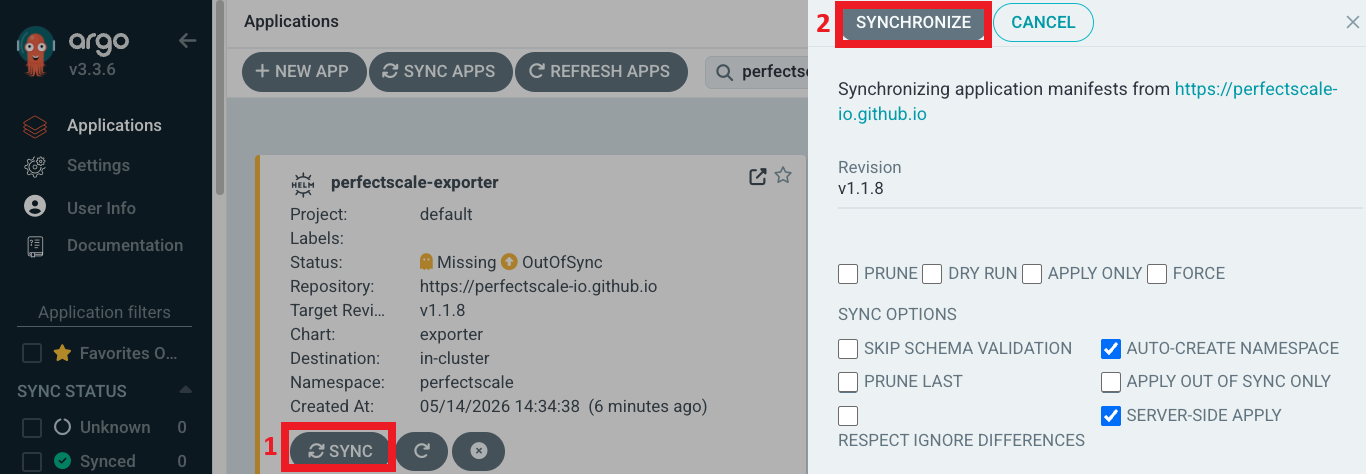
Sync the application (if needed)
- Ensure that all pods are running.
❯ kubectl get pods -n perfectscale
NAME                                                    READY   STATUS      RESTARTS   AGE
perfectscale-exporter-6cbf556b58-6qz47                  0/1     Pending     0          0s
perfectscale-exporter-92ee7f02-crd-upgrade-hook-jjrhn   0/1     Completed   0          22s

❯ kubectl get pods -n perfectscale
NAME                                                        READY   STATUS    RESTARTS   AGE
perfectscale-exporter-6cbf556b58-6qz47                      1/1     Running   0          41s
perfectscale-exporter-cr-manager-69bf9558b8-s4m9w           1/1     Running   0          41s
perfectscale-exporter-kube-state-metrics-5469fcf77c-p5trx   1/1     Running   0          41s
Method 2: Two CRs (troubleshooting alternative)
Overview of Method 2:
Method 1 may fail in rare cases, such as after an incomplete installation, due to CRD-related errors during the App CR sync. For example, the Kubernetes Job responsible for installing or upgrading the CRDs may fail to run correctly.
Method 2 is functionally equivalent to Method 1. The main difference is that Method 2 splits the logic across two Argo CD applications:
perfectscale-exporter-crds: installs or upgrades the CRDs from a Git repository branch.perfectscale-exporter: deploys the Kubernetes application from the Helm chart.
Since the resulting YAML file contains sensitive data, it must be stored securely. At a minimum, store it in a private Git repository.
- Create a perfectscale-exporter.yaml file based on the example below.
Ensure you replace and update values as needed.
apiVersion: argoproj.io/v1alpha1
kind: Application
metadata:
  name: perfectscale-exporter-crds
  namespace: argocd # Namespace where ArgoCD's Applications are stored
spec:        # ^-- This is the conventional value, yours may differ.
  project: default
  syncPolicy:
    automated:
      enabled: true # <- Makes it so you don't need to sync in Web UI
  destination:
    server: https://kubernetes.default.svc
  source:    #v-- a git repo
    repoURL: https://github.com/perfectscale-io/perfectscale-io.github.io.git
    targetRevision: perfectscale-agent-v1.1.8 # Git repo tag, Replace with latest
    path: charts/perfectscale-agent/crds
---
apiVersion: argoproj.io/v1alpha1
kind: Application
metadata:
  name: perfectscale-exporter
  namespace: argocd # Namespace where ArgoCD's Applications are stored
spec:        # ^-- This is the conventional value, yours may differ.
  project: default
  syncPolicy:
    automated:
      enabled: true # <- Makes it so you don't need to sync in Web UI
    syncOptions:
    - CreateNamespace=true
    - Validate=true
    - ServerSideApply=true
  destination:
    server: https://kubernetes.default.svc
    namespace: perfectscale
  sources:   #v-- a classic helm repo
  - repoURL: https://perfectscale-io.github.io
    chart: exporter
    targetRevision: v1.1.8 # Helm chart version, Replace with latest
    helm:
      skipCrds: true # (The other Application takes care of the CRDs)
      valuesObject:
        secret:
          create: true
          clientId: xxxxxxxx-xxxx-xxxx-xxxx-xxxxxxxxxxxx #Replace
          clientSecret: xxxxxxxx-xxxx-xxxx-xxxx-xxxxxxxxxxxx #Replace
        settings:
          clusterName: your-clusters-name #Replace
          corootNodeAgent: # <- JVM Metrics collector
            enabled: false
- Apply both with a single command:
kubectl apply -f perfectscale-exporter.yaml
- Ensure that all pods are running.
❯ kubectl get pods -n perfectscale
NAME                                                       READY  STATUS    RESTARTS   AGE
perfectscale-exporter-6cbf556b58-c79wm                     1/1    Running   0          54s
perfectscale-exporter-cr-manager-68d6bcbf5d-kp4zp          1/1    Running   0          54s
perfectscale-exporter-kube-state-metrics-5469fcf77c-ztfpw  1/1    Running   0          54s
Method 3: Private git repo hosted helm chart and ArgoCD Web UI (Deprecated)
This method is deprecated because it takes longer to set up and is harder to maintain. Ensure that you replace and update the values as needed.
- Use the unix shell commands below, to download from our helm repo, the most recent version of the perfectscale-exporter helm chart (as a .tgz file).
helm repo add perfectscale https://perfectscale-io.github.io --force-update
helm fetch perfectscale/exporter
tar -xf exporter-*.tgz && rm exporter-*.tgz
- Upload the helm chart to a private git repo, and ensure ArgoCD can access the repo.
- You'll need to create an additional helm values file, for each cluster that you plan to install the perfectscale-exporter application to.
So a dev.yaml file could be used to represent custom helm values (helm chart input parameters), that would be used when installing into a dev cluster.
Note: This file should be co-located next to the helm chart's default values.yaml
cat > exporter/dev.yaml <<EOF
secret:
  create: true
  name: "perfectscale-secret"
  clientSecret: "xxxxxxxx-xxxx-xxxx-xxxx-xxxxxxxxxxxxx"
  clientId: "xxxxxxxx-xxxx-xxxx-xxxx-xxxxxxxxxxxxx"
settings:
  clusterName: "xxx"
EOF
There are two methods to add an application to ArgoCD: using the WEB UI or creating a YAML CRD file. You can select the approach that best suits your infrastructure.
YAML Application manifest
- Push all the modifications to your private git repository, which is accessible by ArgoCD.
- Make sure ArgoCD is configured to be able to authenticate against the private git repo.
(When done correctly, something like this[email protected]:perfectscale/ps-kube.gitcan become a valid repo target.) - Login to the ArgoCD Web UI interface and click the
NEW APPbutton.
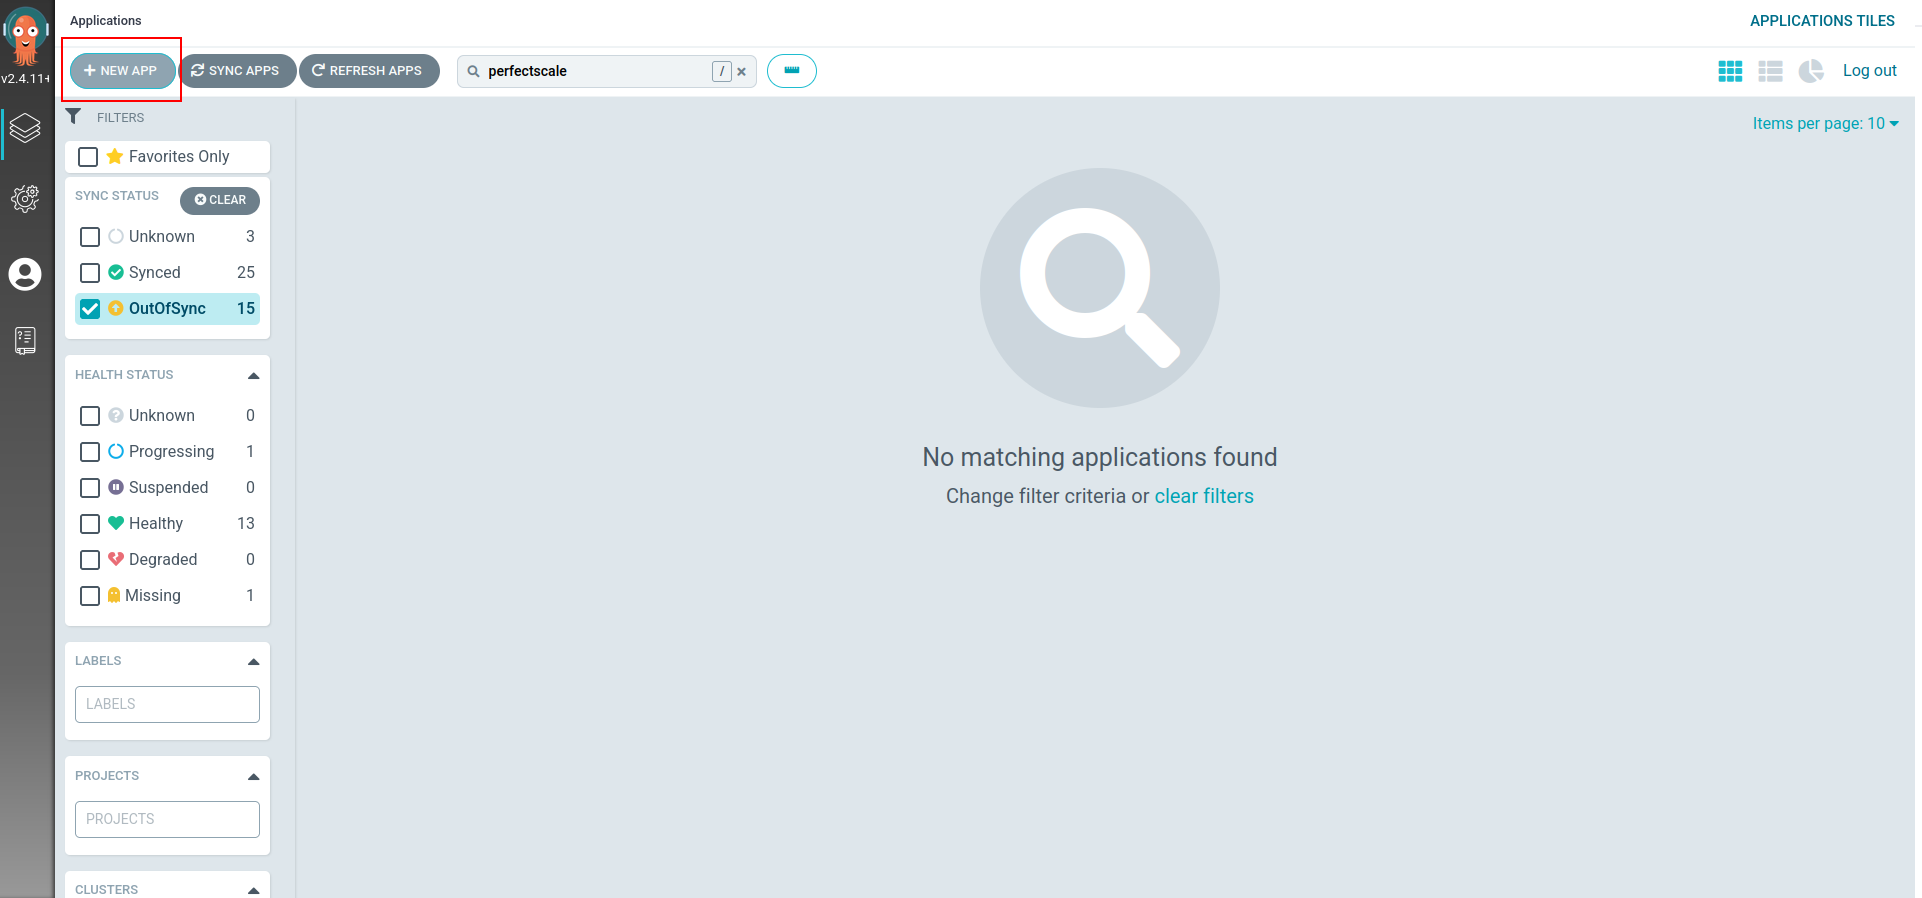
New app ArgoCD
- Give the app a name.
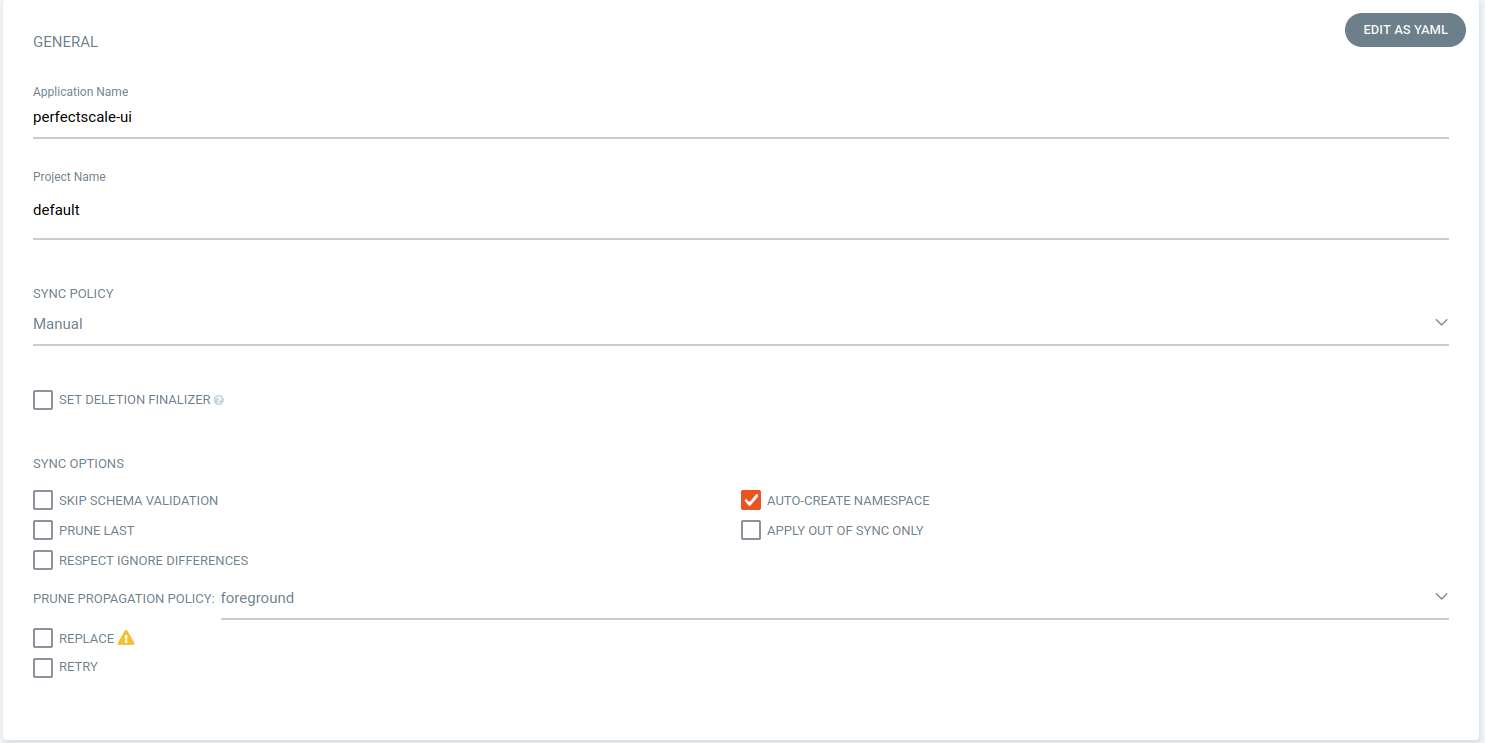
New app form1
- Scroll down and reference your git repo.
([email protected]:perfectscale/ps-kube.gitrepresents ssh auth against a private git repo)
(HEAD: refers to the latest revision)
(Path: = exporter, refr
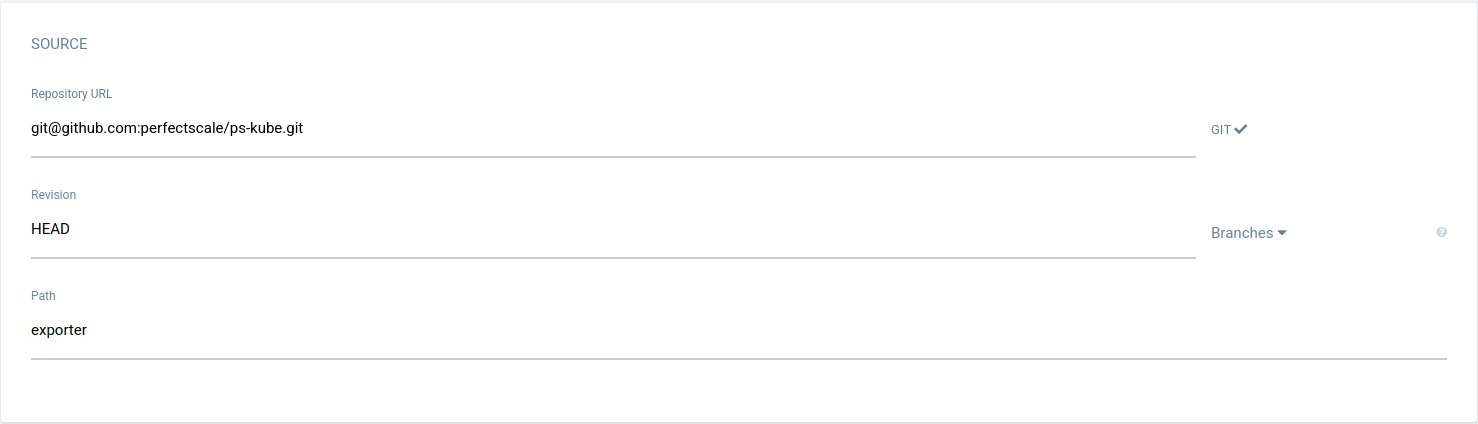
New app form2
- Scroll down and configure a destination
(kubernetes.default.svc represents the kubernetes cluster where ArgoCD is running)
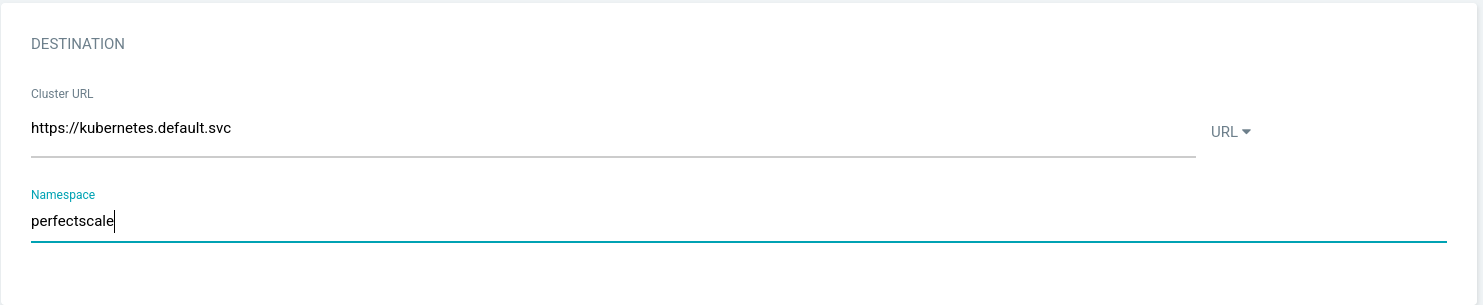
New app form3
- Configure input parameters as needed
values.yaml represents default helm values of the helm chart.
dev.yaml represents customized helm values that should be applied to a dev cluster.
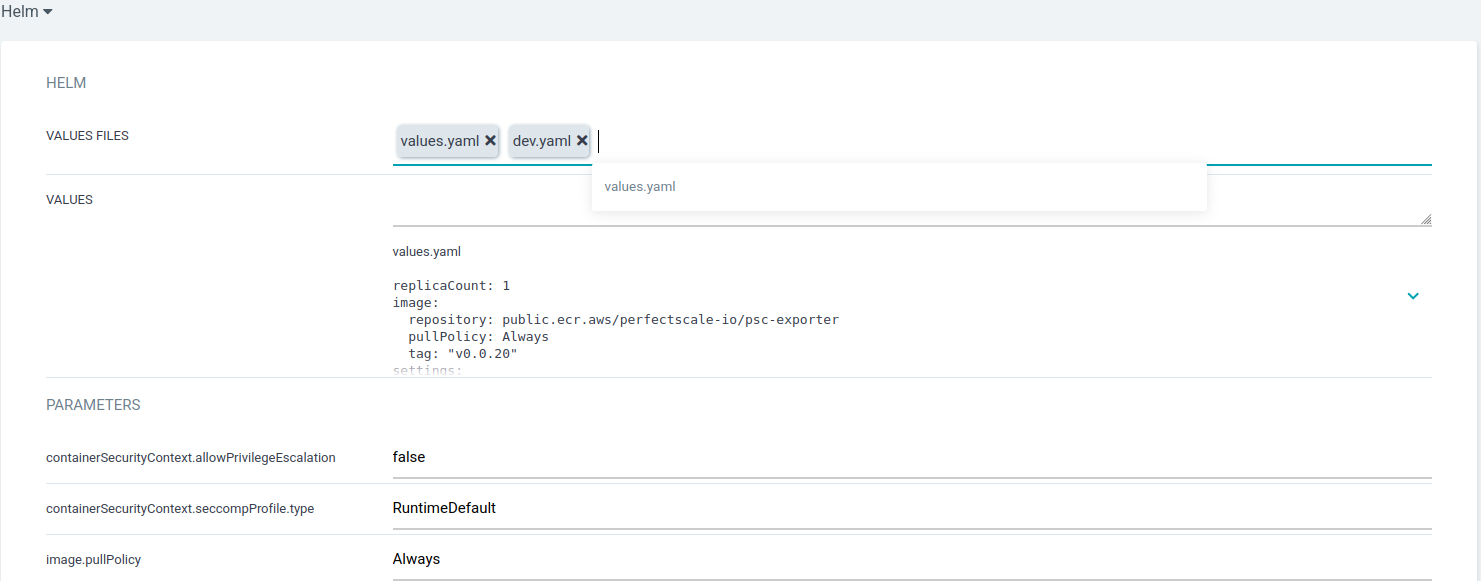
New app form4
- Once the creation process is completed, you will see an OutOFSync application.
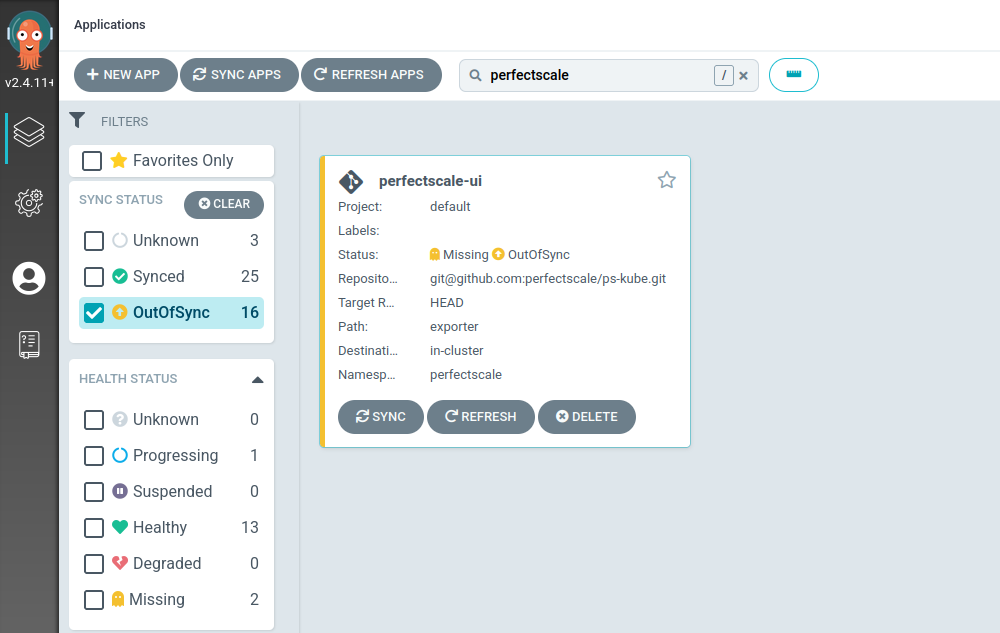
OutOFSync application
- Synchronize the application.
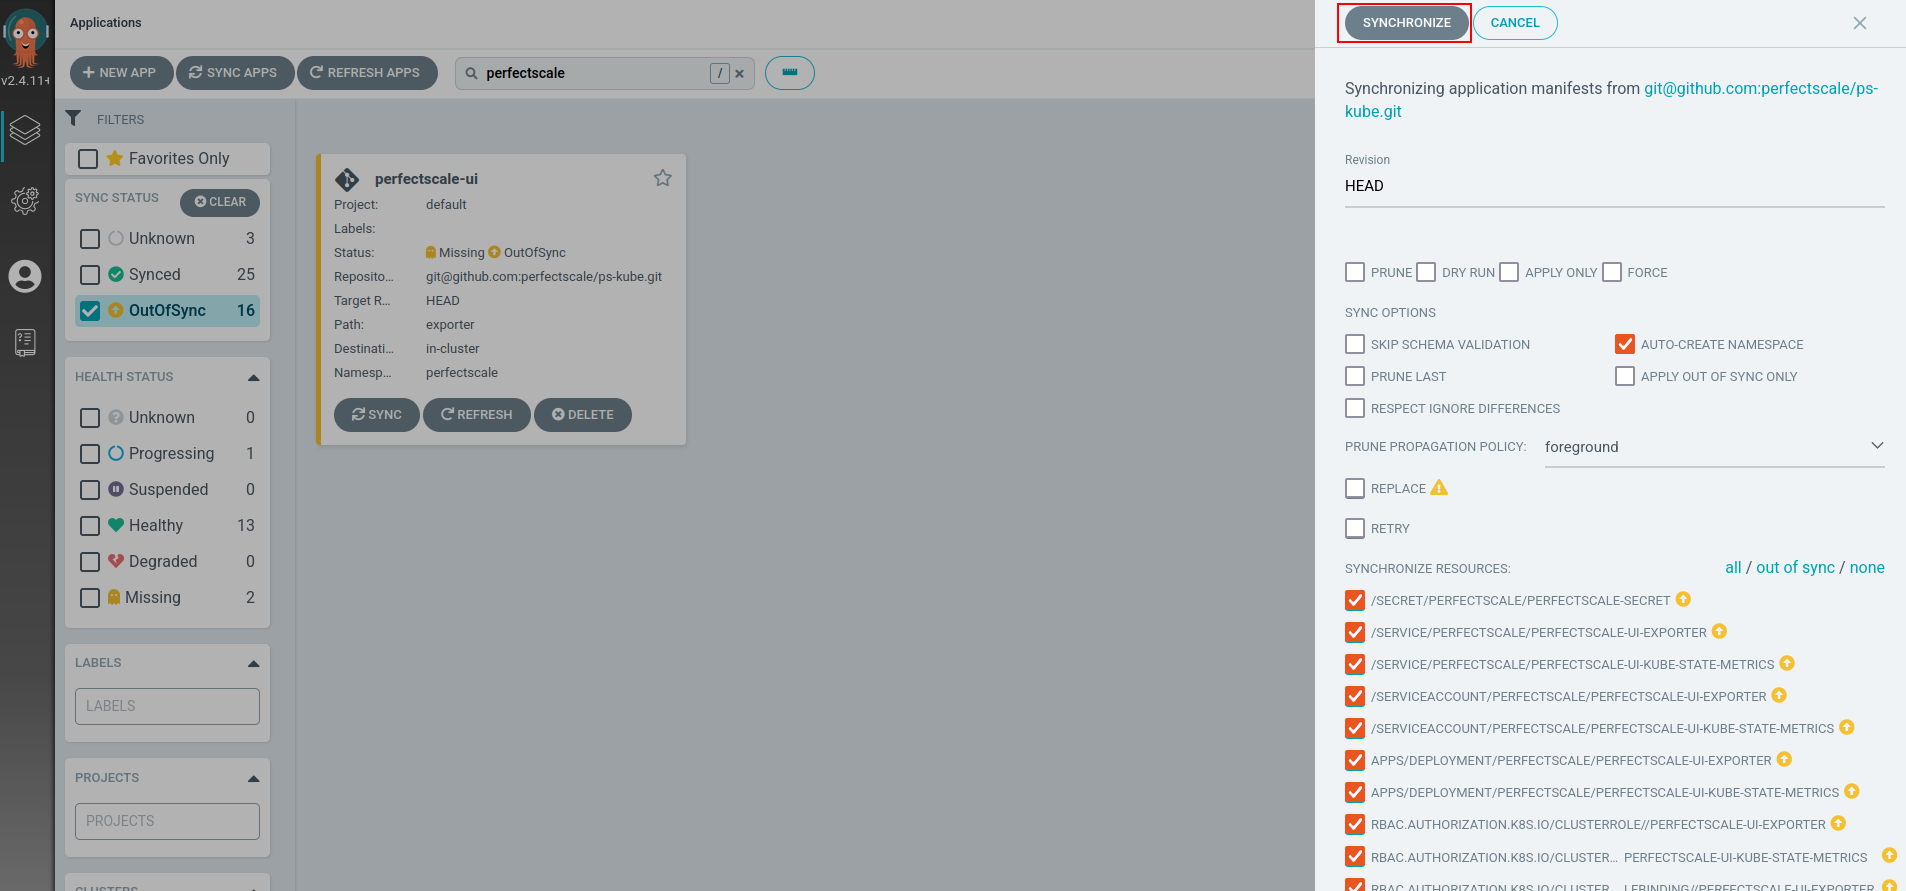
Application synchronization
- Once things stabilize, you should see something like the image below.
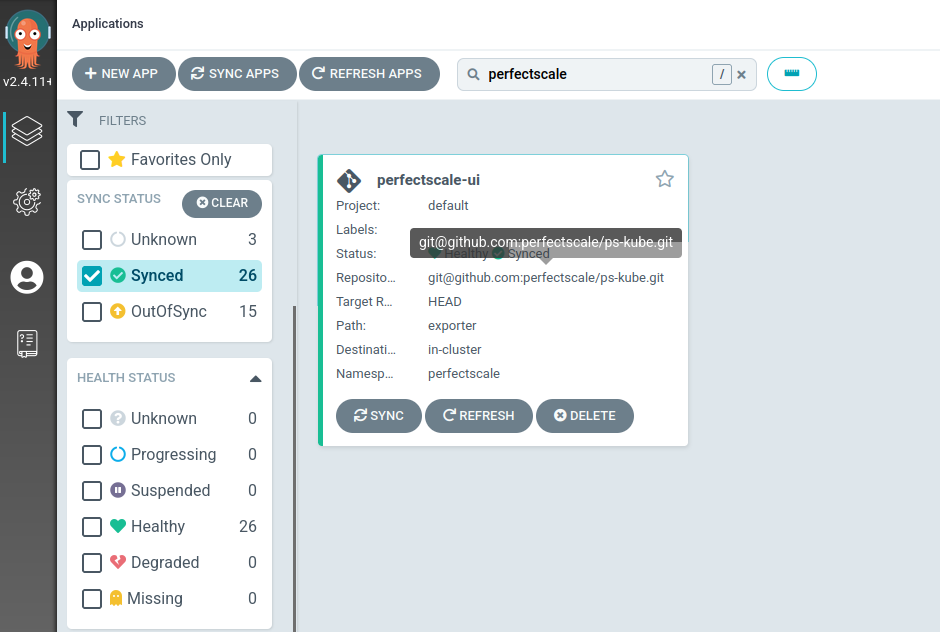
Synchronized application
- Ensure that all pods are running.

Check running pods