Attribute Azure デプロイ
Attribute Terraform を使用したインストール
スムーズな導入を行うために、Attribute は請求情報の抽出とセンサー登録のセットアップを自動化する Terraform モジュールを提供しています。詳細な Terraform のドキュメントとサンプルは、Terraform モジュール内の README に記載されています。
このモジュールによって作成されるリソース
モジュールを実行すると、次のリソースが作成されます。
Attributeという名前の Resource group- 請求データを保存する Storage account
- データ取得を可能にする
Attributeという名前の Managed Identity - データ取得を容易にする Data Export リソース
重要な補足事項
- サポートされる Terraform のバージョンは 1.9 以上 です。
- モジュールは Azure tenant レベルまたは Azure subscription レベルのいずれかにインストールでき、Attribute ソリューションに必要なすべてのインフラストラクチャを作成します。
- モジュールを実行するには、ユーザーに特定の権限セットが必要です(最新の必要な権限の完全な一覧は、下記インストール手順のステップ 2 に記載されています)。
- このモジュールは、コンピュートインフラストラクチャ上に Attribute センサーをデプロイ しません。そのプロセスはコンピュートクラスタごとに異なるツールで実行します(Attribute のインストールガイドを参照してください)。
付録 A: 詳細なインストール手順
この付録では、subscription レベルでのセットアップ全体の手順を説明します。
ステップ 1 — Billing の統合
-
使用している Terraform のバージョンが 1.9 以上であることを確認してください。
terraform version -
モジュールを実行する権限を持っていることを確認してください。最新の一覧はモジュールの README に記載されています。必要な権限は次のとおりです。
Microsoft.Resources/subscriptions/resourceGroups/readMicrosoft.Resources/subscriptions/resourceGroups/writeMicrosoft.Resources/subscriptions/readMicrosoft.Storage/storageAccounts/readMicrosoft.Storage/storageAccounts/writeMicrosoft.Storage/storageAccounts/listkeys/actionMicrosoft.Storage/storageAccounts/blobServices/containers/readMicrosoft.Storage/storageAccounts/blobServices/containers/writeMicrosoft.Storage/storageAccounts/blobServices/readMicrosoft.Storage/storageAccounts/fileServices/readMicrosoft.ManagedIdentity/userAssignedIdentities/readMicrosoft.ManagedIdentity/userAssignedIdentities/writeMicrosoft.ManagedIdentity/userAssignedIdentities/federatedIdentityCredentials/readMicrosoft.ManagedIdentity/userAssignedIdentities/federatedIdentityCredentials/writeMicrosoft.Authorization/roleAssignments/readMicrosoft.Authorization/roleAssignments/writeMicrosoft.CostManagement/exports/readMicrosoft.CostManagement/exports/write -
main.tfファイルを更新します。デフォルトでは、Billing Export は subscription スコープで作成されます。代わりに billing account スコープでエクスポートを作成したい場合は、下記のオプション 2 を参照してください。
オプション 1 — subscription レベルで実行する場合:
- 使用している Terraform プロファイルを更新し、正しい Azure subscription を指すようにしてください。
subscription_idを、対象の subscription を指すように更新してください。organization_idとtokenの値は 変更せず、そのままにしてください。
terraform {required_providers {azurerm = {source = "hashicorp/azurerm"version = "~> 4.0"}azapi = {source = "azure/azapi"version = ">= 2.0.0, < 3.0"}}}provider "azurerm" {features {}subscription_id = "subscription-id"}module "attribute-sensor" {source = "ZouzIO/attribute-sensor/azurerm"version = "~> 2.0"organization_id = "XXXXXXXXXXXXXXXXXXX"token = "XXXXXXXXXXXXXXXXX"}オプション 2 — billing account レベルで Billing Export を作成する場合:
main.tf内のattribute-sensorモジュールを更新し、billing account ID を含めてください。module "attribute-sensor" {source = "ZouzIO/attribute-sensor/azurerm"version = "2.0.1"organization_id = var.organization_idtoken = var.tokenbilling_account_id = "<YOUR_BILLING_ACCOUNT_ID>"}追加の subscription ごとに, モジュールを更新し、次の値を含めてください(プライマリ以外の subscription ではコストエクスポートを無効にします)。
module "attribute-sensor" {source = "ZouzIO/attribute-sensor/azurerm"version = "2.0.1"organization_id = var.organization_idtoken = var.tokencreate_costs_export = false} -
Terraform を適用します。
terraform initterraform apply -
検証。 次のリソースが作成されていることを確認してください。
Attributeロール- Storage account
AttributeExportCost Management export
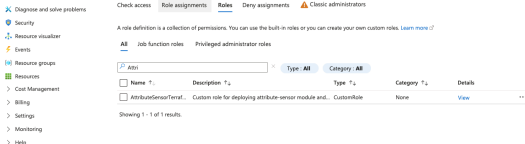
ステップ 2 — センサー実装
次に、各 AKS クラスタ上で Helm chart を使用してセンサーのインストールを実行します。
-
Attribute から提供された values ファイル(
operator-values.yaml)を保存します。このファイルには一意の一時トークンが含まれています。 -
使用している Helm のバージョンを確認してください。3.8.0 以上 がサポートされています。
helm version -
operator-values.yaml内のcluster_nameの値を、対象クラスタに合わせて更新してください。cluster_name: <subscription_id>/<resource_group>/<cluster_name>注意subscription_idおよびresource_groupは、そのクラスタ固有の値です。クラスタノード用に異なる resource group を使用している場合は、ノードの resource group ではなく クラスタ の resource group を使用してください。 -
operator-values.yaml内の Java インストゥルメンテーション設定を確認してください。デフォルトで次のフラグが含まれています。# Java instrumentation settingssensorDisableAutoJavaInstrumentation: truejavaAutoInject:enabled: trueこの構成は Kubernetes 1.28 以上 でサポートされています。インジェクションバックエンドは自動的に選択されるため、バージョン固有の調整は不要です。
admission-time injection の代わりにセンサーの動的 Java インストゥルメンテーションを使用するには、
javaAutoInject.enabledをfalseにし、かつsensorDisableAutoJavaInstrumentationをfalseに設定してください。これら 2 つを同時に有効にしてはいけません。両モードの詳細な説明については、Attribute Java Instrumentation Guide を参照してください。 -
Helm chart をインストールします。
helm upgrade -i attribute \oci://quay.io/attribute/operator-chart \-f <values.yaml> \-n attribute \--create-namespace -
検証。 次を実行し、Helm リリースおよび operator とセンサーが稼働していることを確認してください。
helm list -n attributekubectl get pods -n attribute期待される出力例:


他のコンピュートリソースタイプ(単体サーバーなど)にセンサーをデプロイしたい場合は、該当するセンサーデプロイメントのドキュメントを参照してください。
商標: Microsoft および Microsoft Azure は、Microsoft グループ各社の商標です。Terraform は HashiCorp, Inc. の登録商標です。Kubernetes は The Linux Foundation の登録商標です。その他すべての商標は、各所有者に帰属します。