Ticketing & Bug Tracking — Self-hosted 2.0
Jira integration simplifies issue management within clusters and helps you ensure every issue gets properly addressed. With just a few clicks, tickets can be opened and assigned to the proper teams, with the details needed to streamline resolutions and configuration changes.
PerfectScale only supports the SaaS Jira integration.
Configuring Jira integration with the profile
:tools: How to create Jira Profile
There are two options for creating a Profile: from the Settings tab or directly from the Overview.
From the Settings tab
Go to the Settings tab on the left panel -> select Integrations -> click the +Add Integration button and select Jira from the drop-down -> insert the required data.
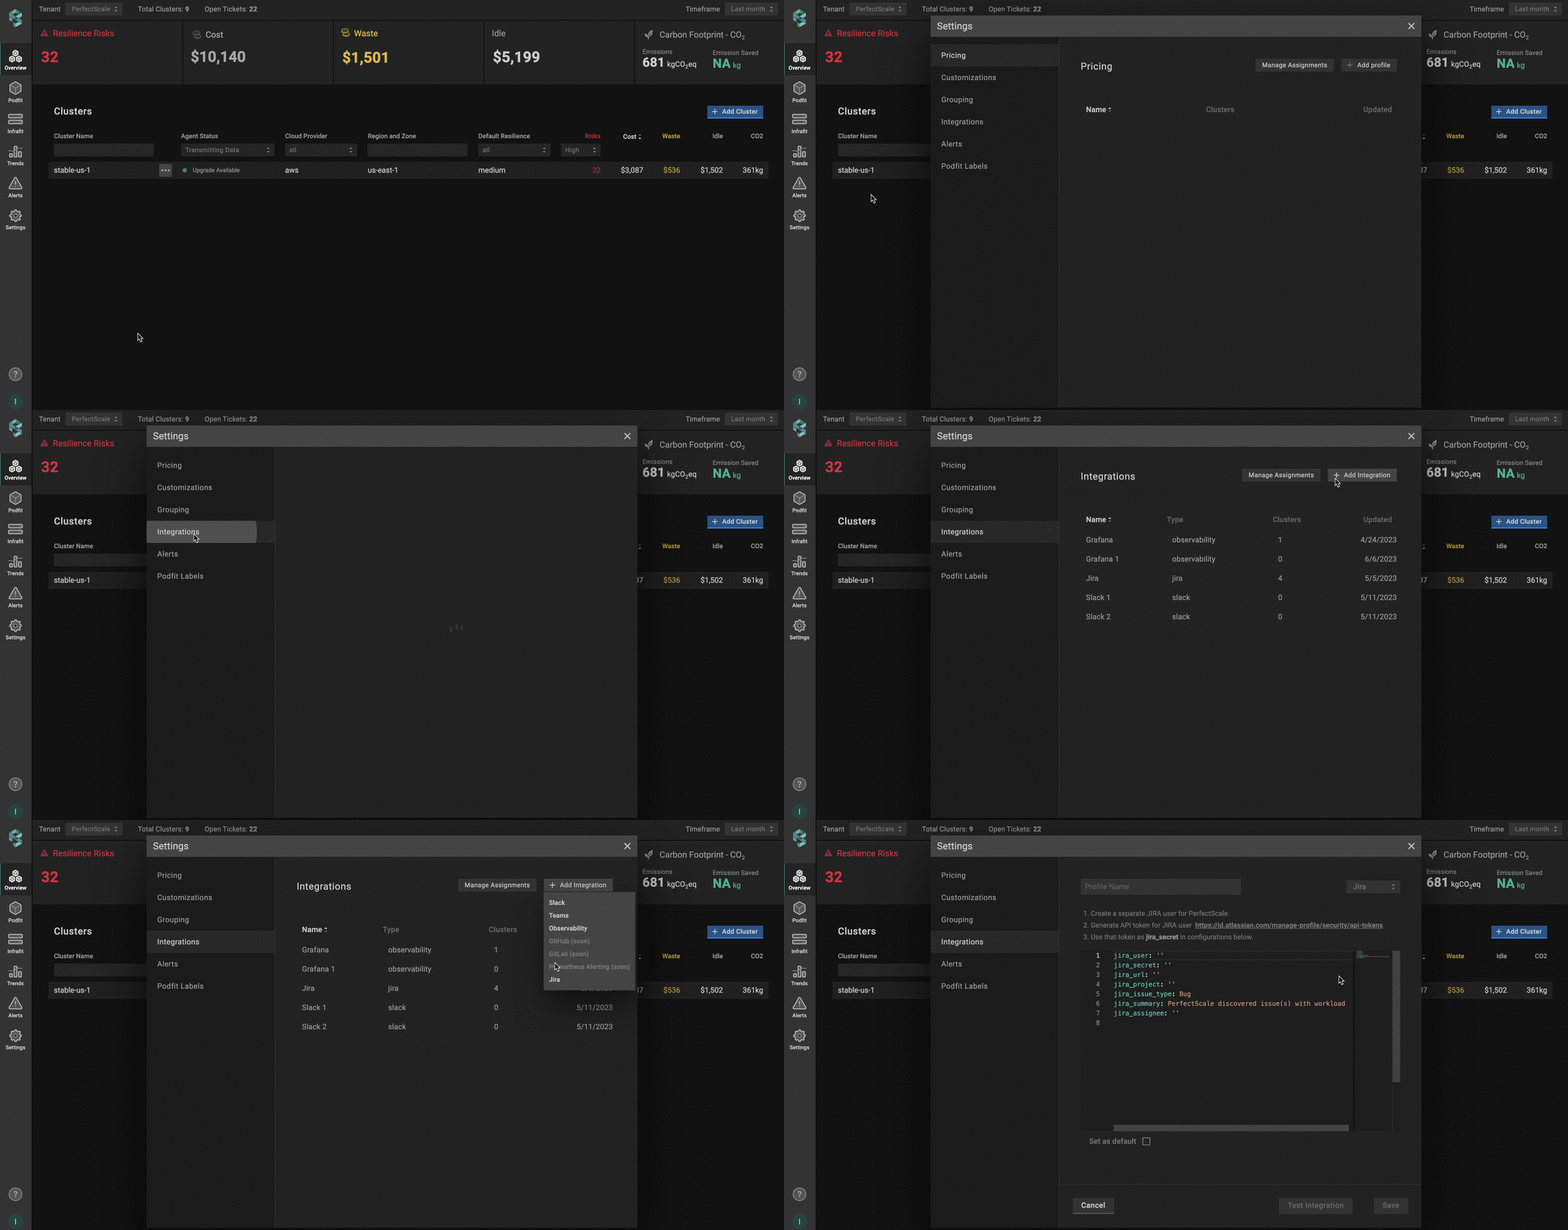
Jira profile from settings
From the Overview tab
Go to the Overview tab on the left panel -> find the cluster to which you want to apply the Profile and click gear button -> go to Customizations -> find Integrations and click the Ticketing & Bug Tracking drop-down list -> click the Add New Profile button -> insert the required data.
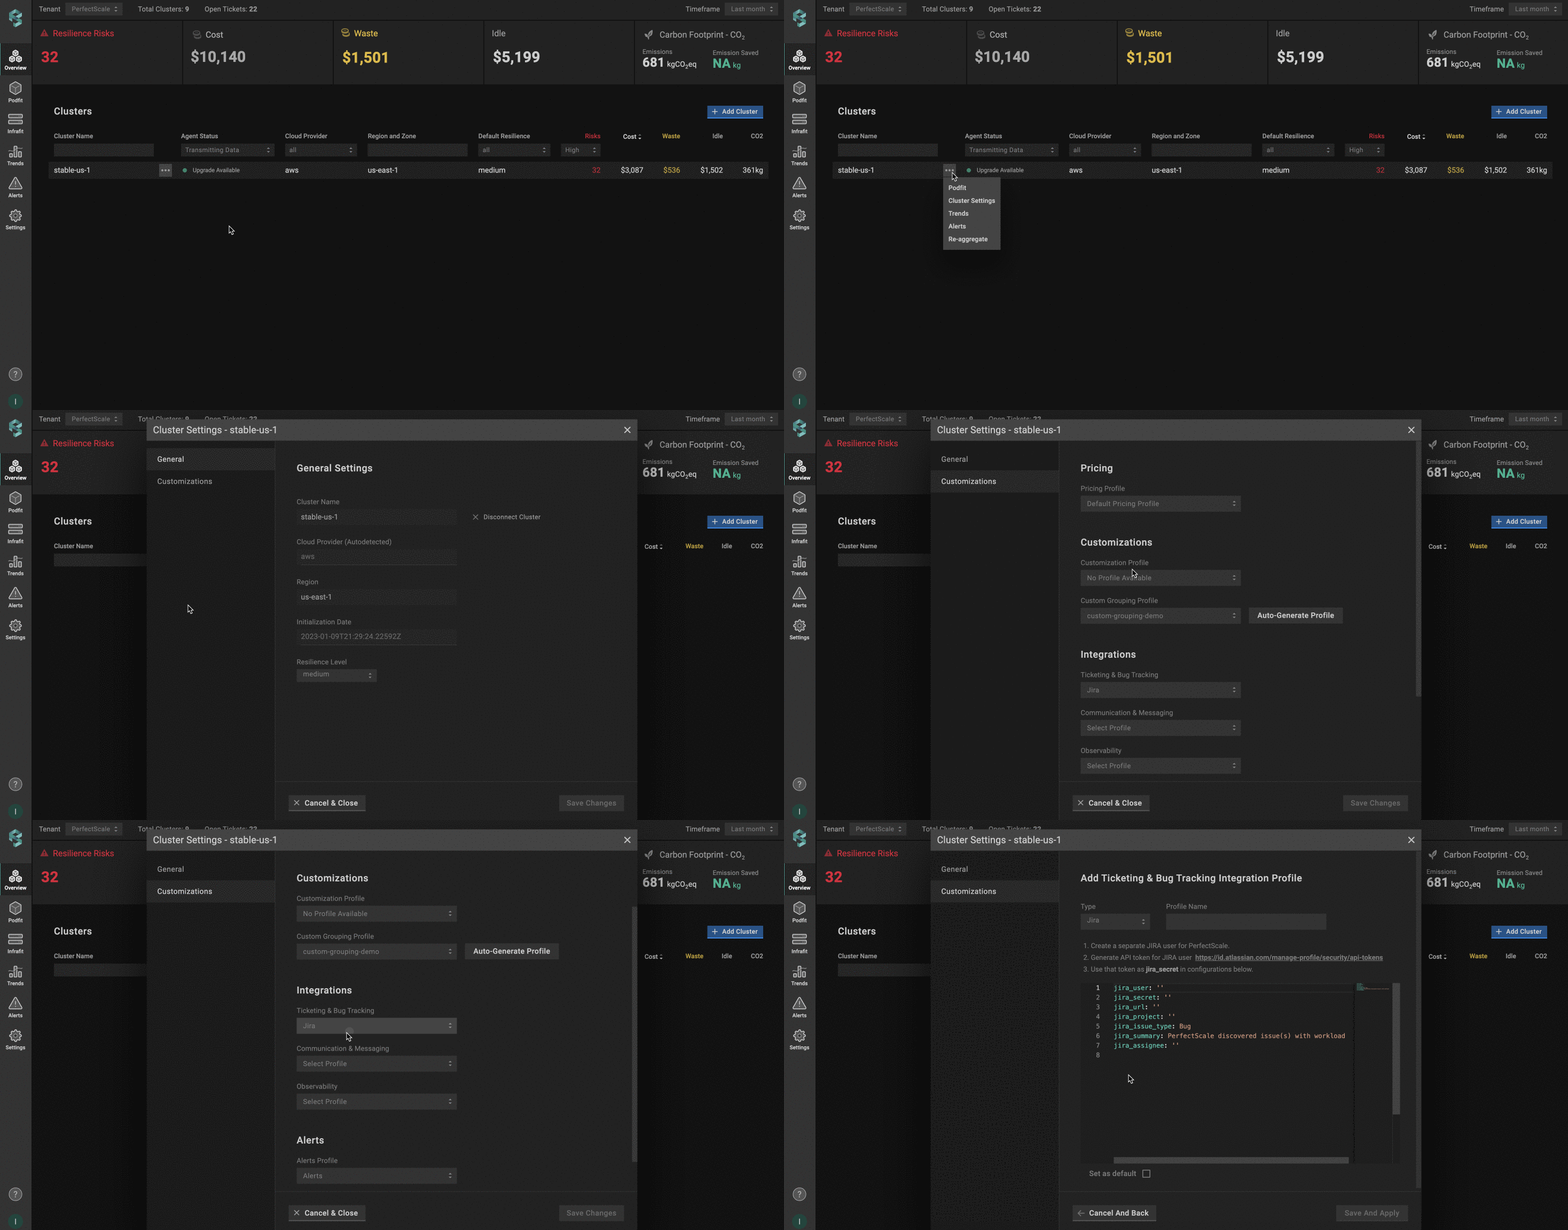
Jira profile from overview
Jira Profile Configuration
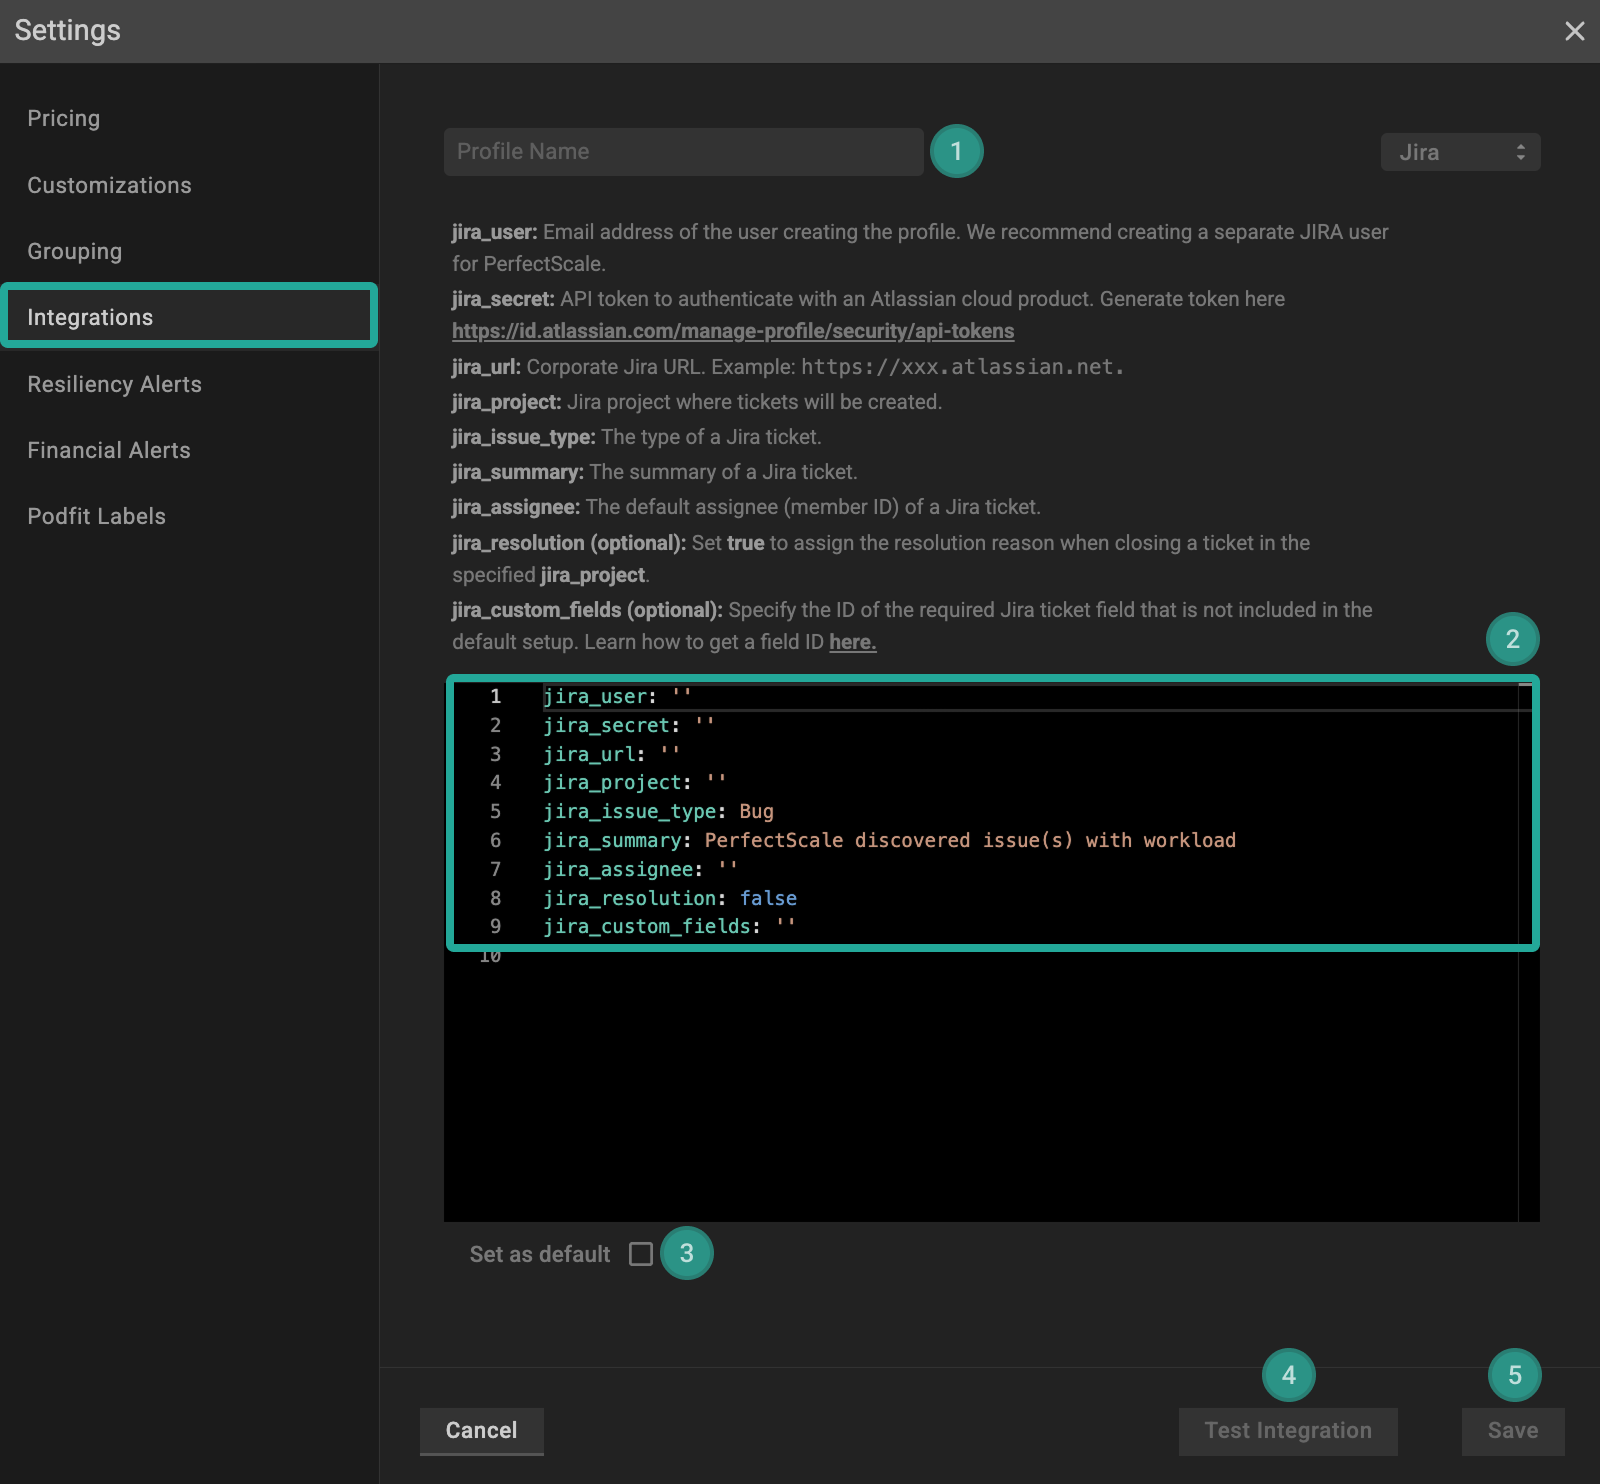
Jira profile configuration
- Name your profile
- Configure the profile according to the following instructions:
jira_user: Email address of the user creating the profile. We recommend creating a separate JIRA user for PerfectScale.
jira_secret: API token to authenticate with an Atlassian cloud product.
The API token in the profile must have the Jira Administrator global permission.
-
Go to https://id.atlassian.com/manage-profile/security/api-tokens and click
Create API tokenbutton.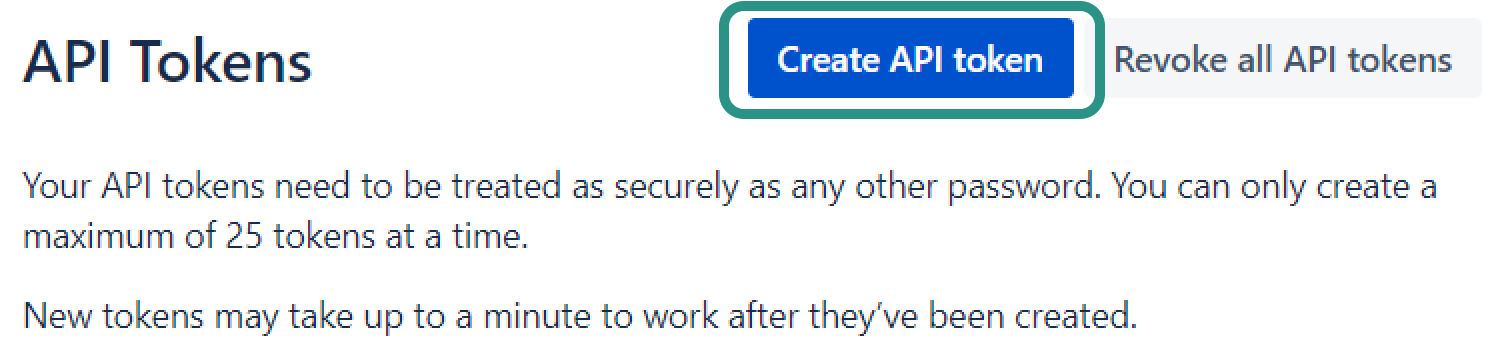
New API token
-
Insert the label and click
Createbutton.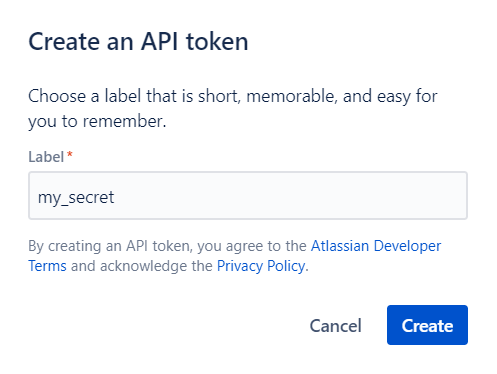
Create an API token
-
Copy the created API token and put it in the
jira_secretfield.
💡 NOTE: To generate the API token, you need to use the Jira account that is associated with theIntegration Profile(account specified injira_user).
jira_url: Corporate Jira URL. Example: https://xxx.atlassian.net, where xxx - a corporate domain.
jira_project: Jira project where tickets will be created.
jira_issue_type: The type of a Jira ticket.
jira_sumary : The summary of a Jira ticket.
jira_assignee : The default assignee (member ID) of a Jira ticket.
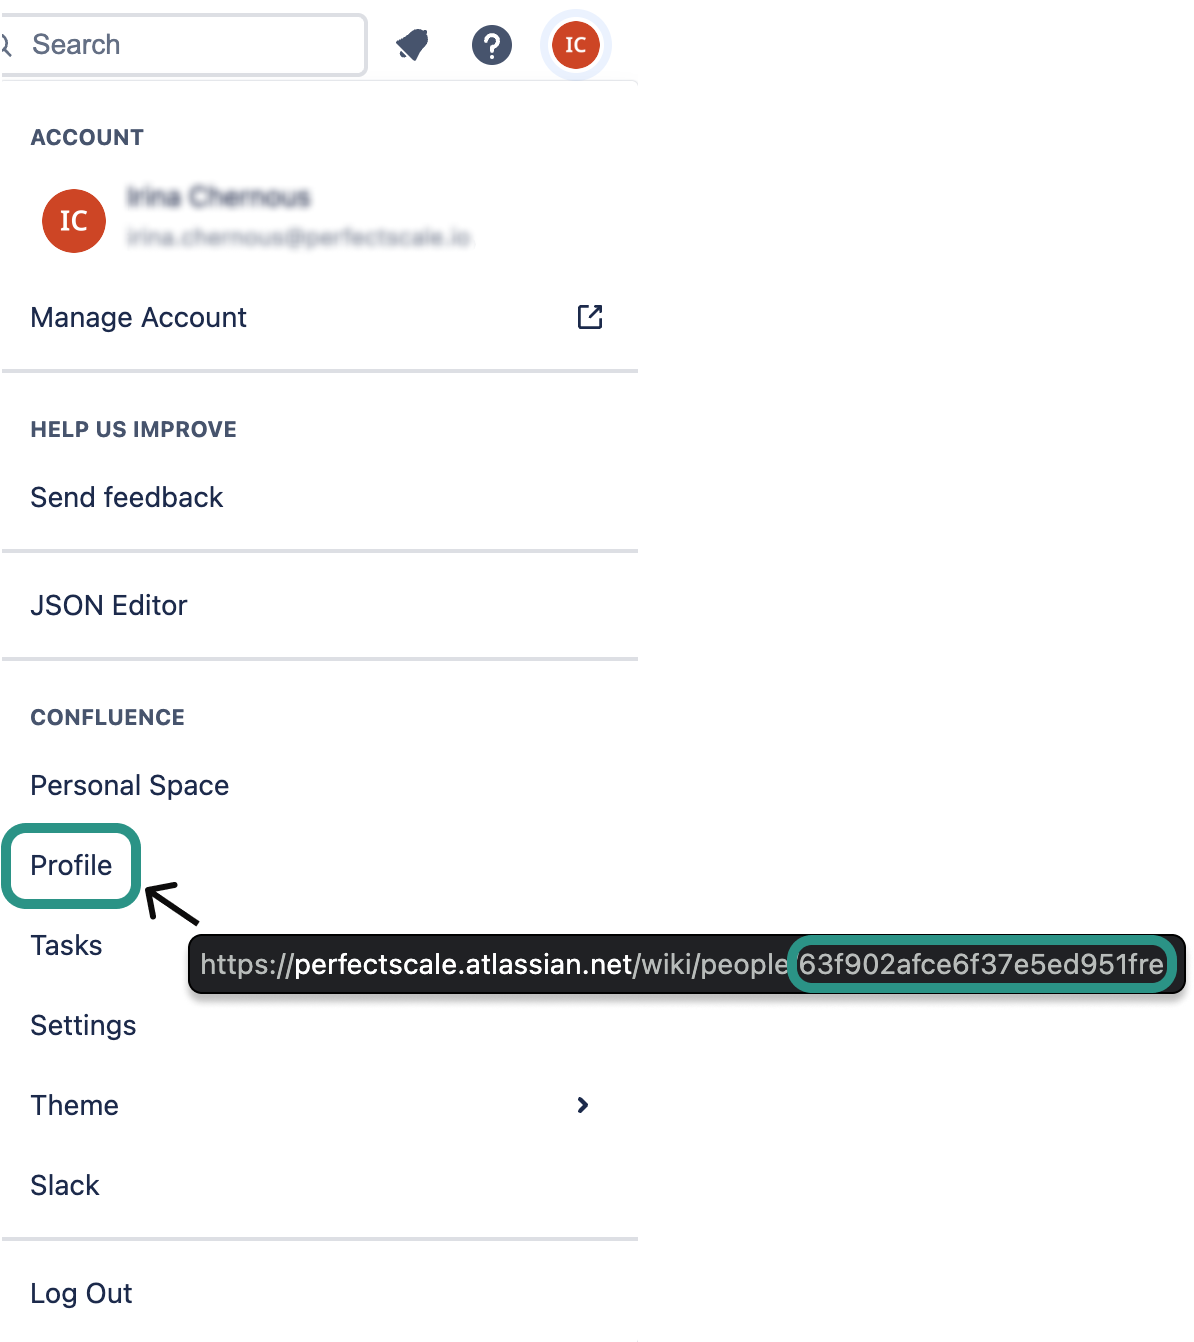
Member id
jira_resolution(optional): Set true to assign the resolution reason when closing a ticket in the specified jira_project.
jira_custom_fields(optional): Specify the ID of the required Jira ticket field that is not included in the default setup. Use the following format for the custom field ID:
jira_custom_fields:
  customfield_XXXXX: 'DevOps Team'
Learn how to get a field ID here.
- Use
Set as defaultcheckbox to automatically assign the profile to the clusters.
💡 NOTE: The manually assigned profile takes priority over the default one. - To verify the accuracy of your Jira configuration, simply click on the
Test Integrationbutton. When the configuration is correct, you will see the messageJira Configured Correctly. In case ofJira Configured Wronglyresponse, check and ensure the correctness of the data. - Click the
Savebutton to save the progress.
How to get Jira custom field ID
A simple method to obtain a Jira custom field ID without requiring extra permissions is to inspect the relevant Jira issue that includes this field. Follow the next simple steps:
- Open an issue (Jira ticket) with the custom field for which you want to find the ID.
- Right-click on the field name and select
Inspect. - On the Developer Tools panel, you will find the name and ID for your custom field.
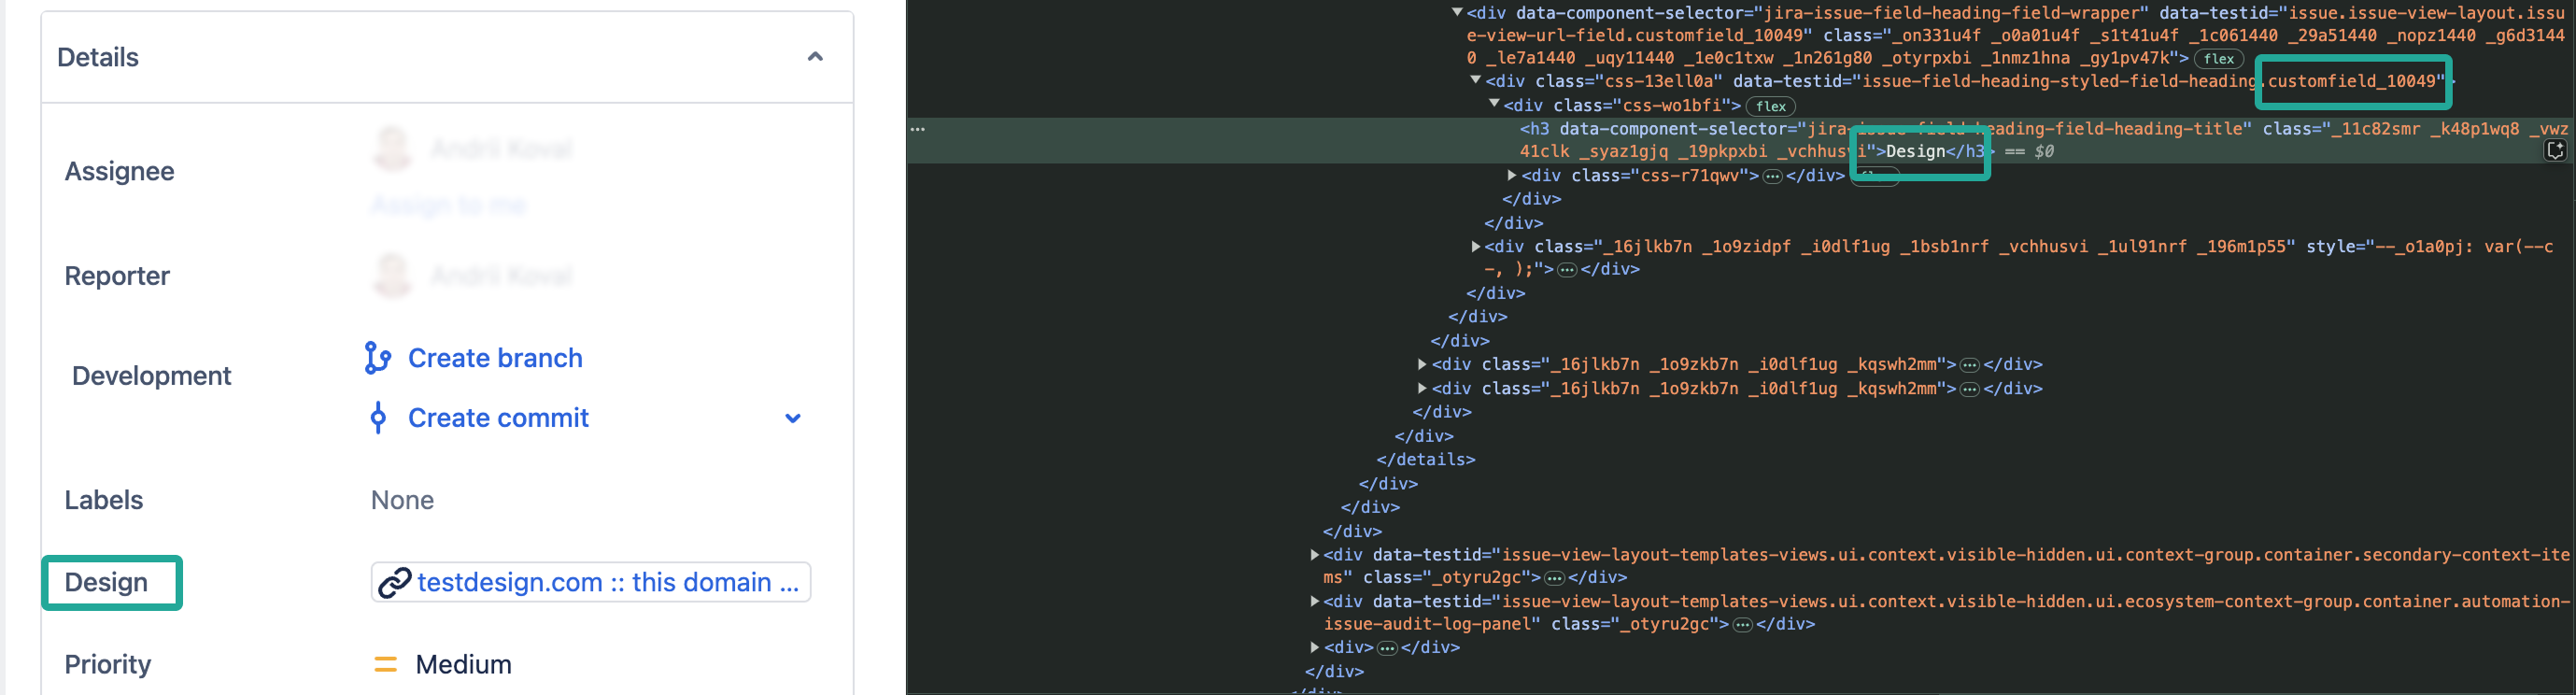
Jira custom field idApplying resiliency alerts profile to a single cluster
You can easily set up multiple custom fields within one profile by listing them under jira_custom_fields. For example:
jira_custom_fields:
  customfield_00000: 'DevOps Team'
  customfield_00001: 'Resource anomaly fix'
  customfield_00002: 'Under-provisioning'
:tools: How to apply Jira Profile
Apply to a single cluster
To apply the Profile to the cluster, go to the Overview tab on the left panel -> find the cluster to which you want to apply the Profile and click gear button -> go to Customizations -> find Integrations and click the Ticketing & Bug Tracking drop-down list -> select the needed profile.
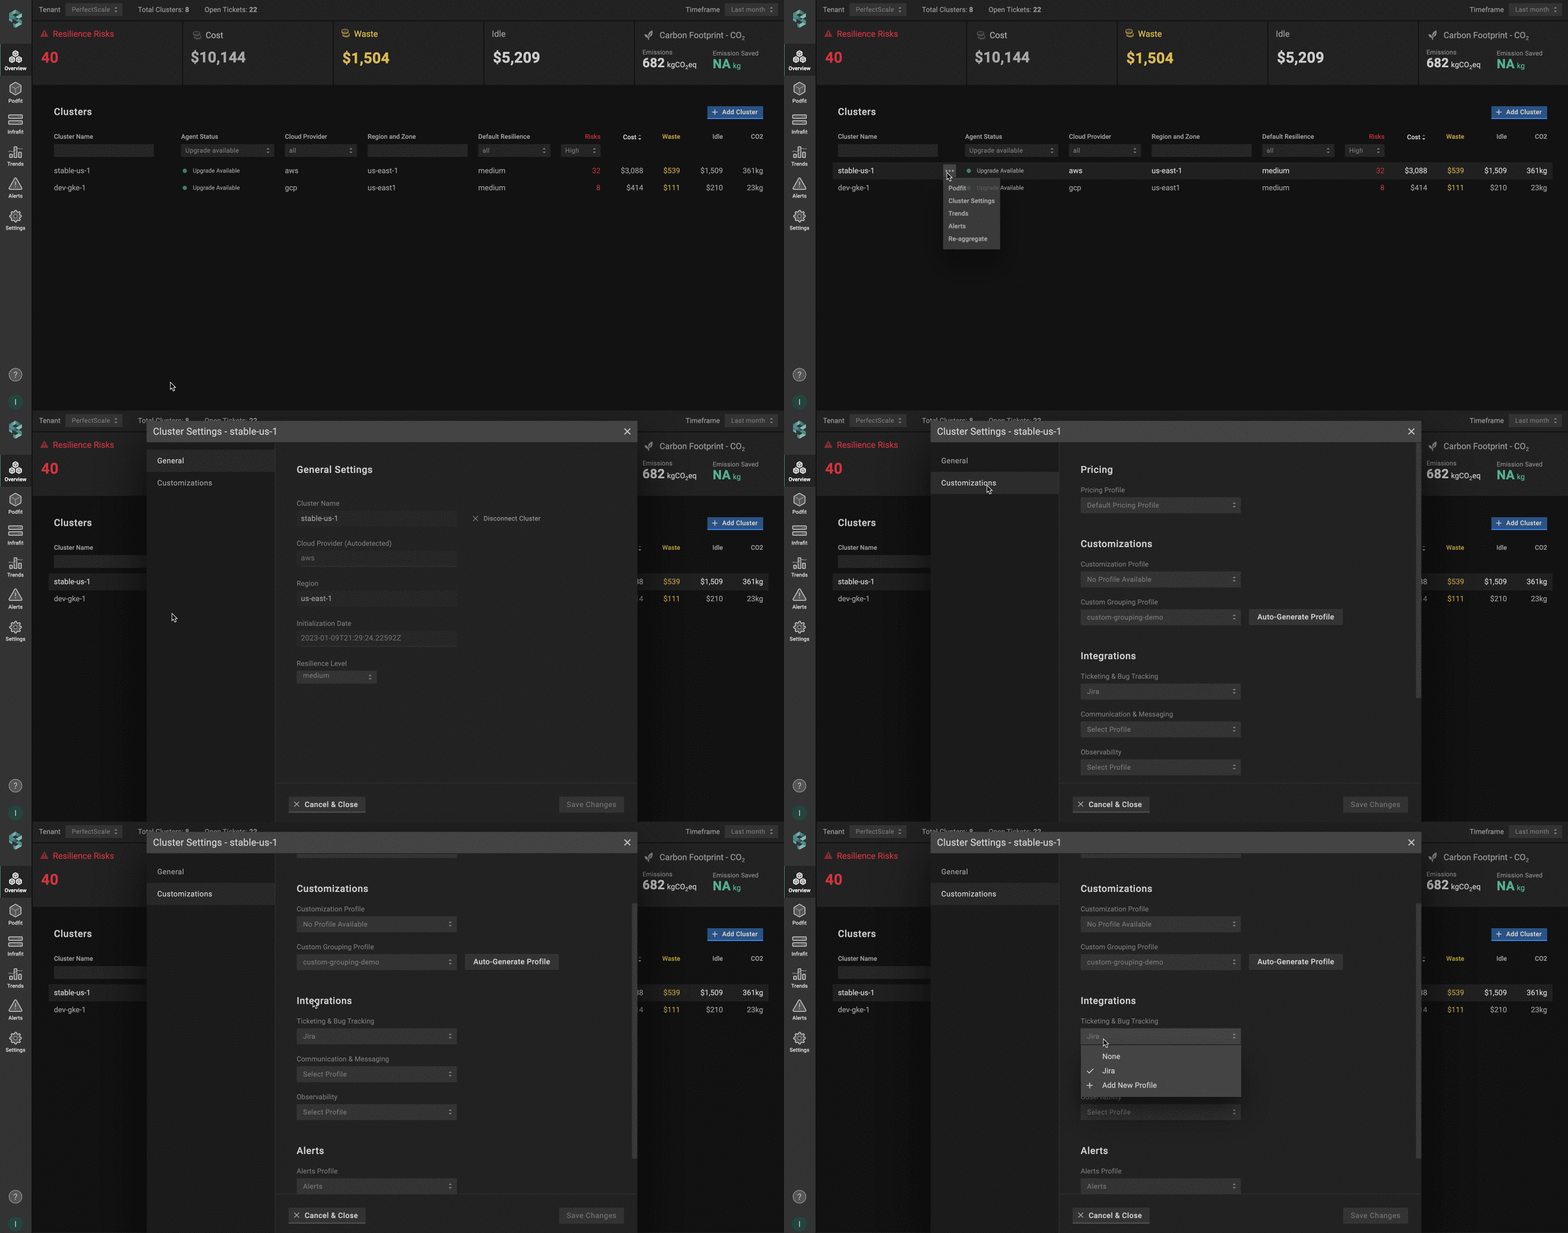
Applying Jira profile to a single cluster
Apply to multiple clusters
To apply a profile to multiple clusters from a single view, use the Manage Assignments feature.
Go to the Settings tab on the left panel -> select Integrations -> click the Manage Assignments button -> apply the profile for the needed clusters in the Ticketing & Bug Tracking section -> click the Save Changes button.
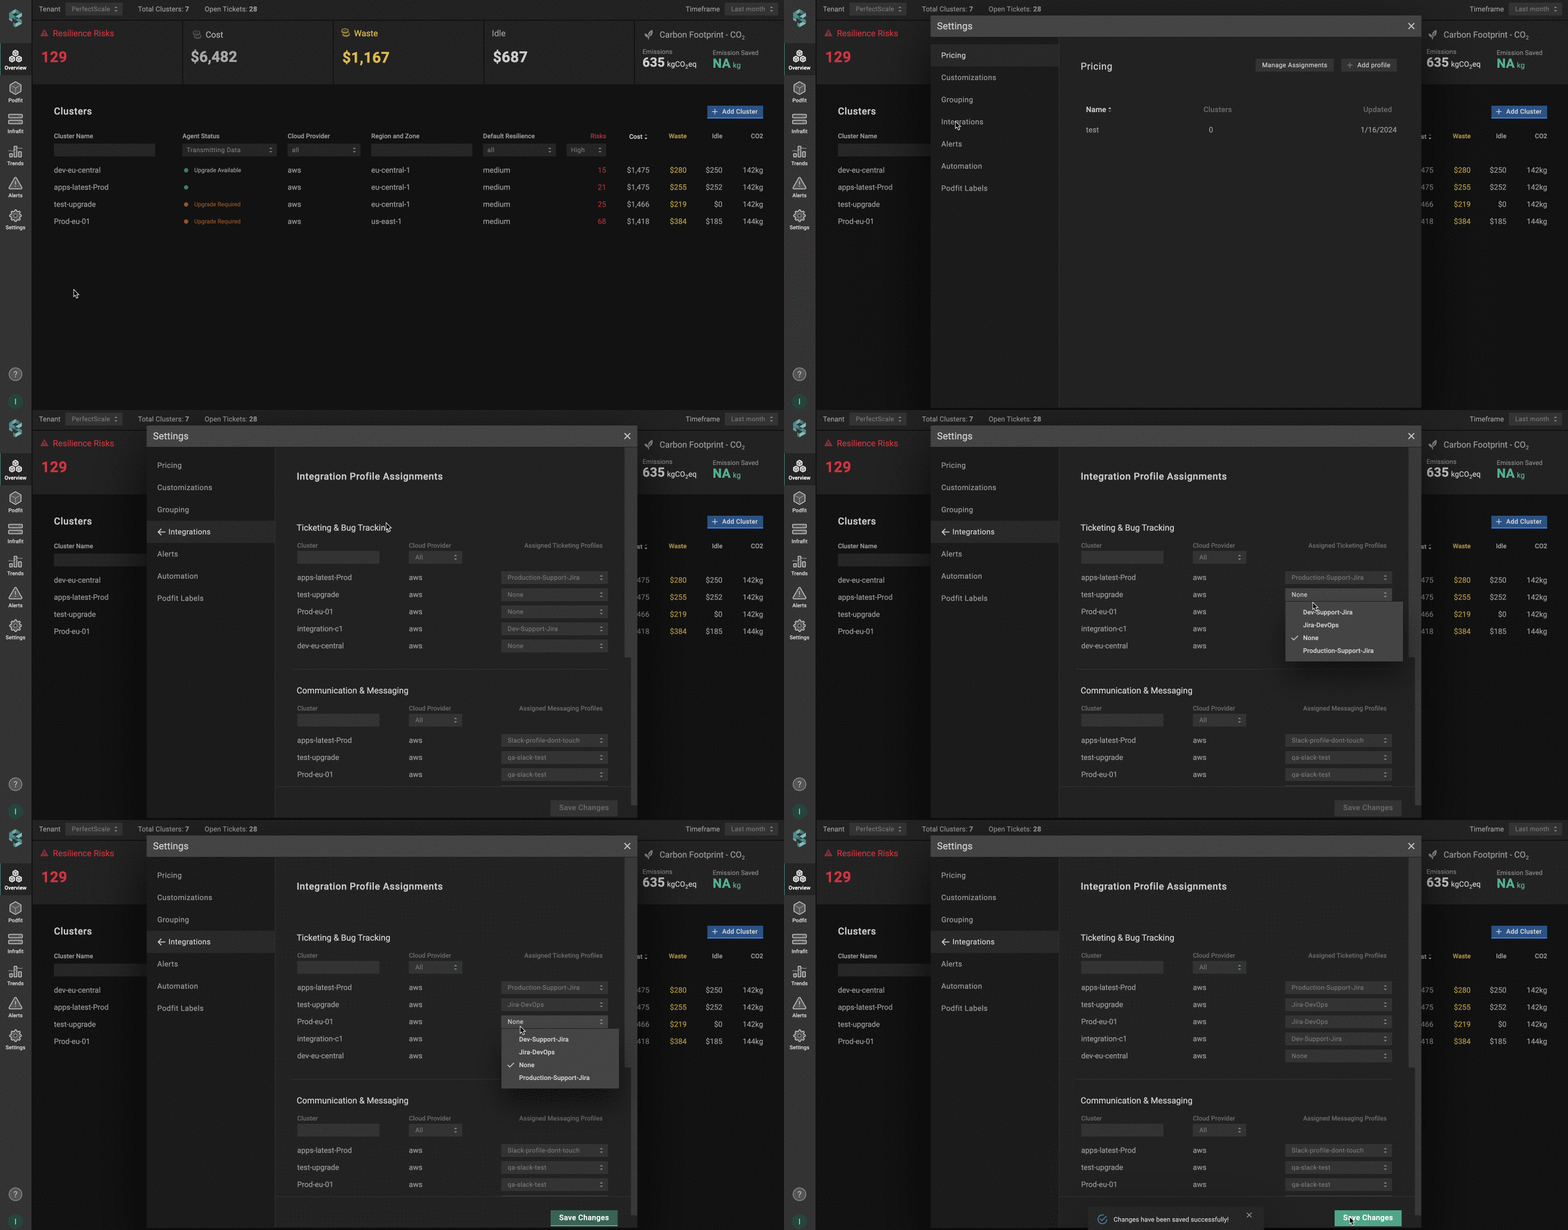
Applying Jira profile to multiple clusters
Configuring Jira integration with CRD
To enable Jira ticketing using a Custom Resource Definition (CRD), you’ll need to define and apply a Custom Resource (CR) with the required Jira parameters. This approach allows you to manage Jira ticketing directly through Kubernetes manifests.
The Custom Resource (CR) must be created in the perfectscale namespace.
Setup instructions
- Navigate to your Jira instance (e.g., https://mycompany.atlassian.net)
- Create a bot user or use an existing user account.
We recommend you create a separate JIRA user for PerfectScale.
- Generate an API token for the user.
- Copy the API token (you will need it for CR configuration).
- Apply the Jira API token secret.
- Configure a CR.
You may need to use custom fields for the integration. This configuration is optional, and you can learn more about it here.
Apply the Jira API token secret first:
Jira API Token Secret (apply this first)
apiVersion: v1
kind: Secret
metadata:
  name: jira-credentials
  namespace: perfectscale
type: Opaque
stringData:
  api-token: "your-jira-api-token-here"
Ensure that the secret is created in the same namespace as the exporter - perfectscale.
Configure the CR:
apiVersion: perfectscale.io/v1
kind: ClusterSettings
metadata:
name: cluster-settings-main
namespace: perfectscale
spec:
profiles:
integrations:
- type: jira
name: infrastructure-tickets
assigned: true
value:
jira_url: "https://mycompany.atlassian.net"
jira_secret_from:
secretKeyRef:
name: jira-credentials
key: api-token
jira_project: "INFRA"
jira_issue_type: "Bug"
jira_summary: "PerfectScale discovered issue(s) with workload"
jira_assignee: ""
jira_resolution: false
# Optional: custom fields (not included in the default setup)
# jira_custom_fields:
# customfield_10001: "DevOps Team"
# customfield_10002: "Resource anomaly fix"
⚙️ CR parameters:
| Parameter | Description |
|---|---|
jira_url | Corporate Jira URL. Example: https://xxx.atlassian.net |
jira_user | Email address of the user creating the CR. |
jira_secret_from | API token to authenticate with an Atlassian cloud product. |
jira_project | Jira project where you want tickets to be created. |
jira_issue_type | The desired type of a Jira ticket. |
jira_summary | The desired summary of a Jira ticket. |
jira_assignee | The default assignee (member ID) of a Jira ticket. |
jira_resolution | (optional) Set true to assign the resolution reason when closing a ticket in the specified jira_project. |
jira_custom_fields | (optional) Specify additional Jira ticket field (field ID) that is not included in the default setup. |