How to onboard a cluster — SaaS
PerfectScale is compatible and can be deployed in any Kubernetes environment, including EKS/EKS Anywhere, GKE, AKS, KOPS, private cloud, and other Kubernetes distributions.
Onboarding instructions
-
Login into the PerfectScale app.
-
Once logged in, navigate to the
Overviewtab. -
You can see a button to connect a new Kubernetes cluster. To connect a new cluster, click the
Add Clusterbutton. A pop-up window with the following steps will appear.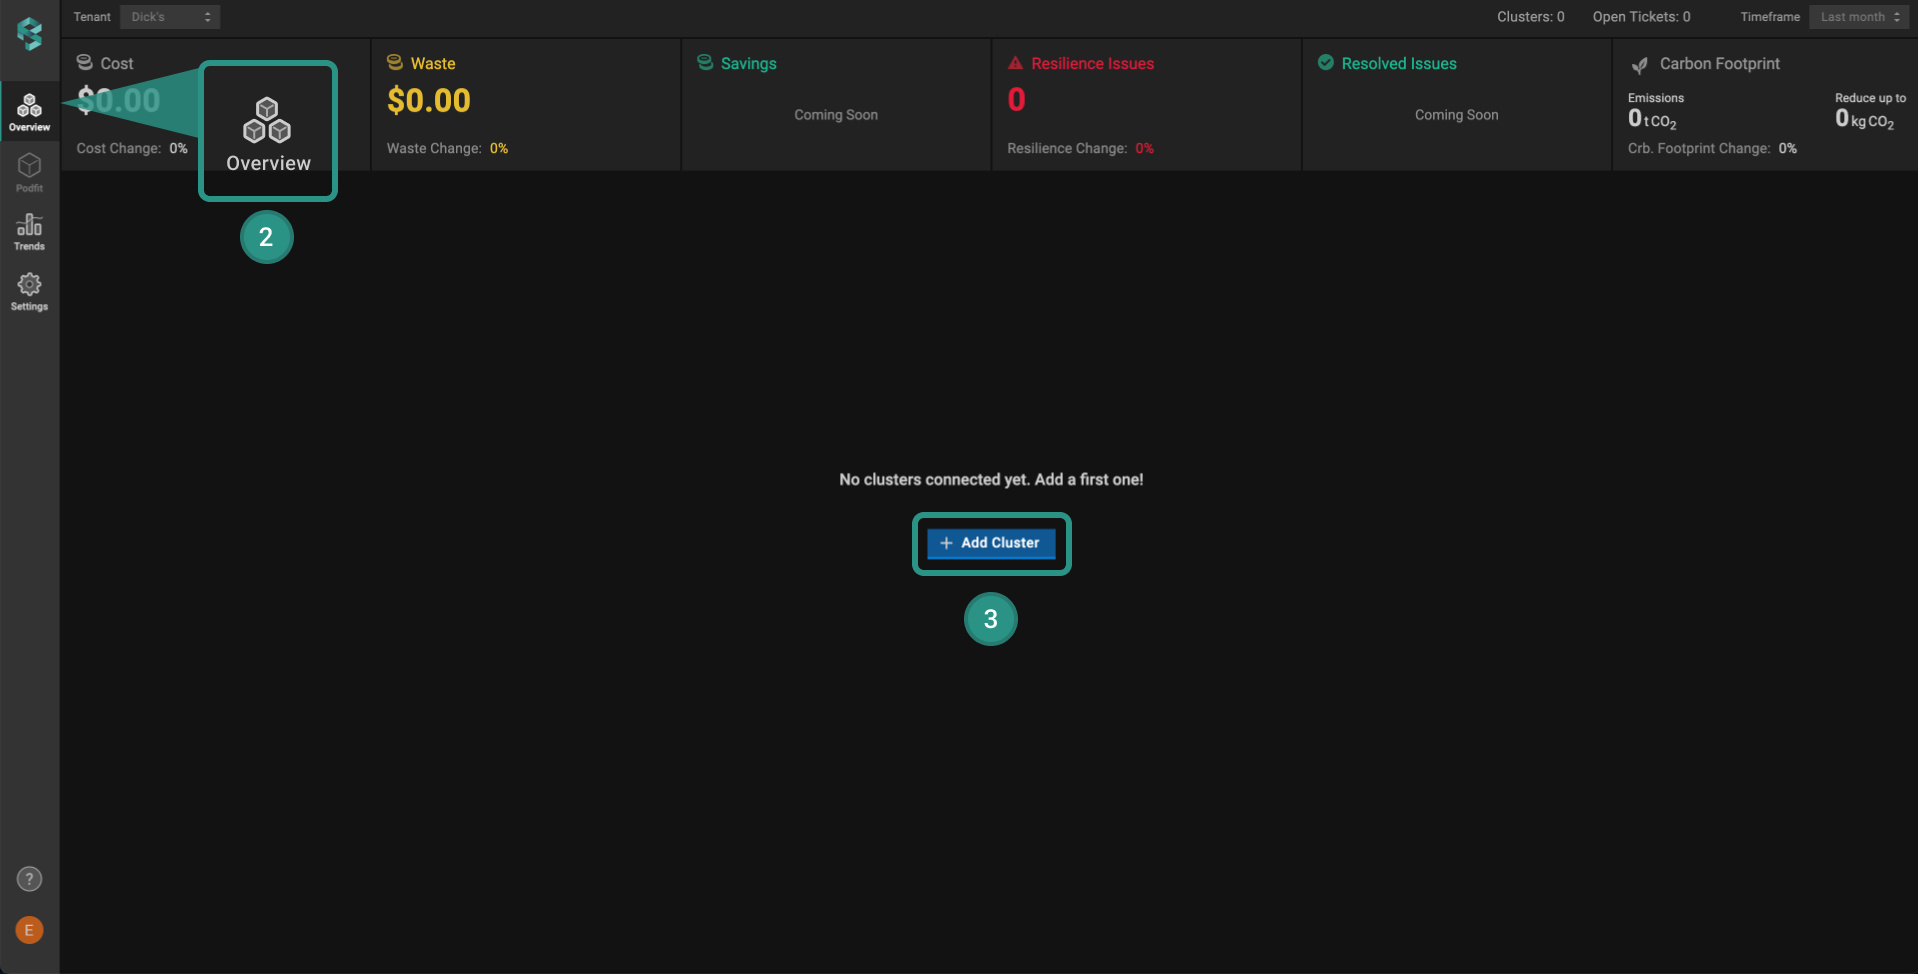
Onboard first cluster
To provision clusters dynamically, follow the instructions for Onboarding clusters programmatically.
PerfectScale Agent deployment
Onboarding PerfectScale to a cluster, starts with deploying the PerfectScale Agent.
There are 2 deployment methods for doing so:
Method 1: PerfectScale Operator
1. Use helm to deploy the PerfectScale Operator.
The full list of all possible PerfectScale Operator helm (input) values can found here.
2. Use kubectl to deploy an Agents CR (Custom Resource of kind: Agents)
3. The PerfectScale Operator will then deploy the PerfectScale Agent based on the Agents CR.
Method 2: Helm Deployment
1. Use helm to deploy the PerfectScale Agent
The full list of all possible PerfectScale Agent helm (input) values can found here.
We recommend you to install the PerfectScale Operator to automate deployment and ensure your agents stay up to date with the latest features and product updates.
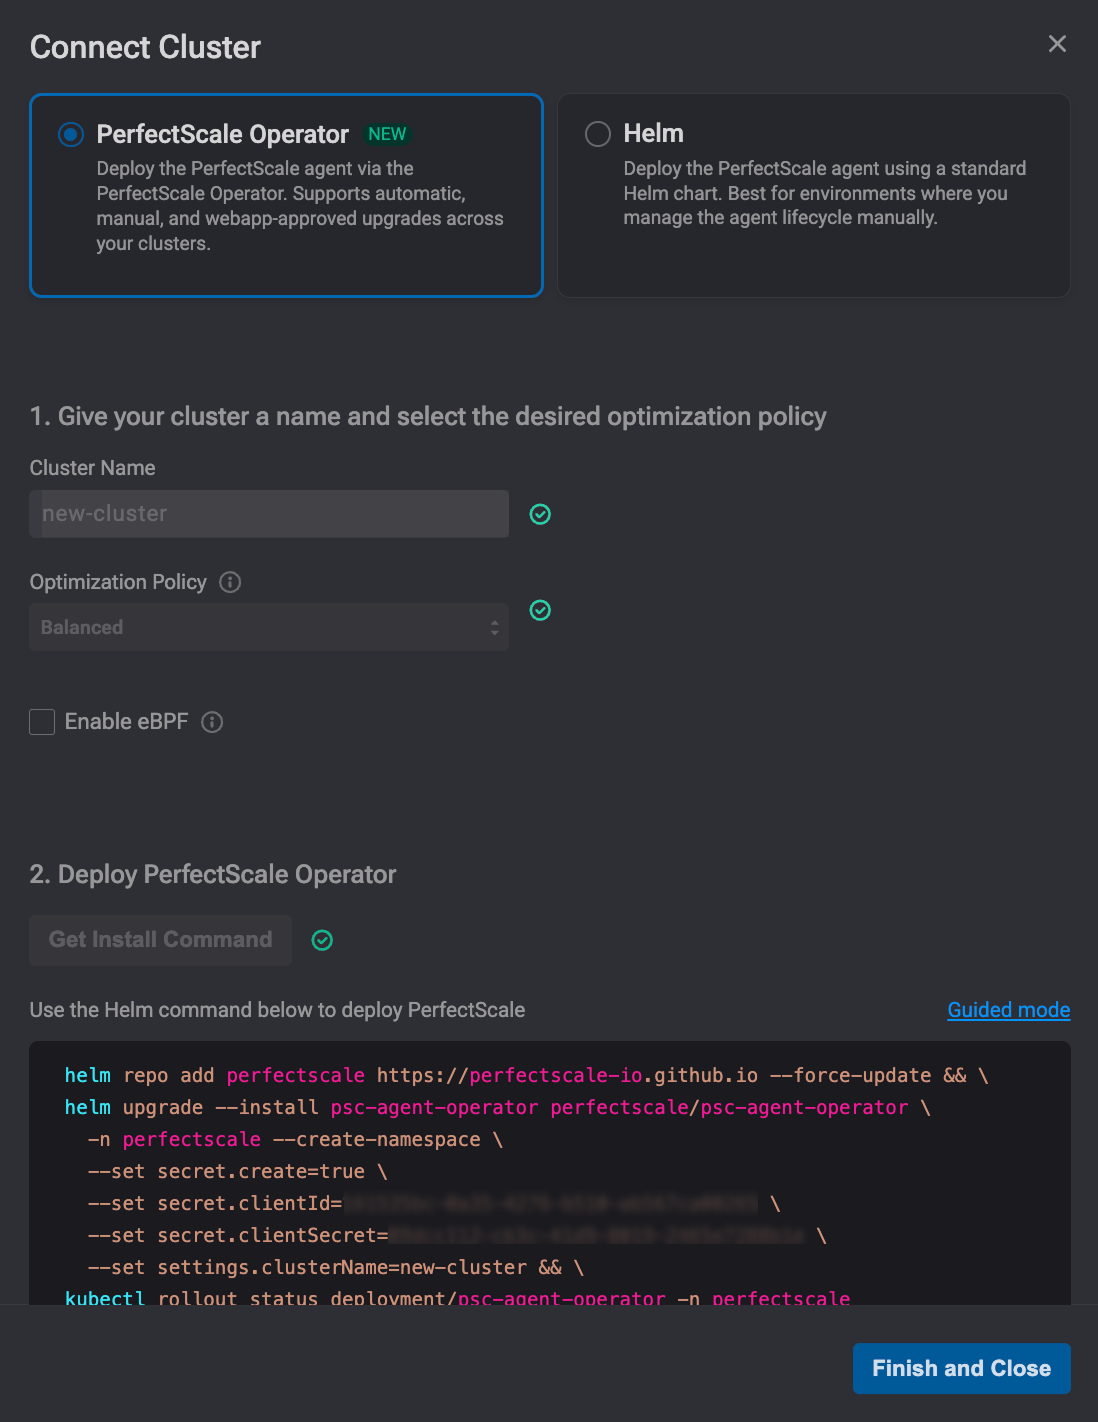
Connect cluster
PerfectScale supports Windows nodes; however, the PerfectScale exporter itself must run on Linux nodes. In clusters that include both Windows and Linux nodes, you must configure a nodeSelector to ensure the exporter is scheduled only on Linux nodes. Please follow the additional instructions below to run the exporter on Linux nodes.
- In a pop-up window, click
Copy to Clipboardand clone the Helm chart provided on p.1. - Enter a name for your cluster and select the desired Optimization Policy:
- MaxSavings - maximum cost savings, the best for non-production environments
- Balanced (default) - optimally balances cost and resiliency
- ExtraHeadroom - the best fit for latency-sensitive environments
- MaxHeadroom - keeps the environment above the highest spikes
The Optimization Policy feature allows you to specify how your resources should be allocated in order to support the individual needs of your workloads. Define the policies that best suit your environment and business goals, depending on whether you want to maximize cost savings or provide extra headroom to maintain the resilience of mission-critical services.
The Optimization Policy can be set at a specific level. The workload's Optimization Policy takes precedence and will override the value defined at the cluster level.
Learn more about the optimization policy customization here.
Discover more about customizing the Optimization policy here.
Connecting cluster with PerfectScale Operator
Once you have named your cluster and selected the Optimization Policy, click Get Install Command, so PerfectScale will provide you with the needed installation components.
Connect cluster with PerfectScale Operator
Add Helm repo:
helm repo add perfectscale https://perfectscale-io.github.io --force-update
Deploy PerfectScale Operator:
helm upgrade --install psc-agent-operator perfectscale/psc-agent-operator \
  -n perfectscale --create-namespace \
  --set secret.create=true \
  --set secret.clientId=xxxxxxxx-xxxx-xxxx-xxxx-xxxxxxxxxxxx \
  --set secret.clientSecret=xxxxxxxx-xxxx-xxxx-xxxx-xxxxxxxxxxxx \
  --set clusterName={your-cluster-name}
Apply CRD:
Learn more about PerfectScale Operator CRD here.
kubectl apply -f - <<EOF
apiVersion: perfectscale.io/v1alpha1
kind: Agents
metadata:
  labels:
    app.kubernetes.io/name: psc-agent-operator
  name: agents
  namespace: perfectscale
spec:
  exporter:
    installationMode: "on"
    upgrade:
      mode: auto
  autoscaler:
    installationMode: "on"
    upgrade:
      mode: auto
  promexporter:
    installationMode: "off"
    upgrade:
      mode: auto
EOF
Alternatively, you can install the Operator with a single command:
helm repo add perfectscale https://perfectscale-io.github.io --force-update && \
helm upgrade --install psc-agent-operator perfectscale/psc-agent-operator \
  -n perfectscale --create-namespace \
  --set secret.create=true \
  --set secret.clientId=161535bc-0a35-4276-b510-ab567ca00265 \
  --set secret.clientSecret=89dcc112-cb3c-41d9-8019-2465e7288b1e \
  --set settings.clusterName=new-cluster && \
kubectl rollout status deployment/psc-agent-operator -n perfectscale --timeout=120s && \
kubectl apply -f - <<EOF
apiVersion: perfectscale.io/v1alpha1
kind: Agents
metadata:
  labels:
    app.kubernetes.io/name: psc-agent-operator
  name: agents
  namespace: perfectscale
spec:
  exporter:
    installationMode: "on"
    upgrade:
      mode: auto
  autoscaler:
    installationMode: "on"
    upgrade:
      mode: auto
  promexporter:
    installationMode: "off"
    upgrade:
      mode: auto
EOF
Connecting cluster with Helm
Once the optimization policy is selected, preceede wit hthe following steps:
Click the Generate Secret button.
For security reasons, PerfectScale does not store your secret key.
Execute the command from Deploy PerfectScale.
If you are utilizing both Windows and Linux nodes within the cluster, it is necessary to run PerfectScale agent on the Linux nodes. You can do it following the instructions -> Mix of Windows and Linux nodes.
PerfectScale supports Windows containers. To enable support for Windows containers, follow the instructions outlined here.
- Click on the
Finish and Closebutton.
It is not supported to install multiple agents in a single cluster, as it may result in unexpected results.
The newly added cluster will appear under the Clusters list in the Overview tab. Once the Agent Status becomes green, the cluster data will appear, which indicates successful cluster creation.
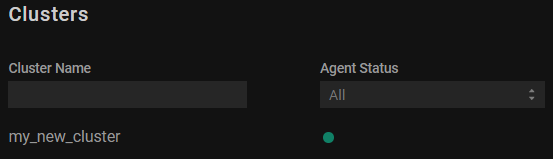
Agent status
💡 Discover additional information regarding the Overview.
Your cluster will become visible only after it starts transmitting data.
Run PerfectScale agent on specific nodes
PerfectScale allows running the agent on particular nodes. To run the agent on the specific nodes, use one of the following options:
nodeSelector(in case there is no taint on the node).nodeSelector & toleration(in case of taint on the node).
In case you are using zsh shell, make sure to add noglob before the helm command
helm upgrade --install -n perfectscale --create-namespace perfectscale \
  --set secret.create=true \
  --set secret.clientId=**** \
  --set secret.clientSecret=**** \
  --set settings.clusterName=name \
  --set nodeSelector.type=monitoring \
  --set tolerations[0].effect=NoSchedule,tolerations[0].key=monitoring,tolerations[0].operator=Exists \
  --set kube-state-metrics.nodeSelector.type=monitoring \
  --set kube-state-metrics.tolerations[0].effect=NoSchedule,kube-state-metrics.tolerations[0].key=monitoring,kube-state-metrics.tolerations[0].operator=Exists \
  perfectscale/exporter
Mix of Windows and Linux nodes
If the cluster contains both Windows and Linux nodes, it is necessary to add the following extra nodeSelector to run PerfectScale agent on the Linux nodes:
--set nodeSelector.beta\\.kubernetes\\.io/os=linux --set kube-state-metrics.nodeSelector.beta\\.kubernetes\\.io/os=linux
For Step 4 in the Cluster configuration instructions above, utilize the subsequent command to designate the Windows nodes:
helm upgrade --install -n perfectscale --create-namespace perfectscale \
 	--set secret.create=true \
        --set secret.clientId=**** \
        --set secret.clientSecret=**** \
        --set settings.clusterName=name \
        --set nodeSelector.beta\\.kubernetes\\.io/os=linux \
        --set kube-state-metrics.nodeSelector.beta\\.kubernetes\\.io/os=linux \
 	perfect scale/exporter
GPU support
GPU support is available starting with the exporter version 1.0.55.
GPU memory support is available starting with the exporter version 1.1.11. Learn more about requirements for GPU memory support here.
PerfectScale’s advanced GPU support feature helps teams optimize resource-intensive applications like AI, machine learning, cloud computing, etc., ensuring better performance, reducing costs, and improving overall efficiency across the entire Kubernetes stack.
PerfectScale now only supports NVIDIA Data Center GPU Manager (DCGM).
In order to enable GPU support, in Step 4 in the Cluster configuration instructions above, utilize the following command:
helm upgrade --install -n perfectscale --create-namespace perfectscale \
      --set secret.create=true \
      --set secret.clientId=**** \
      --set secret.clientSecret=**** \
      --set settings.clusterName=name \
      --set settings.dcgm.exporterEnabled=true \
      --set settings.dcgm.exporterNamespace="perfectscale" \
      --set settings.dcgm.exporterPort="9400" \
      --set settings.dcgm.exporterLabelSelector="app=nvidia-dcgm-exporter"
      perfectscale/exporter
The DCGM exporter is required. Without it, PerfectScale will be unable to collect and display GPU utilization data.
Required DCGM metrics for GPU memory support
PerfectScale requires the DCGM exporter to expose two GPU framebuffer metrics:
DCGM_FI_DEV_FB_TOTAL- total framebuffer capacityDCGM_FI_DEV_FB_RESERVED- driver-reserved framebuffer
PerfectScale uses these metrics to calculate GPU memory utilization. If they are not exposed, GPU memory columns in InfraFit, PodFit, and node-group views will appear empty.
The default dcgm-exporter counters file does not enable DCGM_FI_DEV_FB_TOTAL.
DCGM_FI_DEV_FB_RESERVED was introduced in DCGM 3.0, so it may also be missing from older dcgm-exporter builds.
To confirm which metrics are currently exposed in your cluster, run:
DCGM_POD=$(kubectl get pod -n gpu-operator -l app=nvidia-dcgm-exporter \
  -o jsonpath='{.items[0].metadata.name}')

kubectl exec -n gpu-operator "$DCGM_POD" -- \
  curl -s localhost:9400/metrics | grep -E '^DCGM_FI_DEV_FB_(TOTAL|RESERVED)'
If the command returns no output, add the missing metrics to the DCGM exporter configuration. Use one of the following approaches to update the DCGM exporter configuration:
Patch the DCGM ConfigMap directly
Use this option if the GPU Operator is installed and managed manually, and the DCGM exporter ConfigMap is not controlled by GitOps or another reconciliation process.
Step 1
Find the ConfigMap that contains the DCGM exporter metrics list
kubectl get configmap -n gpu-operator | grep -i metric
Step 2
Edit the relevant ConfigMap
kubectl edit configmap -n gpu-operator <configmap-name>
Step 3
Locate the dcgm-metrics.csv key
This key contains the list of DCGM fields exposed by the exporter. Add the following metrics to that list and save the ConfigMap.
DCGM_FI_DEV_FB_TOTAL,    gauge, Total framebuffer memory (in MiB).
DCGM_FI_DEV_FB_RESERVED, gauge, Reserved framebuffer memory (in MiB).
If DCGM_FI_DEV_FB_RESERVED is already present, do not duplicate it. Add only DCGM_FI_DEV_FB_TOTAL.
Step 4
Restart the DCGM exporter
kubectl rollout restart daemonset -n gpu-operator nvidia-dcgm-exporter
Configure metrics through Helm values
Use this option if the GPU Operator is managed by ArgoCD, Flux, or another GitOps workflow.
In GitOps-managed clusters, manual edits to the ConfigMap are usually overwritten during the next reconciliation. Instead, define a custom metrics ConfigMap and reference it from the GPU Operator Helm values.
Step 1
Update the GPU Operator Helm values
dcgmExporter:
  config:
    name: metrics-config
  env:
    - name: DCGM_EXPORTER_COLLECTORS
      value: /etc/dcgm-exporter/dcgm-metrics.csv
This will point the DCGM exporter to your custom ConfigMap.
Step 2
Create a ConfigMap with the same name in the gpu-operator namespace
The ConfigMap must include a dcgm-metrics.csv key that contains NVIDIA’s default counters list plus the required framebuffer metrics
kubectl create configmap metrics-config \
  -n gpu-operator \
  --from-file=dcgm-metrics.csv=/path/to/your/dcgm-metrics.csv
Step 3
Check if the dcgm-metrics.csv file includes the following entries
DCGM_FI_DEV_FB_TOTAL,    gauge, Total framebuffer memory (in MiB).
DCGM_FI_DEV_FB_RESERVED, gauge, Reserved framebuffer memory (in MiB).
If DCGM_FI_DEV_FB_RESERVED is already present, do not duplicate it. Add only DCGM_FI_DEV_FB_TOTAL.
Step 4
Restart the DCGM exporter
kubectl rollout restart daemonset -n gpu-operator nvidia-dcgm-exporter
Propagation
After the DCGM exporter restarts, run the verify command again to make sure both metrics are exposed.
Once they are available, it may take up to 15 minutes for GPU memory data to appear in the PerfectScale UI.
Java containers support
The Coroot agent is disabled by default. Once enabled, PerfectScale automatically detects Java containers and starts collecting JVM metrics.
Add the following parameter when deploying the PerfectScale agent to enable this feature:
--set settings.corootNodeAgent.enabled=true
Coroot supports only Linux nodes.
PerfectScale automatically identifies Java containers running in your Kubernetes environment and collects JVM metrics from them. By continuously analyzing them, PerfectScale provides granular visibility into resource usage, identifying potential bottlenecks. Based on this analysis, PerfectScale generates tailored recommendations to help ensure that your services remain efficient and maintain consistent performance.
PerfectScale starts collecting JVM metrics automatically. However, if for some reason you do not want PerfectScale to collect this data, you can disable it by turning off the deployment of psc-coroot-node-agent during agent installation:
--set settings.corootNodeAgent.enabled=false
Deploy coroot pods to specific nodes
If your cluster includes both Linux and Windows nodes, make sure to set a nodeSelector for Linux when deploying workloads that are not Windows-compatible.
YAML values file example:
coroot:
  nodeSelector:
    kubernetes.io/os: linux
Helm command example:
helm upgrade --install perfectscale ..... \
  --set coroot.nodeSelector."kubernetes\.io/os"=linux \
  perfectscale/exporter
To restrict workloads to a specific set of nodes (for example, those labeled component=java), you can combine multiple node selectors.
YAML values file example:
coroot:
  nodeSelector:
    kubernetes.io/os: linux
    component: java
Helm command example:
helm upgrade --install perfectscale ..... \
  --set coroot.nodeSelector."kubernetes\.io/os"=linux \
  --set coroot.nodeSelector.component=java \
  perfectscale/exporter
Windows containers support
Make sure you are using PerfectScale exporter version 1.0.53 or later to enable Windows containers support.
PerfectScale supports Windows-based containers, allowing you to optimize and manage them seamlessly. To enable this feature, as a Step 4 in a cluster configuration, execute the following command:
helm upgrade --install -n perfectscale --create-namespace perfectscale \
      --set secret.create=true \
      --set secret.clientId=**** \
      --set secret.clientSecret=**** \
      --set settings.clusterName=your-dev-cluster \
      --set settings.deployWindowsExporter=true \
      --set settings.windowsExporterEnabled=true \
      --set settings.windowsExporterNamespace="perfectscale" \
      --set settings.windowsExporterPort="9182" \
      --set settings.windowsExporterLabelSelector="app.kubernetes.io/name=prometheus-windows-exporter"
      perfectscale/exporter
- Make sure the Helm parameter
windowsExporterEnabledis set totrue - If the windows-exporter should be deployed by the PerfectScale Helm set
deployWindowsExporter=true. In that case, no additional configurations are needed, as the default values will be sufficient. - If
deployWindowsExporterset tofalse, the additional parameters listed below need to be configured.
Helm parameters should be configured according to the user’s environment:windowsExporterNamespacewindowsExporterPortwindowsExporterLabelSelector
Size PerfectScale Agent
For large clusters, if you are not using automation, use PerfectScale’s recommendations for psc-exporter to properly size it.
Setting cAdvisor scraping mode
If you prefer not to expose node/proxy permissions, execute the following command when installing the exporter:
helm upgrade --install -n perfectscale --create-namespace perfectscale \
      --set secret.create=true \
      --set secret.clientId=**** \
      --set secret.clientSecret=**** \
      --set settings.clusterName=name \
      --set settings.cAdvisorScrapingMode=direct \
      perfectscale/exporter
Depending on your security and access requirements, specify one of the scraping modes:
auto (default): Direct scraping with automatic failover to proxy if all nodes fail.direct: Force direct node scraping; excludes nodes/proxy RBAC permissions.nodeProxy: Force proxy scraping via the Kubernetes API.
Uninstalling PerfectScale exporter
If the exporter was installed via Helm
Step 1
To uninstall the PerfectScale exporter, run the following command
helm -n perfectscale uninstall psc-exporter
Step 2
Disconnect the cluster in Cluster Settings
Uninstall the exporter before disconnecting the cluster. If it remains installed, the cluster will continue transmitting data and reappear in the UI.
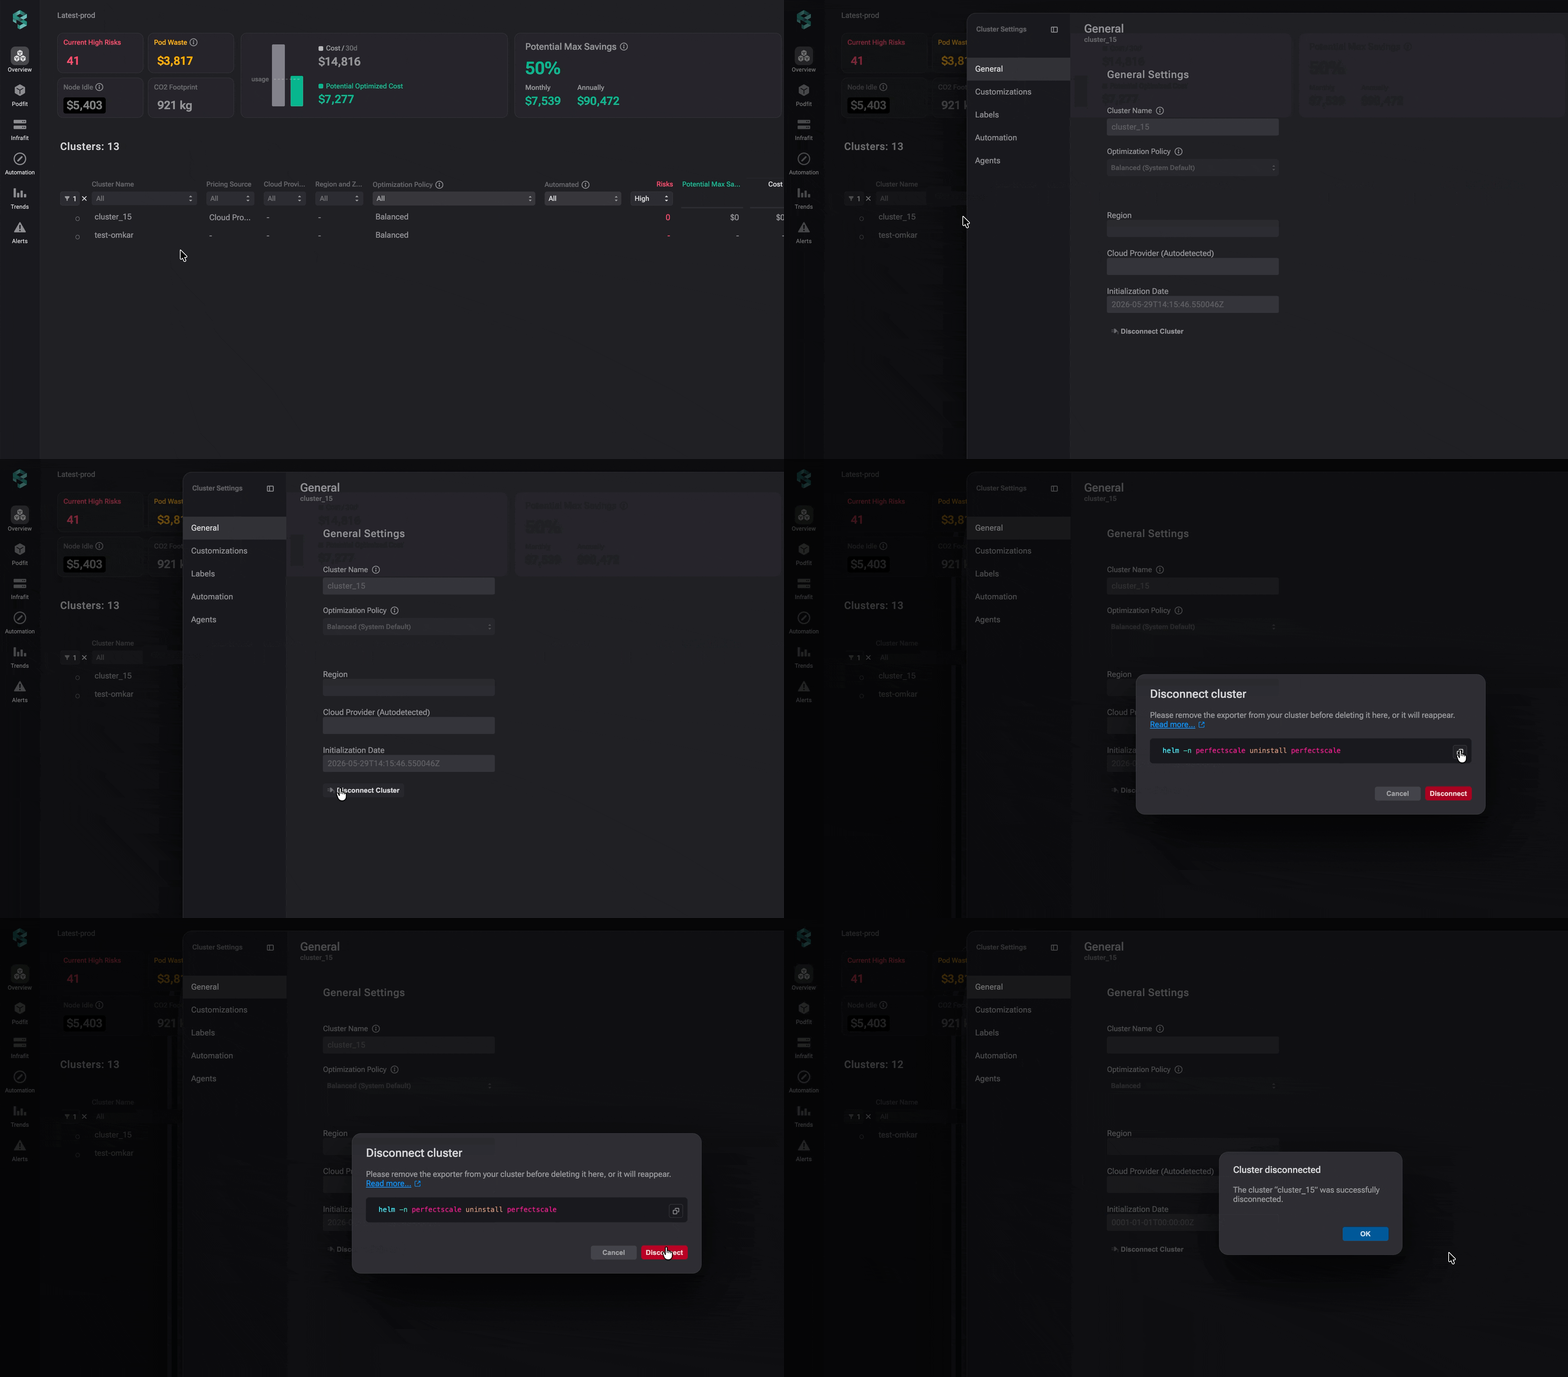
Disconnect a cluster
Step 3
Delete other PerfectScale agents (Optional)
helm list -n perfectscale # returns the list of other helm releases
helm -n perfectscale uninstall <release-name>
If the exporter was installed via PerfectScale Operator
Step 1
Delete the Agents CR
Run the following command to uninstall the exporter and any other agents defined in the CR.
kubectl delete agents.perfectscale.io agents -n perfectscale # this follows this schema kubectl delete <our crd resource and group> <cr-name> -n <namespace>
Step 2
Uninstall Operator helm release (Optional)
helm -n perfectscale uninstall psc-agent-operator
Step 3
Delete other PerfectScale agents (Optional)
helm list -n perfectscale # returns the list of other helm releases
helm -n perfectscale uninstall <release-name>
How to whitelist PerfectScale on GKE with binary authorization enabled
If your GKE cluster enforces Binary Authorization, you need to add PerfectScale images to the Binary Authorization policy whitelist before installation.
Add the following entries under admissionWhitelistPatterns:
- namePattern: public.ecr.aws/perfectscale-io/**
- namePattern: registry.k8s.io/kube-state-metrics/kube-state-metrics*
Example:
admissionWhitelistPatterns:
  - namePattern: docker.io/library/alpine*
  - namePattern: gcr.io/cloudsql-docker/gce-proxy*
  - namePattern: gcr.io/cloud-sql-connectors/cloud-sql-proxy*
  - namePattern: docker.io/justwatch/elasticsearch_exporter*
  - namePattern: docker.io/otel/opentelemetry-collector-contrib*
  - namePattern: us-central1-docker.pkg.dev/doit-glean/gcf-artifacts/**
  - namePattern: public.ecr.aws/perfectscale-io/**
  - namePattern: registry.k8s.io/kube-state-metrics/kube-state-metrics*
These entries allow:
- PerfectScale images from
public.ecr.aws/perfectscale-io kube-state-metricsimages fromregistry.k8s.io
Without this, PerfectScale components may be blocked from running in clusters where Binary Authorization is enforced.